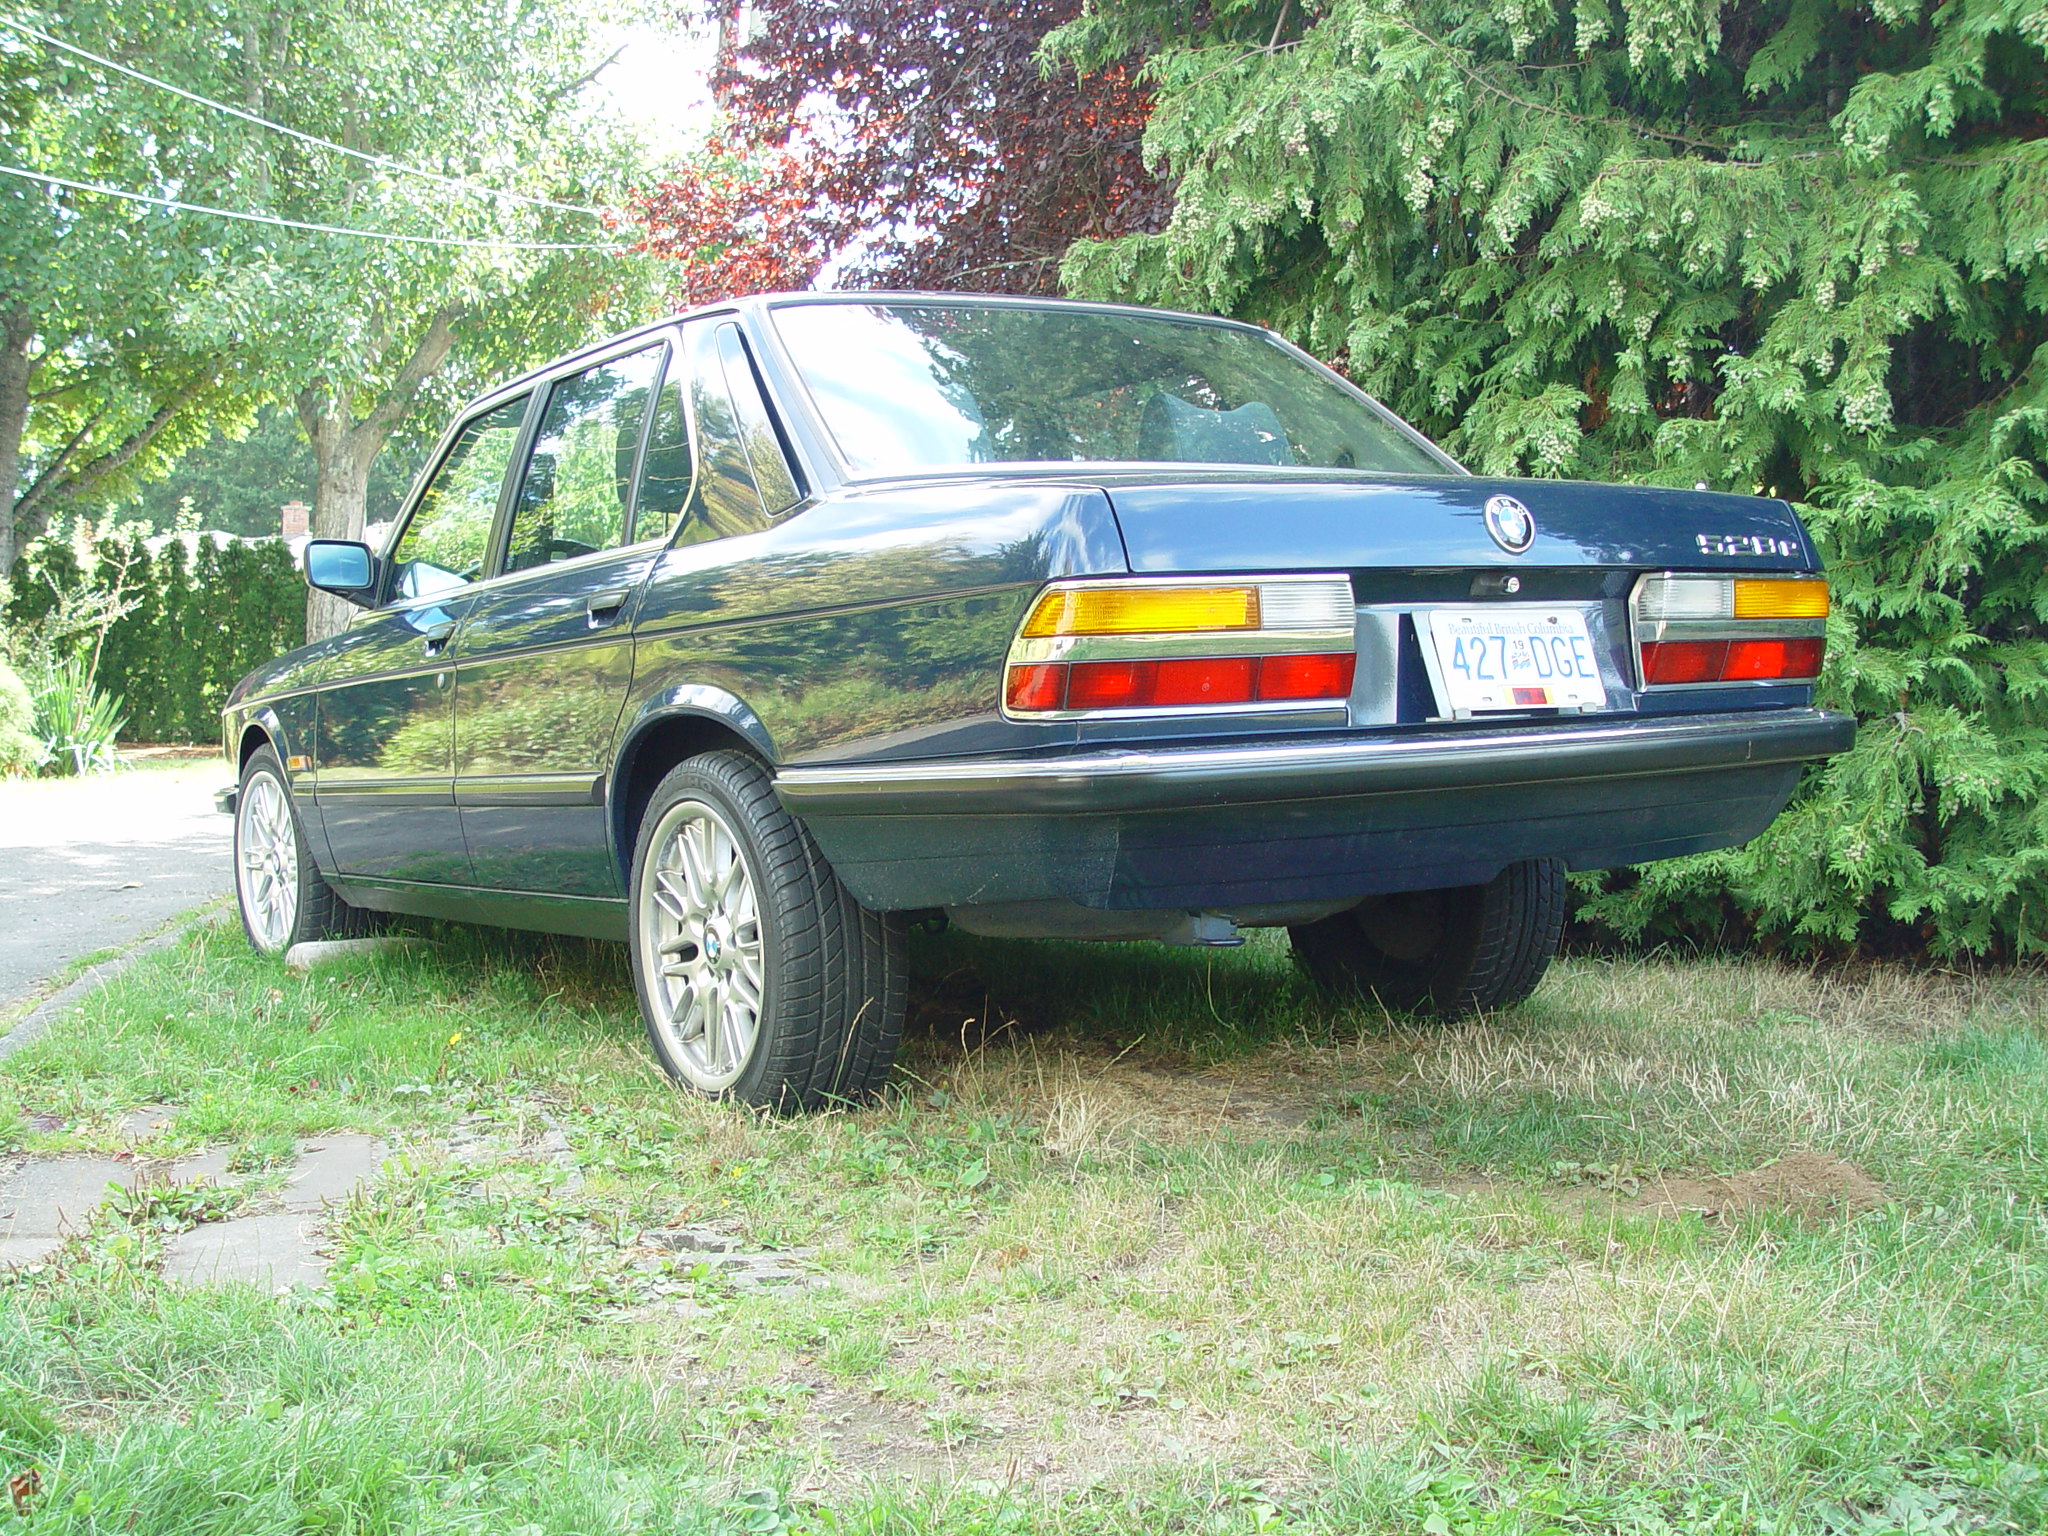
83 528e J-spec
83 528e J-spec
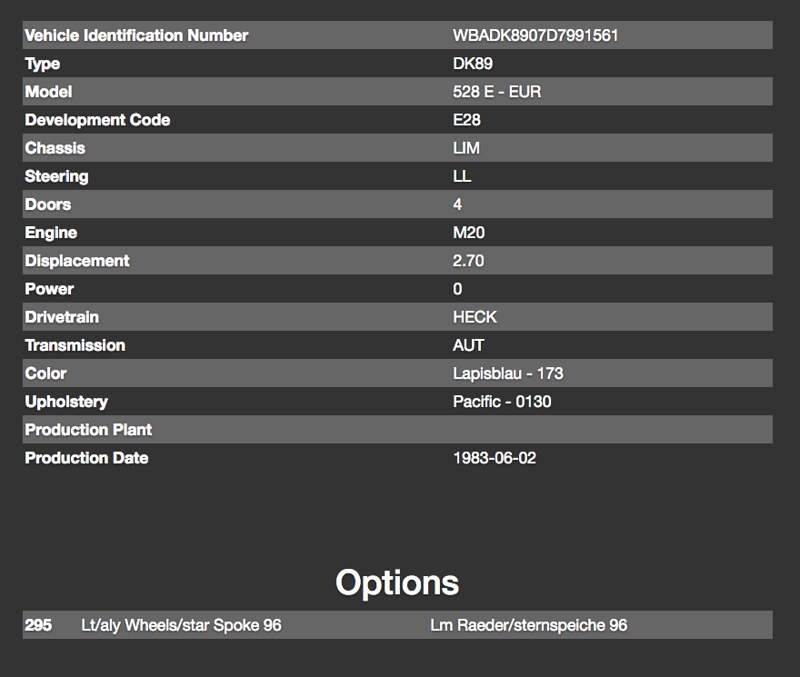
Hi folks, this is my 1983 Japanese spec 528e. Came across it 14 years and 3 weeks ago - back in April 2002 and became the second owner. At the time I was finishing a degree in Geography and looking to replace my '75 2002. And she was fresh off the boat and on my island with a very clean body, 63031 km's, absolutely stock, and looking oh so pretty in lapis blue. It was love at first sight and has been a superb vehicle across many adventures since that day. It has never left me on the side of the road, never failed to get me home. I have big respect for this car and generally believe the feeling is mutual.
For those reading the fine print above, this old bird is turning 33 in less than a month. And since its restoration over the past 5 years is largely complete and its BMW's 100th anniversary this year, its getting a build thread before the next 33 years gets its grimy fingers all over it! Get off my lawn old man time !!
Almost every system has been touched, mostly in the past five years. The engine is a basic e2i, the diff is a 3.25lsd, the wheels are WEDS, still has its 3HP22, with a bunch of smaller options added like euro headlights, city lights, fog lamps, heated sport seats, cruise control, rear sunshade, premium speakers front and rear and an M tech steering wheel. It didn't come with any options other than the TRX wheels originally, so I'm happy to say it has no sunroof amongst other 'doesn't haves' like ABS and OBC.
The goal of this driver quality restoration was to accentuate the light and nimble handling of the Euro spec eta platform while minimizing NVH and maintaining/highlighting the car's unique J-spec character. Considering these design constraints she's an absolute delight and I'm super pleased with how its turning out. Still needs work, will always need work, but am optimistic 2016 will see a new exhaust installed and a custom M1.0 chip procured.
While I'm saying stuff, tip of the hat to folks like Rod Paine and to the MyE28 community for being invaluable resources over the years. 14 years ago it took an entire night to download a dozen mp3's. And good info on fixing E28's was hard to find. Not so much anymore, thanks internet and old man time.
Tips, pics and stories to follow; next up, the J-spec details, ETA suspension tuning, the engine build, paint, E34 sport seats and the WEDS in no particular order.
Last edited by Conanblau on Jul 21, 2020 2:55 PM, edited 2 times in total.
Re: 83 528e J-spec
Glad to see you sharing! It's always a treat to see this car at 5erWest!
Re: 83 528e J-spec
Subscribed!
-
- Posts: 975
- Joined: Oct 12, 2015 11:47 PM
- Location: Wherever the E28 happens to be parked- Morrisville, NY
Re: 83 528e J-spec
Also subscribed. Those Weds are just orgasmical
-
- Posts: 1340
- Joined: Sep 08, 2007 11:17 AM
- Location: John Graham ATL
Re: 83 528e J-spec
It's a beauty
Re: 83 528e J-spec
Thanks Chris, met some great folks at 5erWest last year, including yourself, and will aim for a repeat this year. Funny enough, the first fella I met last year was a fellow Canuck who turned out to be my neighbour. He lives about a mile away and mentioned he'll be going to 5erWest 2016. Good gathering, obviously
---
So as I was finishing the post above I realized I don't have much for pictures of this car (that and I should have pre-written something). Lots of pics of oddities like window motors, door lock mechanisms, and wiring details, not so many pics of the whole car. Will work on that!
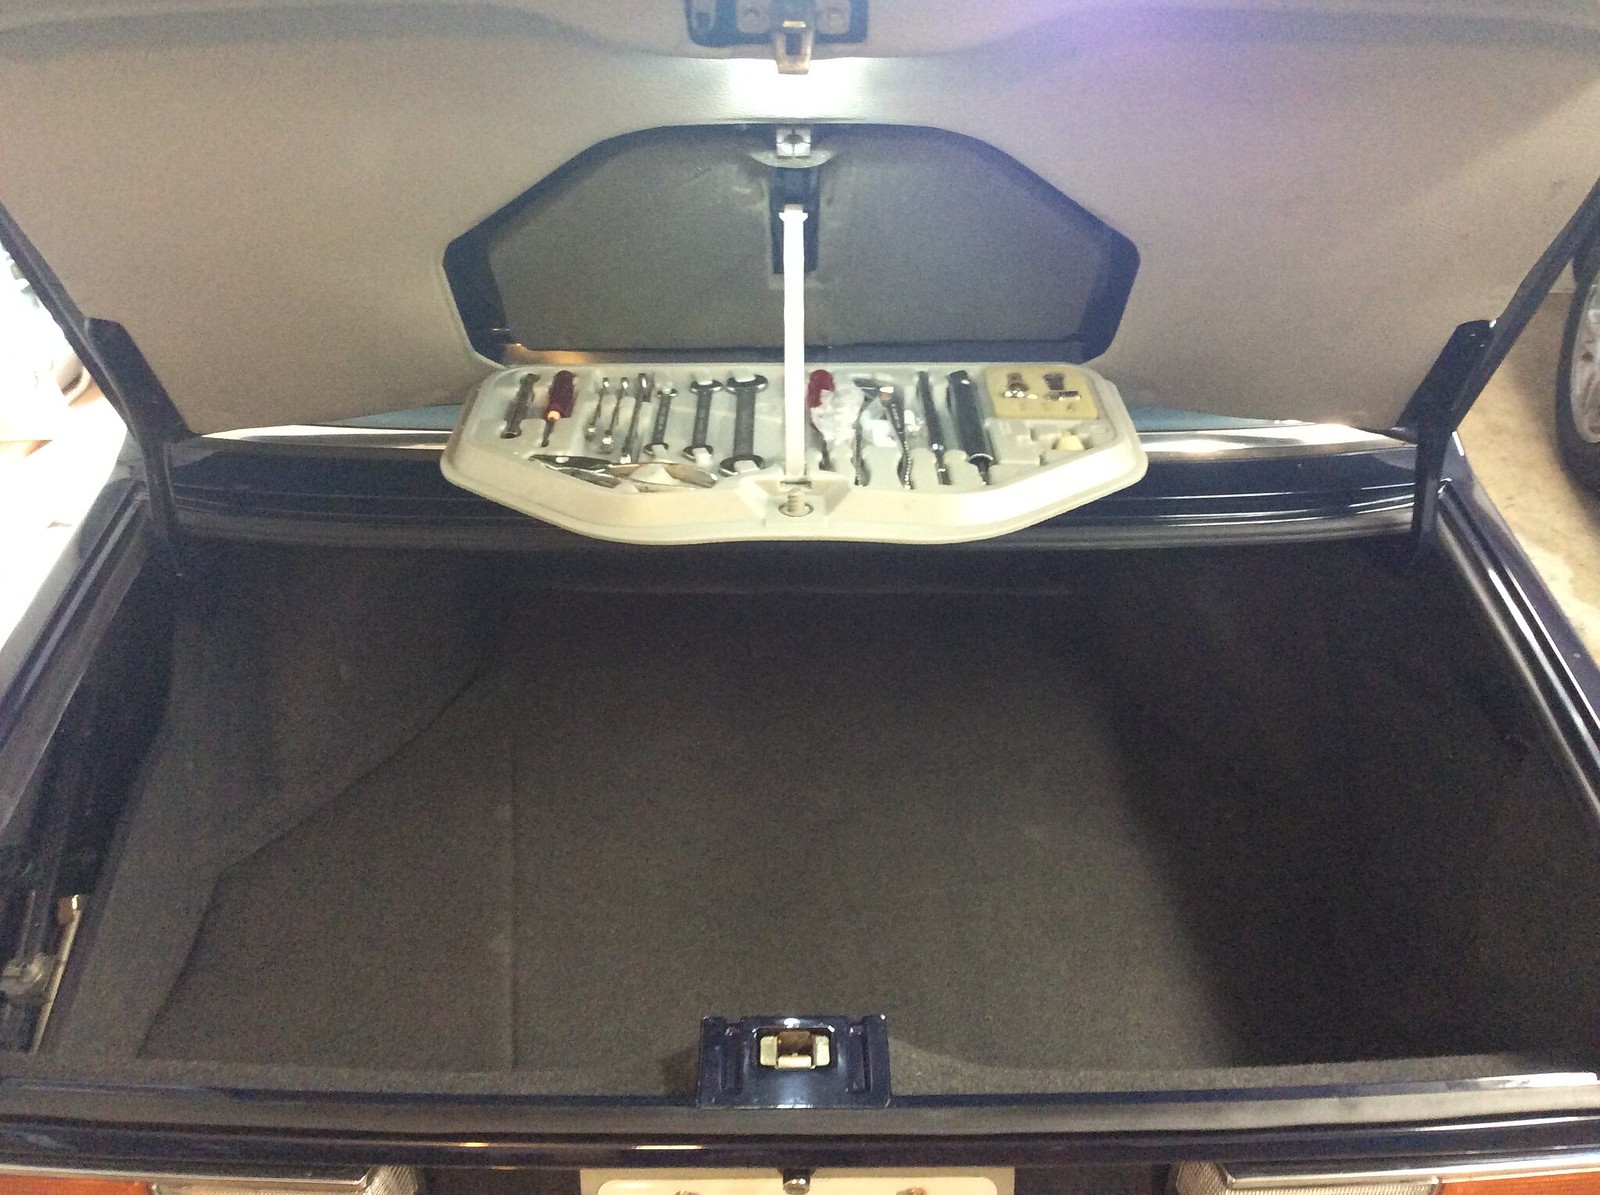
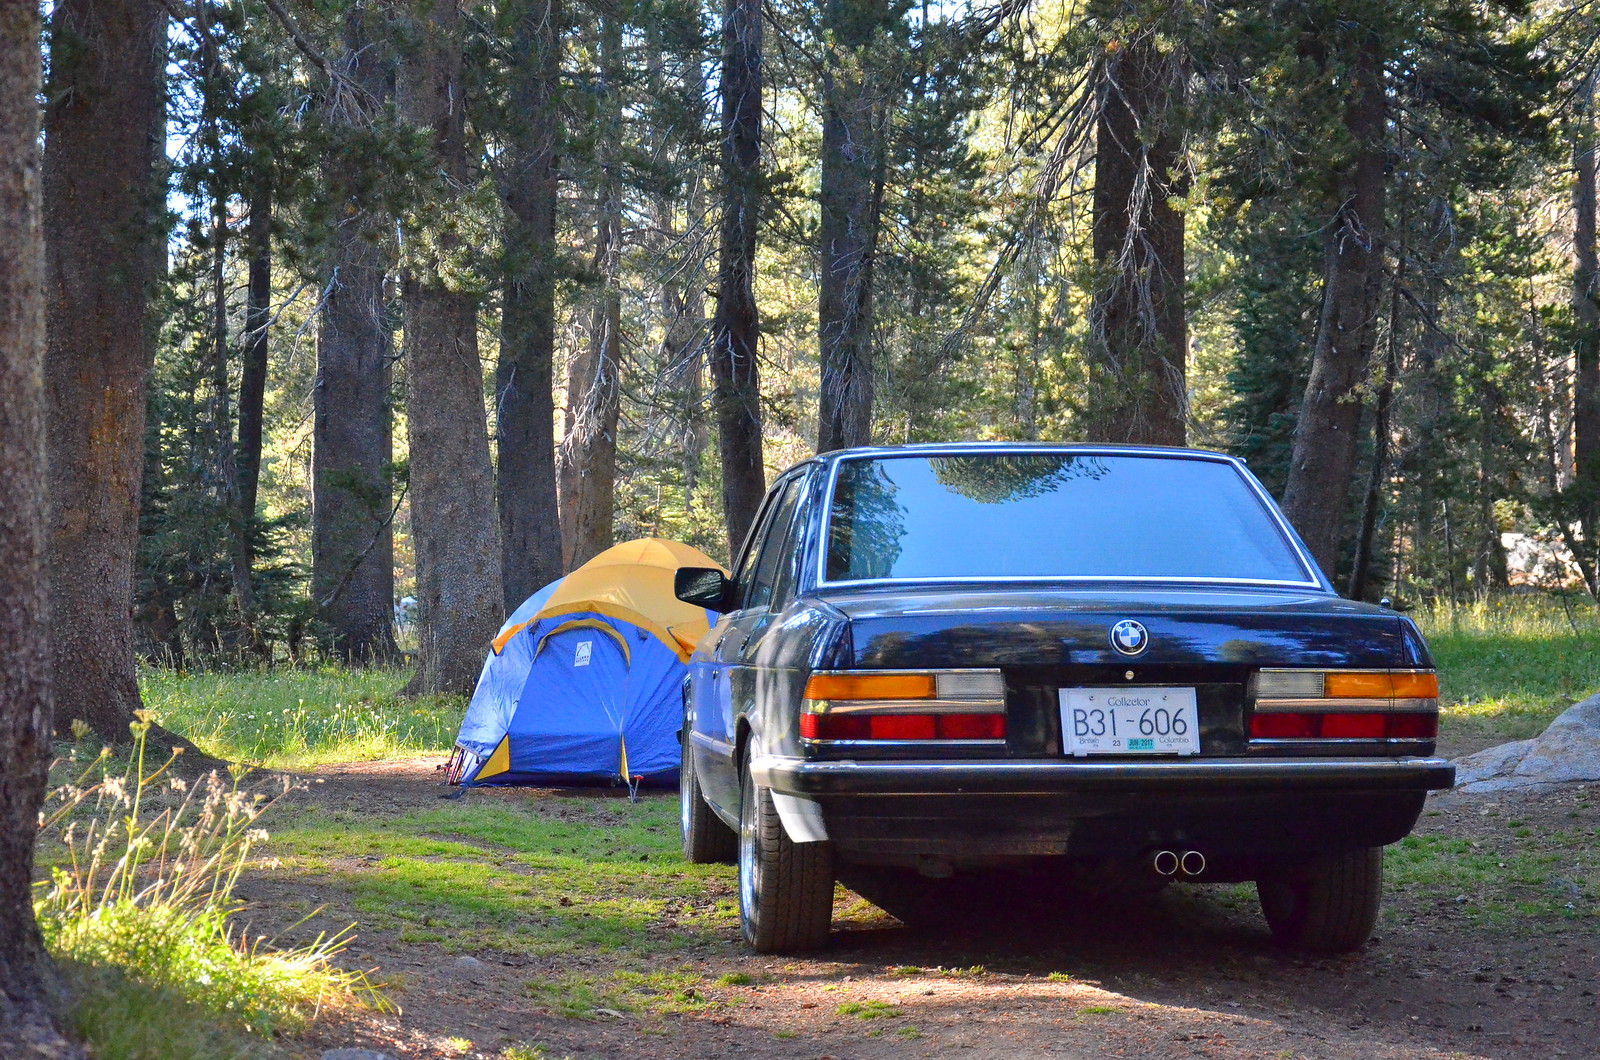
Found a pic of the trunk that was used for the Collectors plate application last summer. Not sure how many Eta's got the big tool box/red handle screwdriver treatment, but there you go. Probably due to its early build date. That trunk gasket tho!
Next post will go into the J-spec differences, like the dual filament front turn signals. When signalling, the respective front running light turns off (if they're on) and the signal circuit starts blinking. Nothing odd there, but when the 5w city lights are wired to the running lights the respective 5w light turns off when that side is signalling. Makes for a neat effect that I've seen used on some pretty fancy cars in the past few years.
Last edited by Conanblau on Jul 21, 2020 3:12 PM, edited 1 time in total.
-
- Posts: 428
- Joined: Sep 21, 2011 9:44 PM
- Location: Canton, Ohio
Re: 83 528e J-spec
What a cool thread, thanks for sharing!
Re: 83 528e J-spec
I'm subscribed for life!
Re: 83 528e J-spec
Totemo omoshiroi ndayo!
Very Interesting!
Very Interesting!
Re: 83 528e J-spec
Banzai!
I like.
I like.
Re: 83 528e J-spec
Beautiful car - I love the approach you have taken with it, to keep its somewhat stock J-Spec Eta fundamentals while adding touches of upgrades to make it your own.
Jim
Jim
Re: 83 528e J-spec
Thanks kindly fellas, the encouragement is appreciated.
So here's what I think I know of the Japanese spec'ed E28's. Of the 723 304 E28's produced, 11 302 were shipped to Japan between 11/81 and 10/87. (making roughly 1.5% of the E28's J-spec)
All were delivered left hand drive.
All were delivered as automatics. (except for 35 J-spec M5's)
All came fitted with euro bumpers.
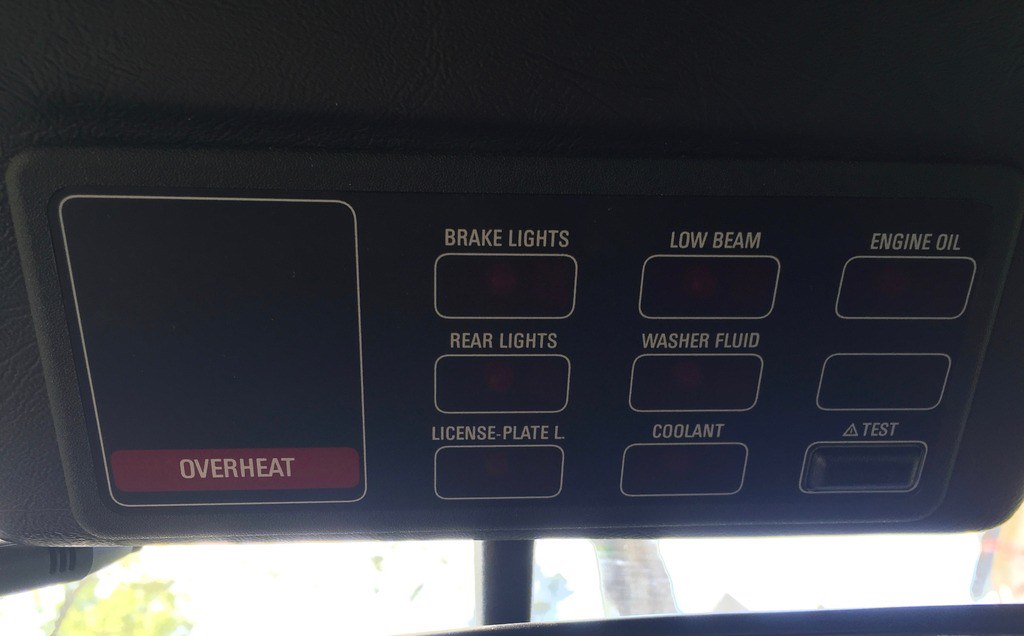
All came with a thermistor in the catalytic. For reasons. This thermistor is coupled to an overheat light in the overhead check panel.
All have the dual filament front indicators. For reasons.
As far as I know all came with the 70L gas tank.
All have the US spec headlights.
Many/most/all(?) have the cloth interior. [EDIT: I've seen plenty of leather optioned E28's from Japan, so this was an incorrect guess]
*
* I'm missing things, of course, and will come back and edit them in.
* Got something to add? Please do!
By the numbers;
1826 | 518i's were produced from 11/81 to 07/86. — 4049 & 4099
5000 | 528e's were produced from 11/81 to 10/87 — 4089
1487 | 533i's were produced from 11/82 to 10/87 — 4289
1814 | 535i's were produced from 01/85 to 09/87 — DC29
1140 | M535i's were produced from 10/84 to 09/87 — DC89
35 | M5's were produced in March 87. — DC93
Total = 11 302
source: JohnH @ https://docs.google.com/spreadsheets/d/ ... li=1#gid=0
The J-spec overhead check panel. Pretty simple, no seatbelt or O2 sensor lights. Its entirely possible this layout changed over the years so this is from an '83. Once in a blue moon the overheat light comes on for a bit. And then it goes out for a long while. So I've got that going for me.
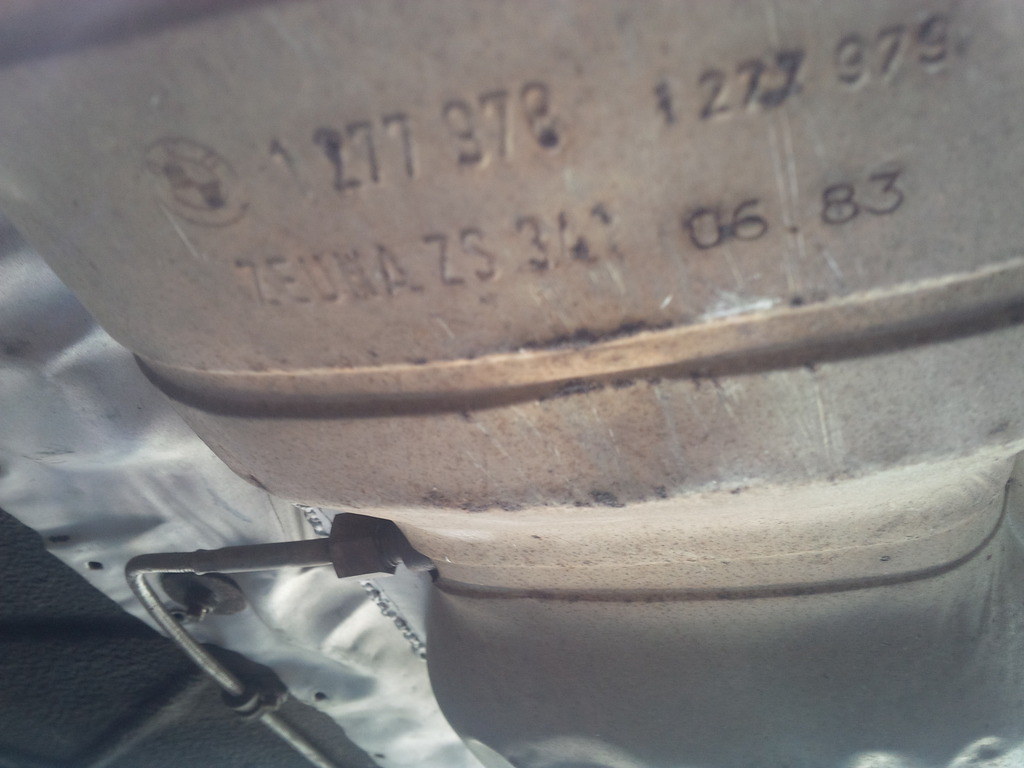
The original catalytic with the original and highly prized thermistor.
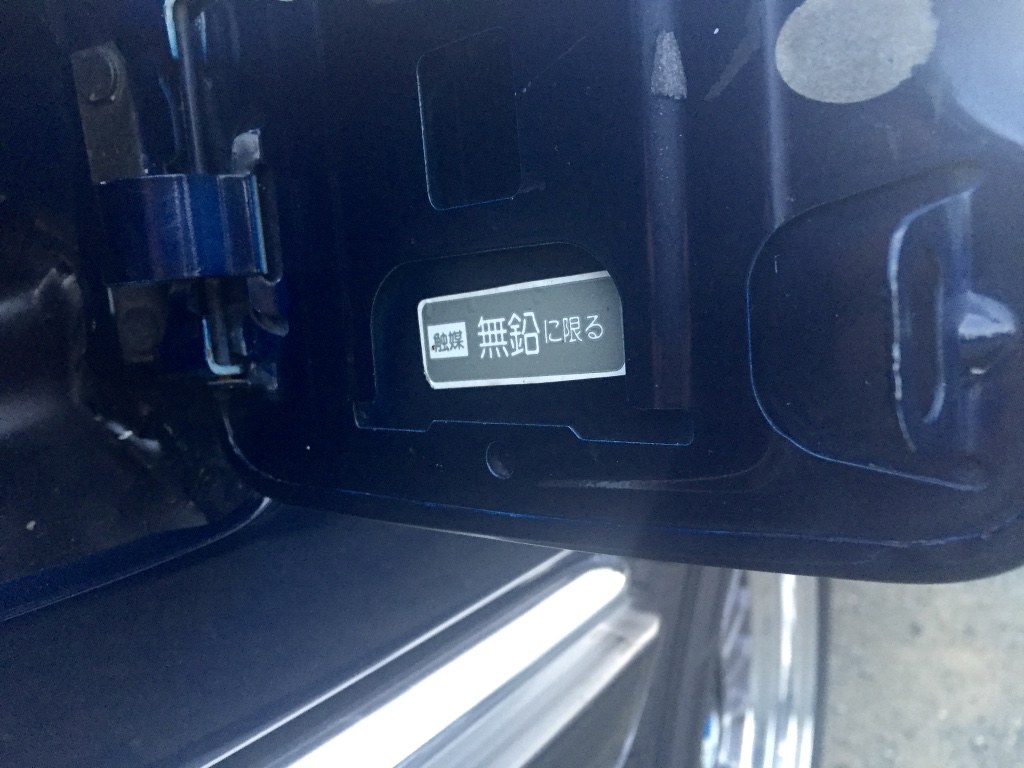
There's a few decals written in Japanese on the car, like on the fuel door, and will try to edit all the J-spec observations and pics into this post over the coming month. Up next - perhaps the engine. The e2i M1.0 is an odd combination. Works great, largely not recommendable, and suits this car just fine.
Last edited by Conanblau on Jul 21, 2020 3:45 PM, edited 1 time in total.
Re: 83 528e J-spec
For the HVAC, is the fan speed variable like the E24 or is it just the 3 speed switch? All the Japanese spec E28s I've seen in pictures had the variable fan control but they were later production cars, '86 and newer.
Re: 83 528e J-spec
Hi Justin, this '83 has the standard HVAC as every other E28 I've seen. Cool to know that the later production cars had a change up, will keep my eyes open for a picture or two and share it here.
Thanks for the tip!
Edit for late model E28 J-spec pictures,
The variable speed fan uses a different, solid graphic towards the bottom right. Subtle change.
The overhead check panel from an '87 also has a minor change to the 'Brake Lights' section, they added a warning symbol. They also changed the TEST button (bottom right) to CHECK. I'd suspect this was an E28 wide change at some point.
This photo was accidentally deleted as I migrated to a new photo hosting regime.
Last edited by Conanblau on Jul 21, 2020 3:55 PM, edited 3 times in total.
-
- Posts: 535
- Joined: Feb 01, 2014 12:00 PM
- Location: Vancouver BC
Re: 83 528e J-spec
Very cool car, I hope to see this in person some day.
Re: 83 528e J-spec
Thanks 'buyit, is it you that has that nice Pusstagrun 518i in Vancouver? Great colour. I'd sure like to see that car in person some day.
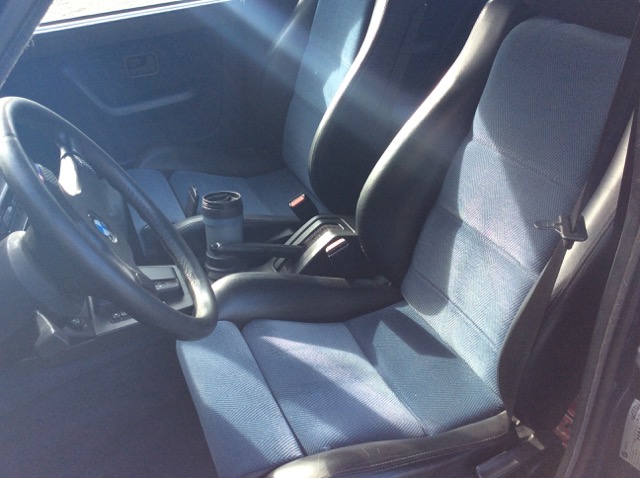
Pictures from last fall, recovered sport seats;
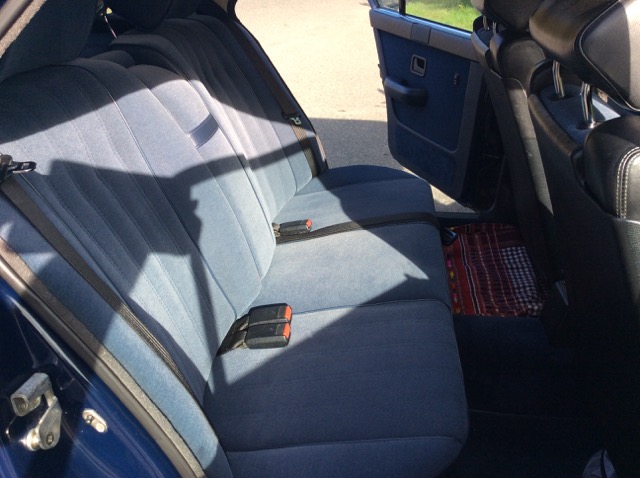
Stock rear seat
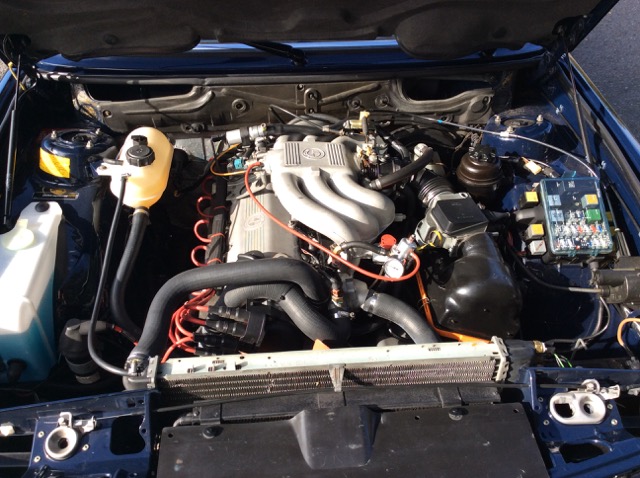
Engine bay is pretty clean and mostly stock looking with the M1.0.
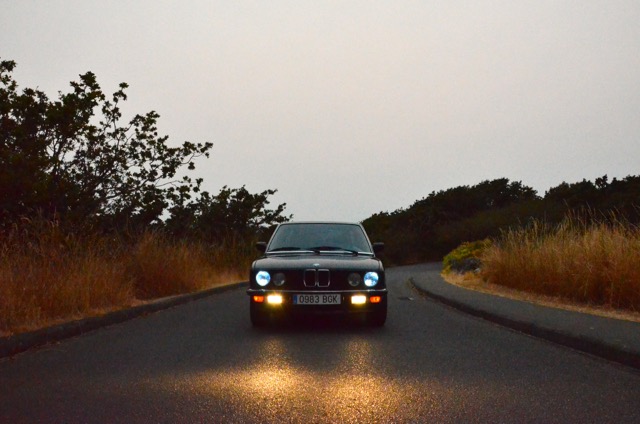
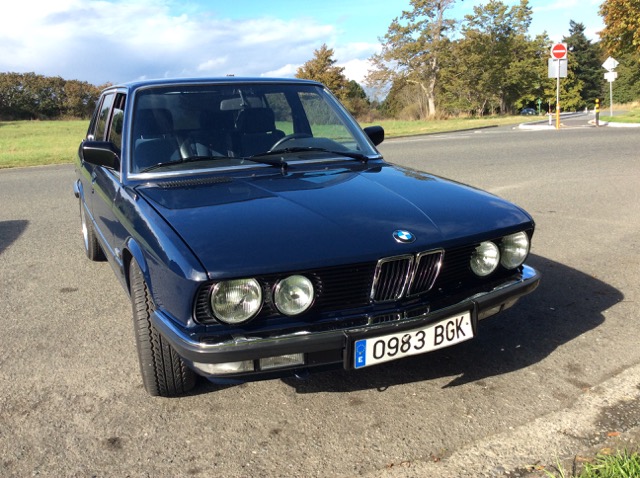
The front end from fall 2015. One of the spring 2016 projects was to square up this hot mess and its looking a lot better. If you look close, someone took time to back into the car last fall. They slowly put a trailer ball and one of those mini-receiver hitches through the front plate, stopping after finding sheet metal behind the plate. So that happened. Since then I've repaired the plate holder and found a new front plate. Hoping this doesn't happen again for a while Shit happens. Hence the build thread.
More pictures to come. The front certainly looks a lot better currently.
Last edited by Conanblau on Jul 21, 2020 3:59 PM, edited 1 time in total.
Re: 83 528e J-spec
What are the specs on your wheels and tires? Love the look
Re: 83 528e J-spec
Thanks Nick, the wheels are 16 x 7 et11, rubber is 205/55R16.
-
- Posts: 975
- Joined: Oct 12, 2015 11:47 PM
- Location: Wherever the E28 happens to be parked- Morrisville, NY
Re: 83 528e J-spec
Any more info on the wheels? You said they were WEDS wheels but anything more specific like model/style or w.e.? I've fallen so deeply in love with themLapisblau wrote:Thanks Nick, the wheels are 16 x 7 et11, rubber is 205/55R16.
Re: 83 528e J-spec
These good sir, are WEDS Bavaria's.EventuallyAyrton wrote:Any more info on the wheels? You said they were WEDS wheels but anything more specific like model/style or w.e.? I've fallen so deeply in love with themLapisblau wrote:Thanks Nick, the wheels are 16 x 7 et11, rubber is 205/55R16.
-
- Posts: 975
- Joined: Oct 12, 2015 11:47 PM
- Location: Wherever the E28 happens to be parked- Morrisville, NY
Re: 83 528e J-spec
Thank you thank you thank you. I'm on the hunt now. I doubt I'll be able to afford a set but a guy can dream right?Lapisblau wrote:These good sir, are WEDS Bavaria's.EventuallyAyrton wrote:Any more info on the wheels? You said they were WEDS wheels but anything more specific like model/style or w.e.? I've fallen so deeply in love with themLapisblau wrote:Thanks Nick, the wheels are 16 x 7 et11, rubber is 205/55R16.
-
- Posts: 386
- Joined: Dec 28, 2014 2:32 AM
- Location: South Carolina
Re: 83 528e J-spec
Wow just gorgeous!Lapisblau wrote:
Re: 83 528e J-spec
What a great car. I got to check it out at 5erWest, as well. I really enjoy this one.
Re: 83 528e J-spec
Been meaning to get back to this thread, and to be honest its hard to know where to start. The history and progression of the car is important, but its the recent jobs completed that are the most satisfying. Like replacing the leaky oil pressure switch, and getting the a/c operational for the first time in 14 years. So forgive me as I randomly bash away at topics that seem relevant, new and old.
Like the oil pressure switch. When I was rebuilding the engine (about 3 years ago) I made a choice about what parts to reuse and the oil pressure switch was one of them. It was working fine and -well- why shouldn't it go back into the car. Put a new washer on it and should be good to go. Which is nice thinking, because of course they leak from the body of the switch, which I had no idea about, and have spent the last few years thinking the oil pan gasket was not sealed within an inch of its life and was weeping. So over the past few years I've tightened the oil pan bolts several times and -no joy- it still leaked a wee bit of oil -somewhere- below the exhaust manifolds and around the pan. Aggravating. Until a few months back I pulled the single wire lead off the switch and found its plastic sheathing full of oil. Huh. Dig around some on the E30 sites and you find out that ya, these oil pressure switches are known to leak at the body. So a new oil pressure switch went in and that felt like a win, M20 lesson learned.
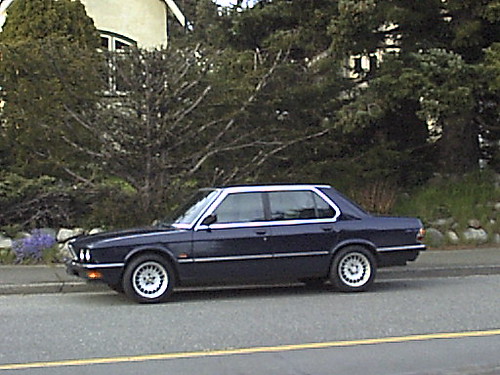
On the other end of the spectrum is this picture of the car when I first got it. This is April 15, 2002. Absolutely stock. TRX wheels. US spec headlights. Euro spec bumpers. Every part was BMW. I knew when I bought it that it had been sitting for roughly ten years. It wasn't particularly fast, had some electrical oddities, but was rust free and accident free. For a fella who only had rusted cars and trucks prior to this, I was surprised by my good luck.
(Pixel attempt via a Motorola fliphone)
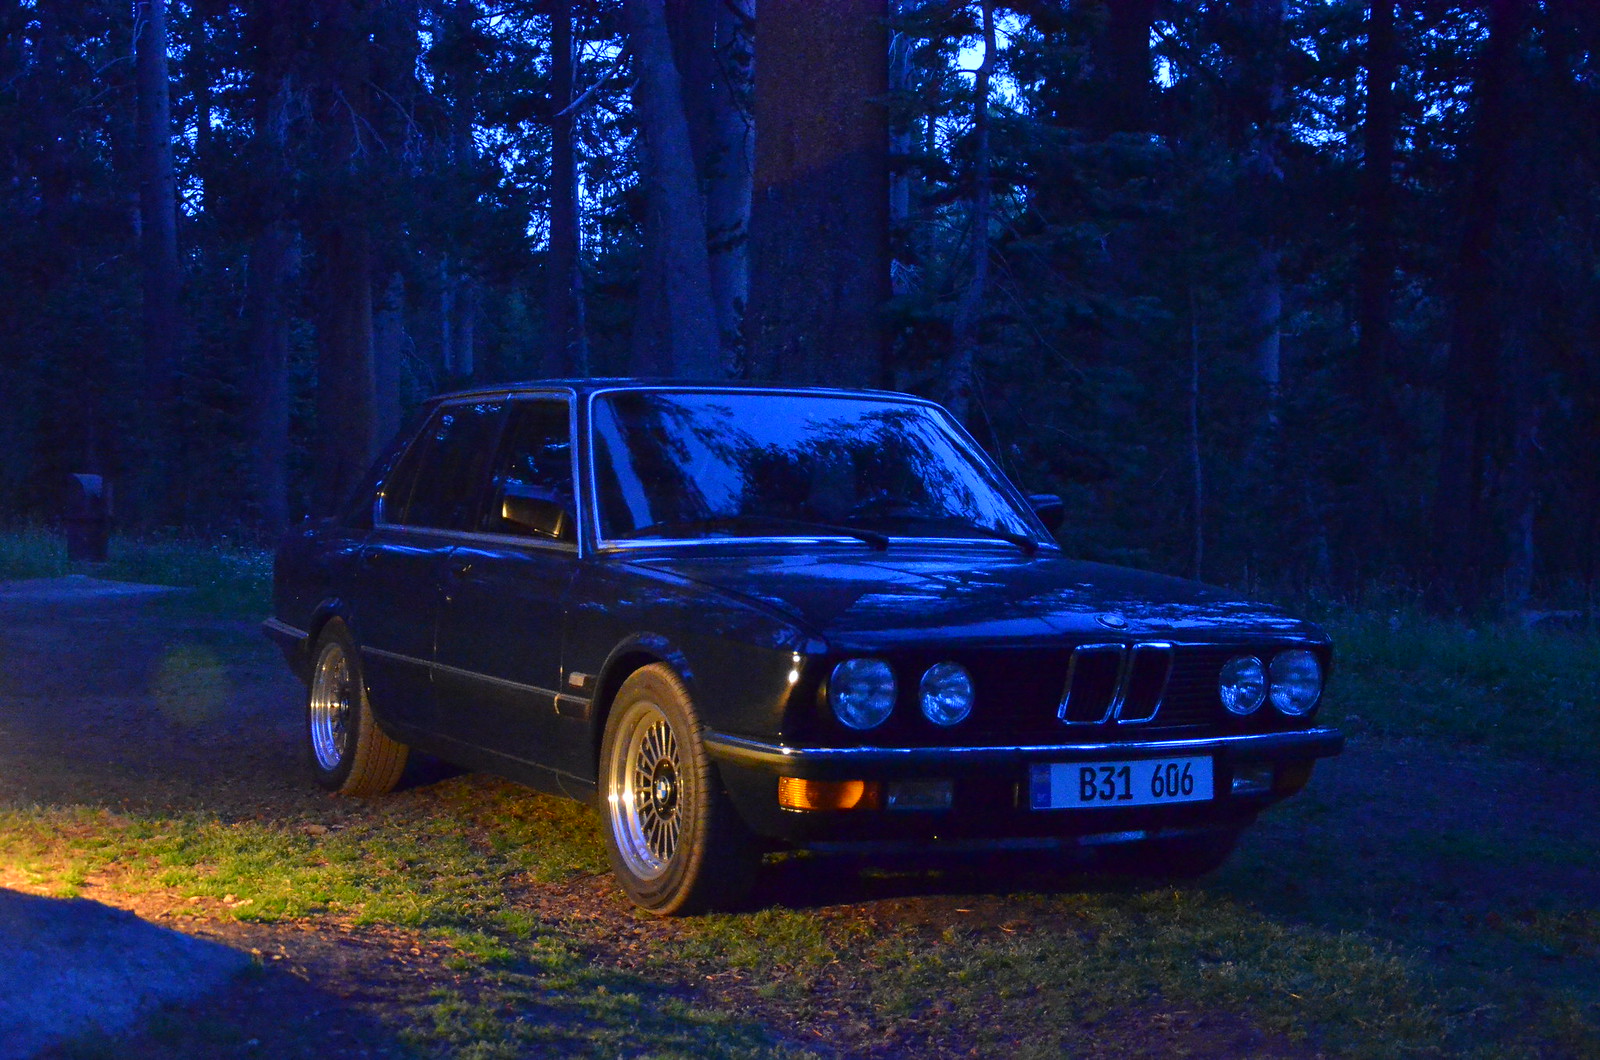
And here's two pictures from August '16 in Yellowstone National Park. For this cars 34th year (and BMW's 100th) it wanted to go for a rip, so it got a 5600km (3500mi) tour of the west coast over 18 days.
Of course, a few things needed to be brought up to spec for a driving holiday, like the a/c, rear suspension, an overdrive gear and a bunch of other things that drive car nuts nuts, like slight oil leaks. And I'll get to those stories as their most recent and some are still on the to-do list.
I'd like to get back to the Japanese aspect of this car for a minute. Japanese cars imported to North America get shit on a fair bit and coming from my very limited experience of this one car, I've never understood it well. The story seems to go either they're not maintained well or someone's rolled back the odometer, or some such thing. In my experience, they're maintained well for 7 or 10 years and then largely left to dry rot as insurance and expensive secondary checks dramatically diminish the value of the car. That and I think the Japanese don't see much value in old cars, or old anything, but I'm not a sociologist, just a guy who reads the internets and likes cars.
So here's the history of this car as I know it. The first 13 entries from 84-99 are drawn from 13 BMW service records that came with the car.
1984. 0 kms
1985. 8066 kms
1987. 18 047 kms
1988. 23 959 "
1989. 27 931
1990. 29 604
1991. 34 122
1991. 41 517
1992. 43 645
1993. 54 402
1995. 61 015
1997. 62 020
1999. 62 285
2002. 63 031 purchased April 15th, 2002. (39 000mi)
2003. 76 093
2006. 102 000
2007. 111 034 hit while parked in front of house
2012. 132 192
2013. 137 553 engine rebuild, paint
2015. 145 000 leaving 5’er West in Portland
2016. 155 600 September 2016
If there was one thing I could point to that said this car came from Japan its probably the decal on the fuel door. Thats it. For the E28 geeks the dual filament front indicators or the overhead "Overheat" warning light would also serve this purpose. But if you needed it easy and in writing, this is it. I have no idea what it says, I'm guessing "unleaded."
It's a car that was shipped to Japan, had a good life there, and now lives in Canada. It's not an M5, or an M30 heavy hitter or some sort of Alpina wunderkind. It's just a car thats done pretty well so far despite my ill-conceived efforts to better it.
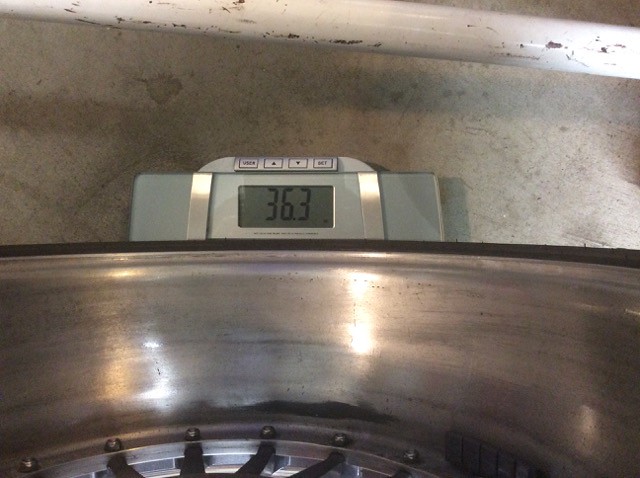
Like 17" wheels. Gotta have 17's!! Once I get 17's on there, its going to be so awesome. And thats how I felt, and thats what I did in 2004. The TRX rubber was shot. It was shot when I bought the car and two years later it was even more shot. 17's MOFO! So ya... you think you're doing right by the car, but it was likely the single worst thing i did to it. You see the 17" Style 65 replica wheels were heavy. 46.1lbs per corner, as weighed in 2015. The replacement wheels (the WEDS) weighed 36.3lbs. Throw in some lightweight lug bolts and lets call that 10lb/corner difference. Huge change in the handling of the car, all for the better, and it only took 11 years to figure that out. So yeah... thats how this thread goes.
Up next from 2016, the mistakes made and lessons learned regarding a/c re-install, a 5 speed swap, and the switch to a dual exhaust setup.
Last edited by Conanblau on Jul 21, 2020 4:28 PM, edited 1 time in total.
Re: 83 528e J-spec
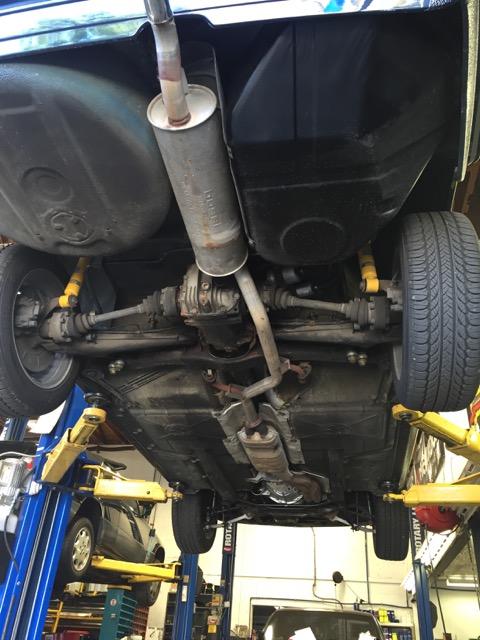
Eta Exhaust.
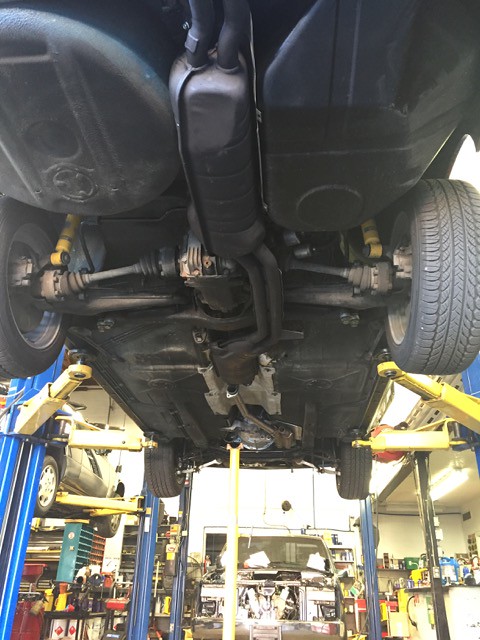
The first hunk of non-BMW metal that went in to this car was in 2003. The original BMW cat-back was ~20 years old and leaking. Nothing horrible, but you know, you want to do something good for your car every now and then, and it needed a new muffler. So it got a Bosal, just like the one pictured below. I'm not proud of it, but at the time it came down to a Bosal (give or take) and a factory replacement for triple the price. It got the Bosal. I distinctly remember the mechanic enthusiastically chucking the grass fire heat shields onto the shop floor one by one, declaring them garbage and revelling in my inability enjoy his ruthlessness. He loved it. Then the Bosal went in, but they don't fit trouble free out of the box. So he got in there with a three foot prybar and a hammer and started making room. Anything can be made to fit with a big enough hammer and time. Ten minutes later I'm driving away in a slightly quieter car, listening to the catalytic leaking and well... none of it felt particularly good.
Seven years later in 2010 another Bosal went in to the car. Unsurprisingly it fit with no need for the hammer and prybar. This time I installed it myself and it took perhaps 30 minutes. The catalytic was still making the same wheezy sounds as before, somewhere underneath its heat shielding it had troubles.
In 2013 when the drivetrain was out I started looking harder for a high quality exhaust for the E28 eta. More or less they don't exist. Of course, you can do anything with the right tools, but an off the shelf ultimate fix for the E28 eta exhaust just isn't there and for numerous good reasons. So the rebuilt drivetrain went back in, and with no easy exhaust answers the marginal Bosal went back on right behind the stock, wheezy catalytic.
By 2015, the second Bosal was leaking worse than the catalytic so something had to be done. But what? A new catalytic from BMW is $4000 give or take, so thats not happening. And the only headers option for the E28 eta is limited to the ebay/OBX which - no (primary dia and length not suitable to non-race application). And all the aftermarket dual exhaust E28 stuff is for the M30 (makes sense) and is going to be too much exhaust for the M20 - so no. But the last year of the E28 eta was the Super Eta, and it received a nice dual exhaust from the factory, just like the M30's stock cat-back.
So by 2016, I found a NOS Boysen twin-pipe cat-back for the euro spec 520i/525e (stamped as such on the body). Same dimensions as the super eta setup and same exhaust hanger setup as the NA spec eta which is great, I just needed a way to plumb it in. And after months of going back and forth on a catalytic solution, I had it cut out and ran straight pipe in its place. If it was a stock eta engine I might have kept it, but its not a stock engine and the cat was 30+ years old and with enough WOT the cat 'cooled down' like a smouldering dumpster fire. Not the tick, tick, ticking of cooling metal, but the crackling of a dumpster fire catching its stride. The catalytic was done for this application. And my concerns the car would be too loud were unfounded, it sounds perfectly quiet, until you're hard into it over 3000rpm.
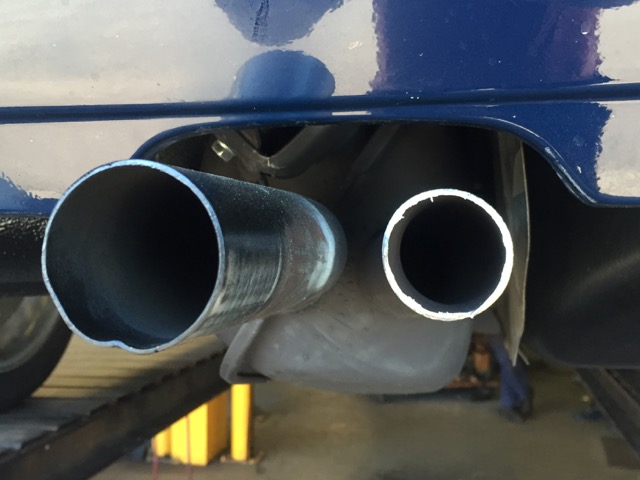
Regarding pipe diameter, the 45mm and 42mm this cat-back came with feels fine for the e2i demands placed on it. The 42mm pipe is necked down from 45mm for a few inches near the flange to the cat so if that 3mm of flow meant something it would be easy to flare it open imo. For reference, relavent dual exhaust pipe diameters:
528e & 525e = 42mm & 45mm
535 = 44mm & 45mm
325i = 42mm & 45mm
528i = 47mm & 49mm
M5 = 47mm & 50mm
aftermarket M30 = 50mm & 50mm (supersprint)
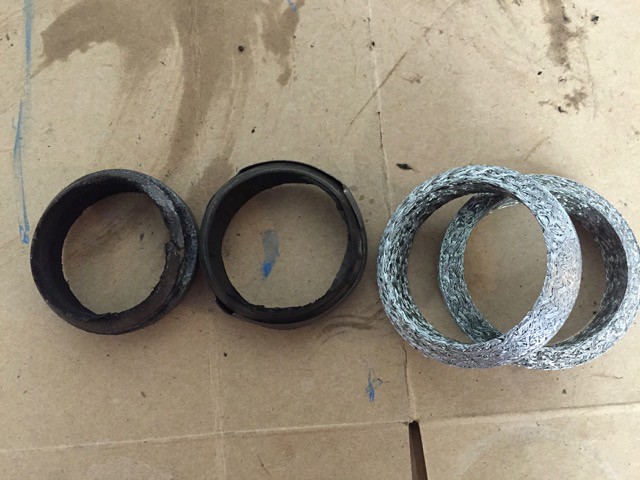
The two 45mm exhaust gaskets (that I destroyed, shame on me) from BMW are on the left, one made from a non-asbestos material, the other had a metal ring around the outside and a softer material in the middle. They were on the car for two weeks. The larger shiny ones are the 45mm replacements from the local parts store. These are as porous as they look, noticeably louder than the others.You could probably smoke a cigarette through them if you tried hard enough. Next time they're out, I'll seal them up with JB Weld or something like that and give that a try. Interesting to see the different materials used here at least.
Lastly was the exhaust tips. BMW doesn't make them anymore but Ansa does, and they come in 46mm inside diameter that should have fit. They didn't. Ultimately I destroyed one trying to slip fit it, ordered another and had an exhaust shop cut the original tips back to a 2" stub, flare the Silverlines and weld in place. They turned out great. And the 46mm's were definitely not slip fit.
And thats how the exhaust went. The hammering and pry bar tricks in 2003 are mostly corrected but the new cat-back still fits a little tight to the body and gas tank, not that anyone is going to notice. Will work on that over the winter. Maybe.
Next up is getting the a/c back in action (the last step was the expansion valve)
[url=https://flic.kr/p/MrggeJ]
Last edited by Conanblau on Oct 21, 2016 12:32 AM, edited 1 time in total.
Re: 83 528e J-spec
The air conditioning was blowing warm in 2002 and by 2010 I had removed the compressor from the system because its heavy and I am (was) a young guy and all, I could roll down the windows. So when the drivetrain came out in 2013, the dryer and lines went into the box with the compressor and was one more thing sitting on the shelf. Until two months ago, when I pulled the box off the shelf and dug out the new o-rings, and dryer that were purchased in the past few years. Threw it all back into the car (like a good completist would) with good intentions and naively hoped for the best. Of course it didn't blow cold. And not being an HVAC guy it was time for the learnings. The system held a good vacuum, and was taking and holding refrigerant, but the low side would dip into a vacuum once the compressor was spinning fast enough to compress (~1200rpm). Blocked expansion valve says the internet. Said valve lives deeply under the dash, and having never dug that deep, was reluctant.
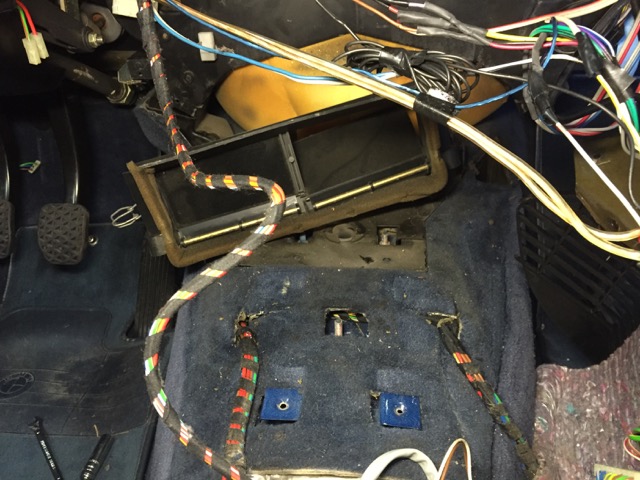
Ordered the expansion valve and tore into the dash hoping to get it done in a day. And could have, but had ordered the 84 and up expansion valve, not the 82-83 valve. The good news was the evaporator box came out in one hour. A fine user Craig(93?) on this board walks through the basics of removal and some tips for reinstall so that really helped. The dash stayed in, the stereo fascia stayed in and the kick panel, glove box and shift console were removed. With the right expansion valve it all went together pretty smooth.
One of the challenges with the evap core is what to replace the disintegrating foam on the sides with. I ended up using strips of sound deadener, it should perform the air blocking task well.
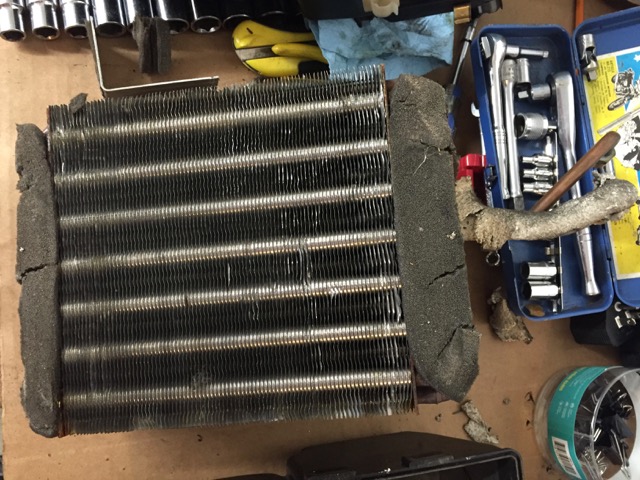
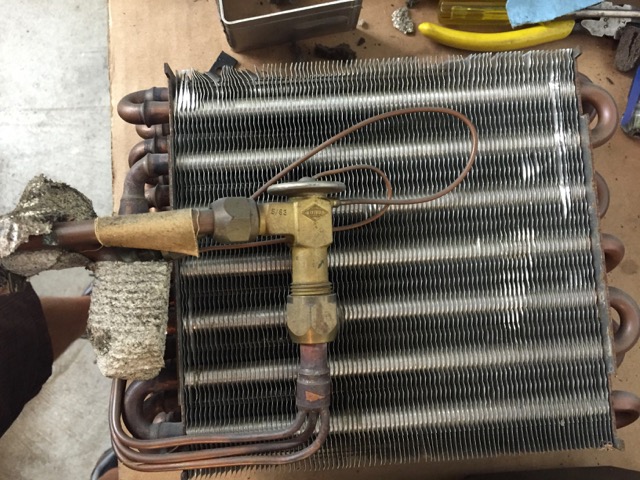
The original expansion valve on the back side of the evaporator. When you finally get to the valve you realize how small the orifices are that the refrigerant flows through. In my case, I'm pretty sure the valve had rusted itself shut.
There's insulation applied to the outside of the fan cage from the factory that was coming off, I replaced it with foil backed sound deadener. If done again, I wouldn't run the foil quite so high up the front as its slightly visible from inside the car.
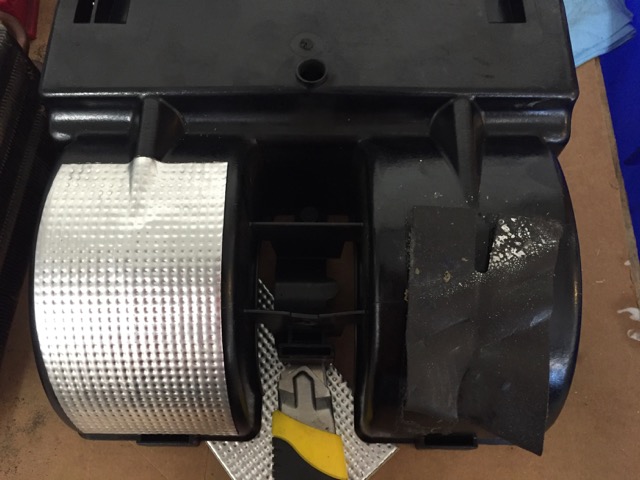
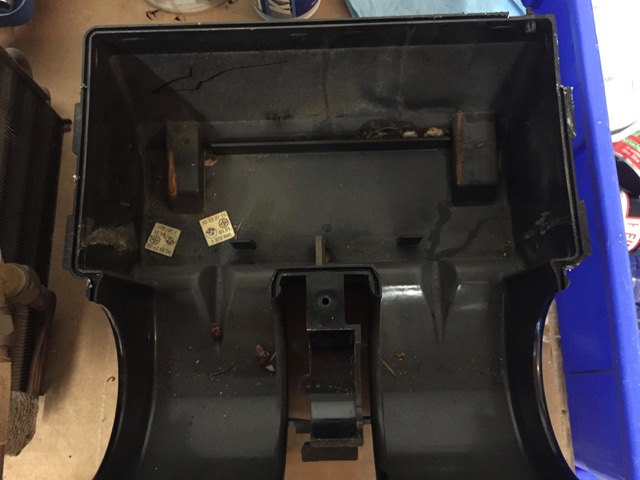
Evap box was pretty clean for 33+ years old. The blower motor has seen light duty over the years and was lubricated and put back in, it sits in the front here.
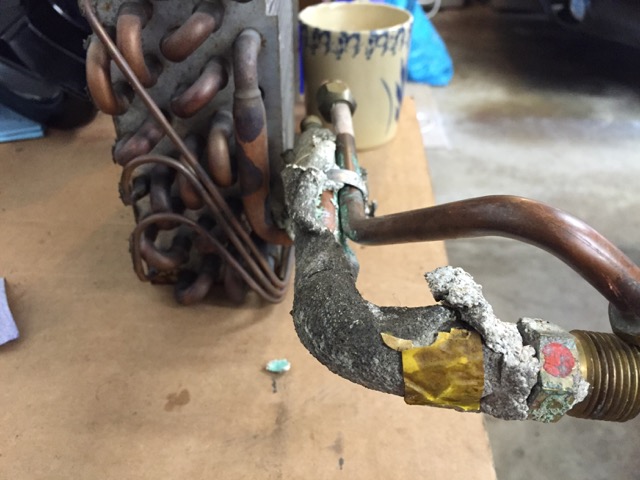
The original insulation on the inlet pipes for the evaporator. Whatever its unique makeup is, it smells bad, and was definitely the source of a rare unpleasant musty smell.
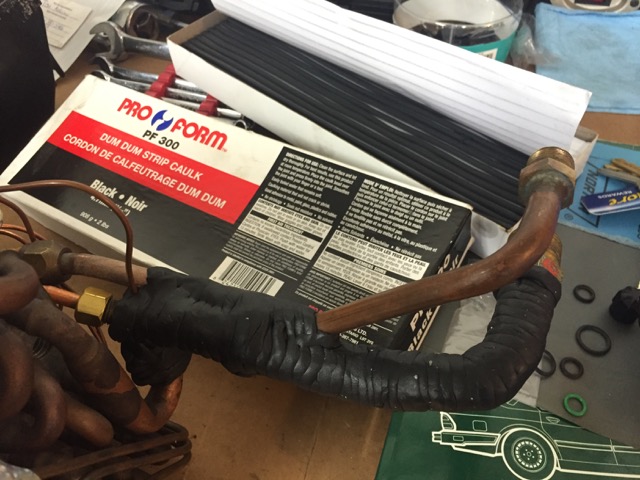
Replacing the factory insulation with rope caulk. MyE28 provided this tip, and it just so happened that I had a box of rope caulk sitting around. It took me a while to understand the insulation purposes here, (other than keeping the refrigerant cold) and its this, you want to prevent humid air from condensing on the cold inlet pipe. To do this you ideally have a 100% seal on the line.
Also used the foil backed sound deadener to close the openings in the evap box, which worked pretty slick.
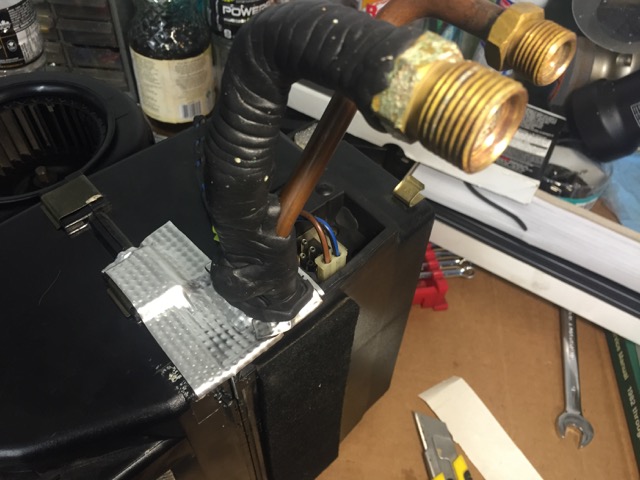
Dum Dum Strip caulk. Once the evap box was back in the car the line including the fitting is completely wrapped as the factory did.
Once the car had its new exp valve a vacuum was drawn on it for the second time, which held nicely, then added R12a refrigerant. Yes, the propane/butane refrigerant. It works fine but received damning push back from a few shops. Whatever, the R12A is a superior option imo for original, old school R12 systems. If leaked to atmosphere it breaks down to carbon dioxide and water quickly and it creates less head pressure on the system which is good if you're using the original hoses (I am). And it blows cold, which is subjective, so I picked up a thermometer in Thousand Oaks CA in August and sampled the vent temps under various conditions. The gist, it can blow 32.7F on a 75F day. And will blow ~44-48F at 65mph on a 104F day IF the fresh air vent is closed.
The original compressor was degreased a few years ago and works fine. Kind of? The system operates as intended but at 1500rpm (only 1500rpm) it can growl pretty significantly inside the cabin. Quiet under the hood at 1500rpm, so -maybe- its just the expansion valve doing its thing -dunno. But the a/c growls at 1500rpm, sounds like bad bearings, you don't hear it under the hood, and it blows cold which is great. So we'll chalk that up as a -1 on the NVH and leave it alone.
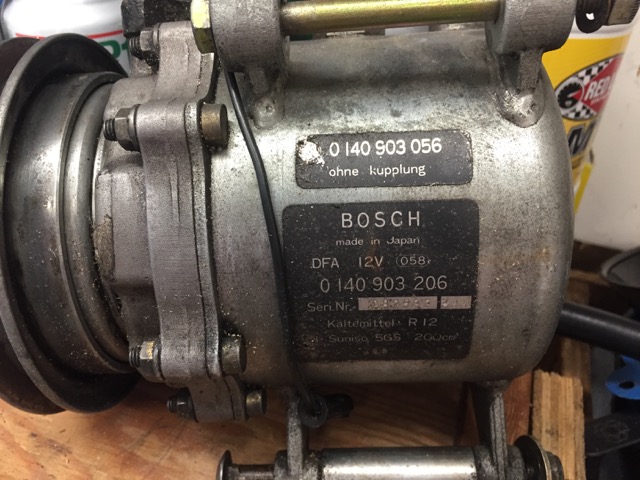
I received a good tip from the second HVAC fella who helped me out. Use dielectric grease to lubricate the o-rings. When assembling the system I had wanted to lubricate the o-rings but didn't as the only advice I read was to use mineral oil itself, which I didn't have. I did have dielectric grease though, next time.
And here's my E28 a/c tip that proves I'm not an E28 a/c guy. Close the fresh air flap (the middle slider) to get colder air from the a/c at highway speeds. I was wondering why the a/c was less effective at highway speeds and was filing it under old car, old a/c, maybe a weak compressor. Until after I left the deserts of California and realized that I could drop the vent temps by 10-15F (on a hot day) at highway speeds by closing the fresh air flap. Makes perfect sense, especially if you examine the way the weighted flaps are set up that control which source of air can use the center vents.
The fresh air/air conditioning diverter with the weighted flaps sits on top of the evap box and fell off as the box was being removed. You can see one flap is askew, the pivot setup for these flaps is certainly fragile. It was reassembled in this case and works properly, but is still fragile and I could see having to get creative for a lasting repair next time its out.
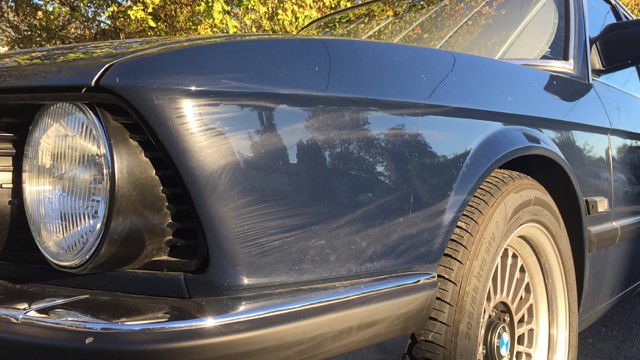
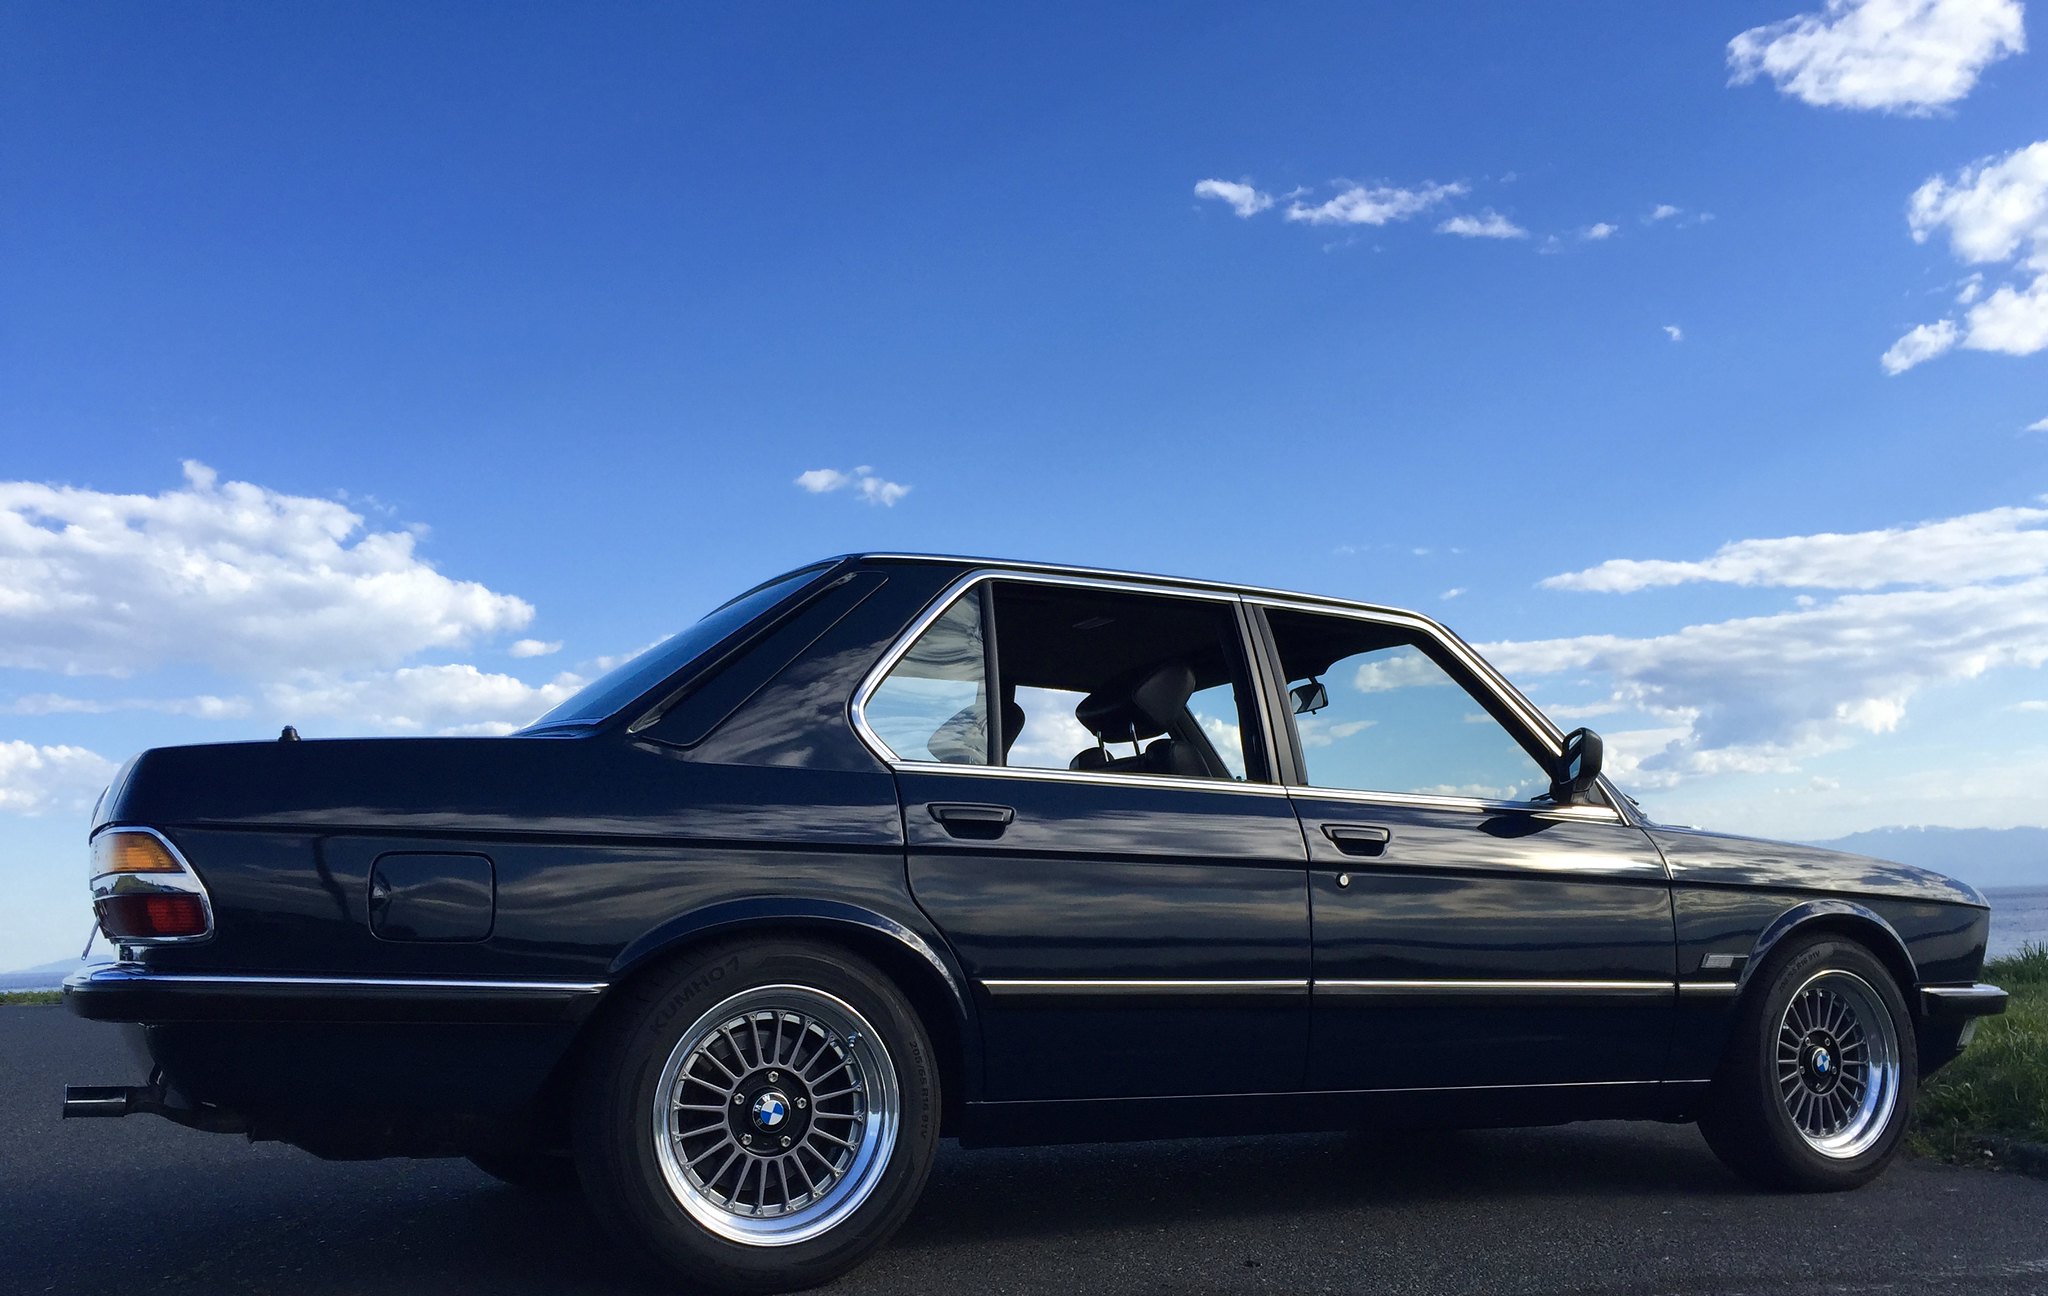
Lastly, my favourite lines on an E28. Highway speeds + rain + distance = these road grime tracks. And they consistently look like this. Neat. Dirty, but neat.
Re: 83 528e J-spec
So the old girl has been tucked away since late November and I'm starting to build the 2017 to-do list. Its interesting how the passion for these projects ebbs and flows throughout the year. By late fall I'm hard pressed to even wash the thing and by spring I'm genuinely excited to get behind the wheel and experience it all over again. Its not spring yet, but I am building the list and ordering the parts
Anyway, here's four small J-spec details collected over the past while.
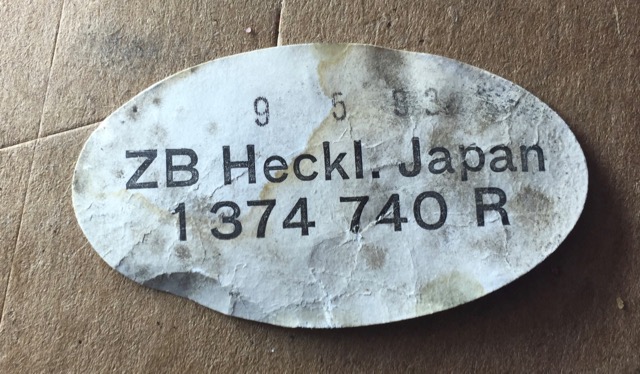
These paper tags used to pop out of the strangest places, haven't seen any new ones in years and this is the only one I can find now. Has been in the tool box for years.
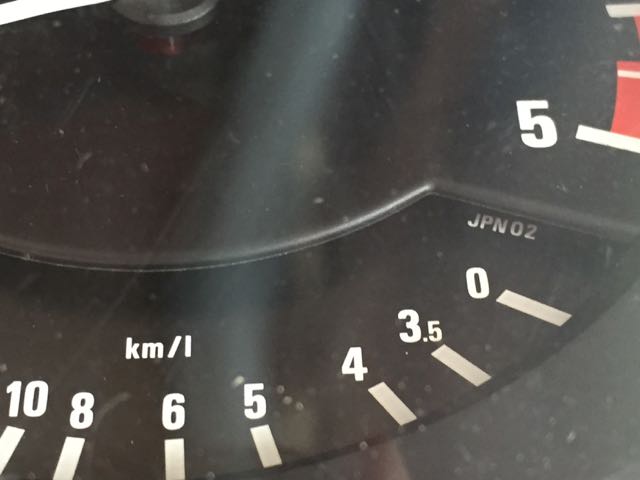
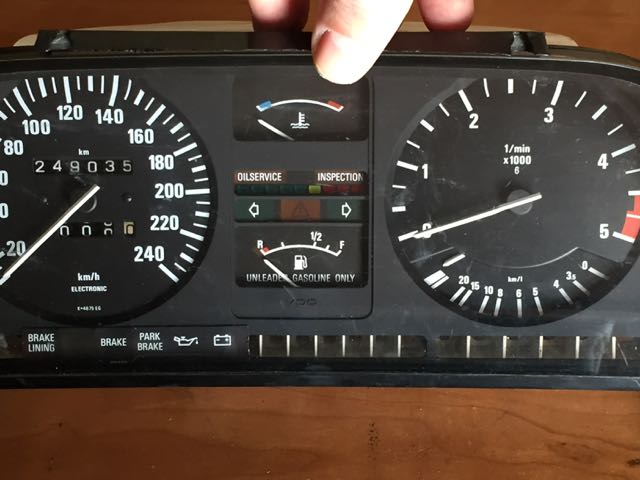
It took awhile to find this JPN02 detail and believe its related to the fuel economy gauge. My guess is the J-spec cars were the only ones to get this km/L gauge face. Which to be honest, I never liked because I was always trying to convert the results back to L/100km (which I do like). Most of you fellas probably have the MPG gauge face, this J-spec face is the equivalent of that but feels infinitely less informative. -so ya- never made much sense to me and was happy to swap out the tach (in 08 maybe?) for an 84 533i unit and with it came a proper L/100km gauge and a more classic BMW red-line north of 6000rpm.
The original tach is stored in this spare cluster for I have no idea why. Anyone need an eta tach with a cryptic fuel economy gauge? Seriously though, its come time to get rid of some of this.
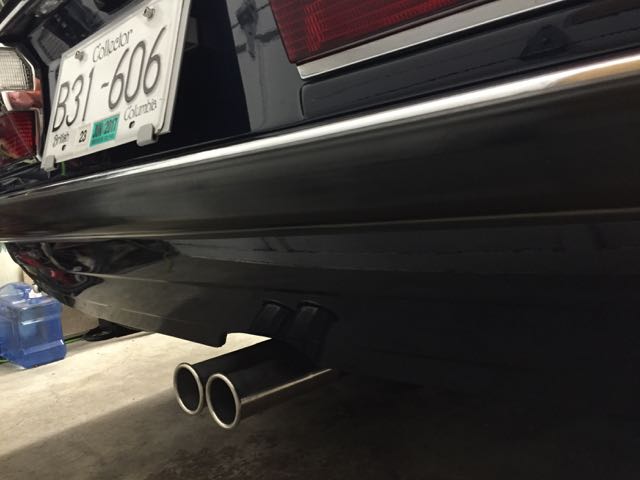
It took a decade or so to figure out that this rear license plate holder is probably a JDM type of thing. Their plates are a different size than NA plates and for ten plus years my rear plate was attached with one bolt (and after enough rattling, some double sided tape). When the car was stripped for paint in 2013 I re-drilled and tapped new mounting holes so I could centre the plate and use two bolts. Progress comes slowly 'round these parts!
(apologies for the pic, was trying to take a picture of the new exhaust tips last summer and its the best pic I have of the plate holder)
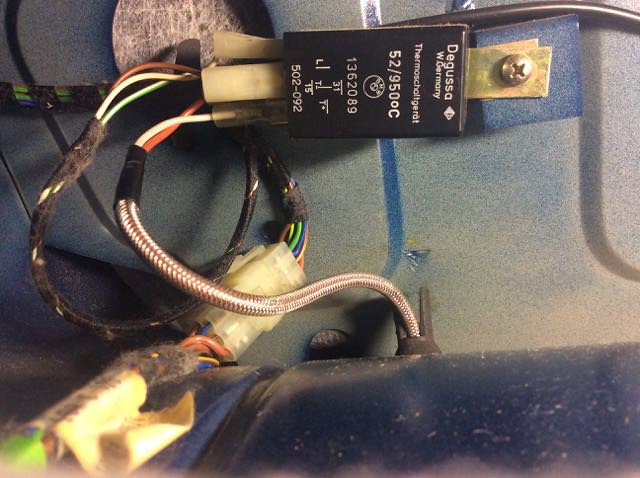
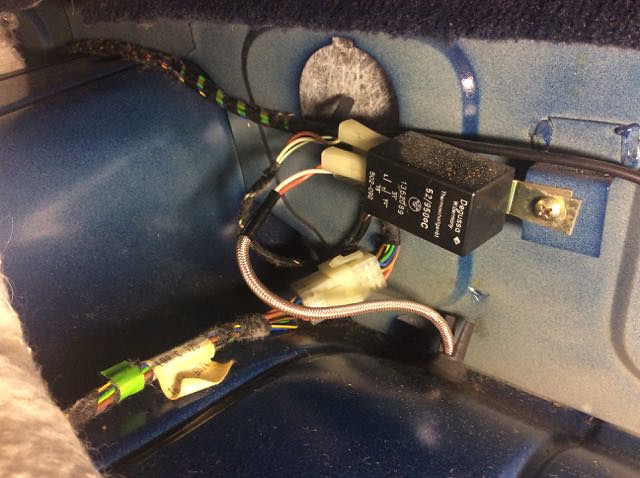
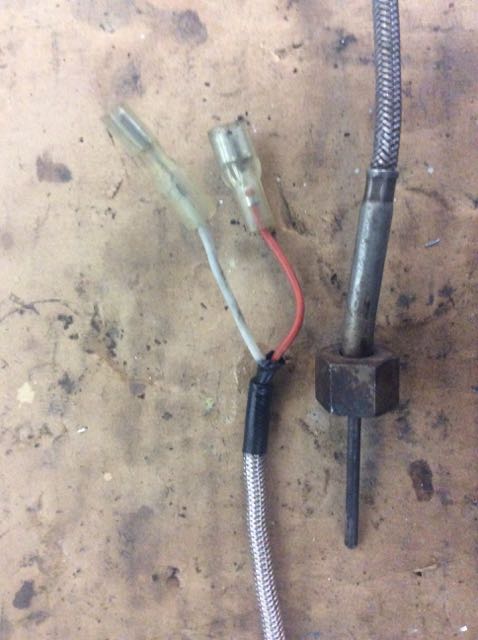
I had mentioned the overheat light earlier in this thread and this is what makes it tick:
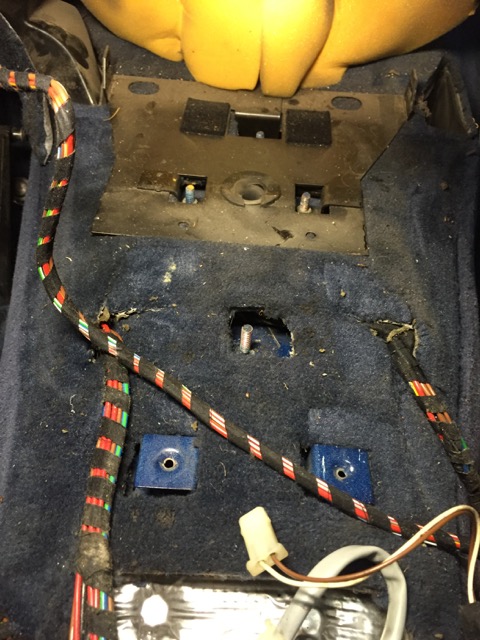
The thermoschaltgerat relay lives under the rear seat.
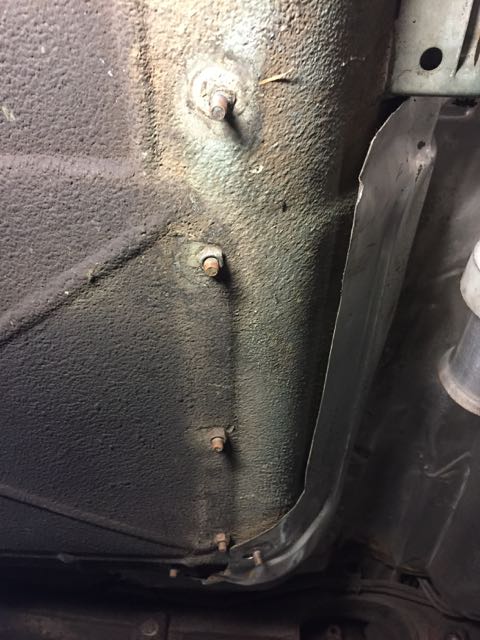
And the 3 feet or so of shielded thermistor was run through a grommet in the floor and back up towards the catalytic. If you read my previous comments on the eta exhaust you'll know I removed the cat this summer and this thermistor was removed at the time. Unplugging the thermistor lit up the Overheat light full time, so I unplugged one of its precious wires and all is now good.
It was held in place with these four studs. Not much to look at, but you get what you pay for.
To carry on my old vs. new, here's a old pic from 2005. September 5, 2005 to be exact. (isn't metadata great? 1. It was a surprise to even find this picture 2. that it had a valid date stamp as well and not some 1-1-2001 kind of thing going on was surprising. Do you remember when VCR's flashed 12:00 because you were too lazy to try to figure out how to set the time? Oh the good old days )
Anyway, as you can see the exhaust and fuel tank are removed so the fuel tank could be slushed. A few months before this picture me and a buddy were putting a new fuel filter into it and we cut the old one open for kicks. What we found was probably half a cup of rust flakes and crap packed into it. Mostly rust. NOT what you want to see coming from your fuel tank. So the tank was out and getting coated. Which worked fine, but had clogged up a couple of those small return lines, making for some interesting plumbing. By perhaps 2010 a new gas tank was installed.
Reflecting back, I did the fuel system ass backwards. The first new parts installed (around 2003) were both fuel pumps, then the fuel pressure regulator and cold start injector and -then- went to the fuel filter, then the injectors were serviced -and then!- the tank as you see it above. I'm thinking the new and serviced parts down stream of that crusty tank didn't appreciate the exposure to the crap being fed through them. If it was to be done over again, starting with a clean gas tank first makes a lot of sense! Lessons learned. That said, the fuel pumps that were installed in 03 are still in the car and doing fine, so she's got that going for herself.
More to follow. I owe this thread a proper build sheet and an update on the a/c and 5 speed adventures from 2016. And I just noticed I totally missed adding the pictures for the dual filament front signals and their oddball relay. Soon.
Cheers.
Last edited by Conanblau on Jan 25, 2017 2:25 AM, edited 1 time in total.
Re: 83 528e J-spec
I just love seeing updates to this. So informative. Thanks!
Re: 83 528e J-spec
Happy to oblige friend. Stay tuned, I've got a few more pieces to add soon. Cheers!
Re: 83 528e J-spec
great looking car and enjoy your thread.
look forward to more updates.