Re: 1985 Arktisblau M535i Renovation - Progression
Re: 1985 Arktisblau M535i Renovation - New Year's Update
^^ Agreed. I'm not worthy.
Sorry about the harness thing, but its really not so bad to take it apart, clean it up, solder and retape.
The real bitch is extending a 179 harness by 18", that 50+ wires...x2!
Sorry about the harness thing, but its really not so bad to take it apart, clean it up, solder and retape.
The real bitch is extending a 179 harness by 18", that 50+ wires...x2!
Re: 1985 Arktisblau M535i Renovation - New Year's Update
new parts are pretty. car looks great!
Re: 1985 Arktisblau M535i Renovation - New Year's Update
Now don't do something stupid, like drive it!
If you have an extra bolt, when you are done, I see where it goes...
If you have an extra bolt, when you are done, I see where it goes...
Re: 1985 Arktisblau M535i Renovation - New Year's Update
HA!dsmith wrote:Now don't do something stupid, like drive it!
There are likely many bolts missing in some of these photos; I have to go over every connection to double check. But just which one do you see?dsmith wrote:If you have an extra bolt, when you are done, I see where it goes...
Re: 1985 Arktisblau M535i Renovation - New Year's Update
Trans stiffener. Long bolt, I believe. Could be wrong.vinceg101 wrote: But just which one do you see?
Re: 1985 Arktisblau M535i Renovation - New Year's Update
I think you are, I reviewed all the bolts and don't appear to missing any. At least since that photo was taken. Thanks for the heads up though.dsmith wrote:Trans stiffener. Long bolt, I believe. Could be wrong.vinceg101 wrote: But just which one do you see?
Re: 1985 Arktisblau M535i Renovation - New Year's Update
Weekend Update: Saturday 1/14 & Sunday 1/15:
Sometimes updating this thread takes as much effort as the actual work itself. But it is therapeutic and I enjoy relating my experiences in hopes that it helps others.
The work is progressing hot and heavy (finally) as I am checking off systems. This past weekend I was focused on finalizing one system:
HYDRAULIC SYSTEM:
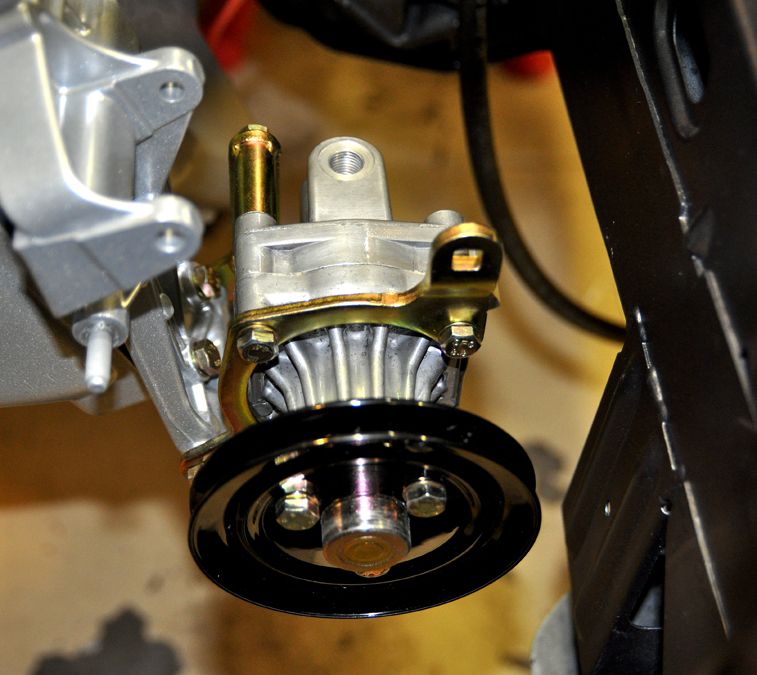
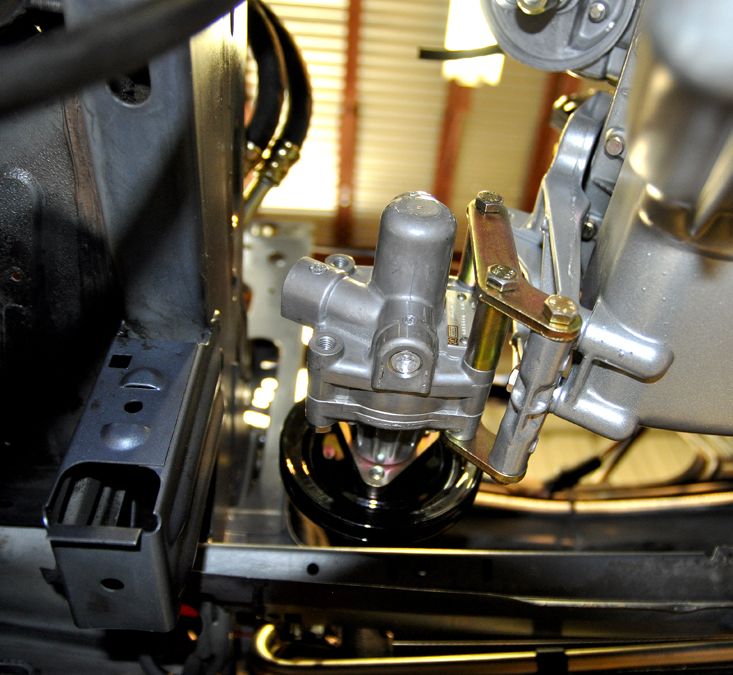
It was time to install the last of the components in hopes to get the system closed up, starting with the Power Steering Pump. The pump has been sitting on a shelf since I assembled it last month along with a box full of hoses and High Pressure Lines. First up was installing the PSP onto the bottom of the Alternator Bracket, along with all new hardware & components:
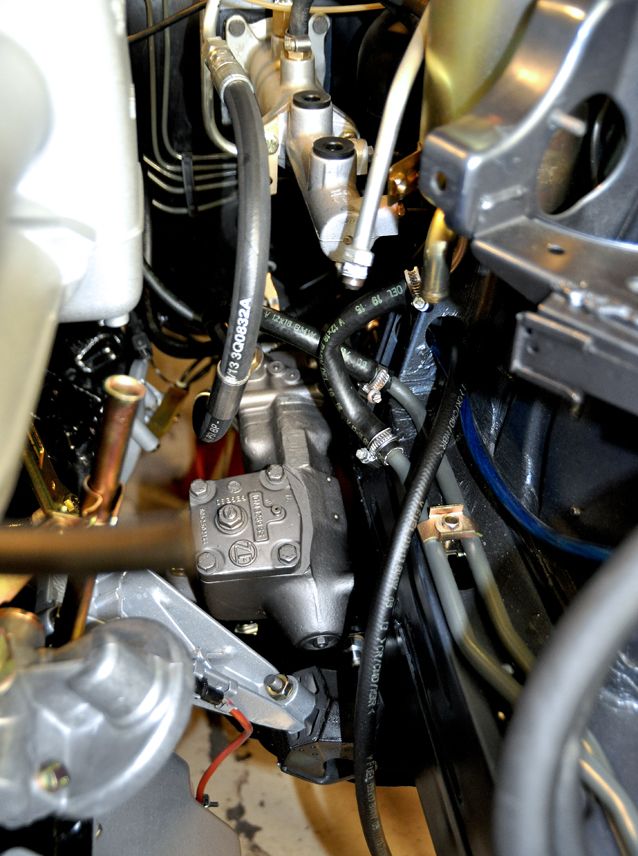
Then it was hooking up the High Pressure Hoses from the Accumulator (Bomb), Fluid Reservoir, Steering Gear Box, and the Cooling Lines. The Accumulator and one of the lines went in a while back as well as the Cooling Lines. A certain amount of the hoses went in previously also:
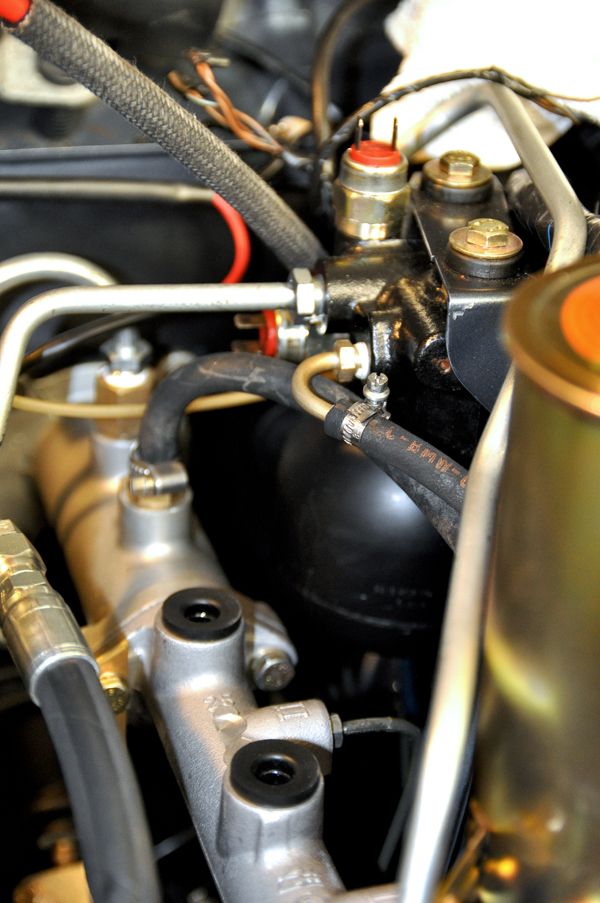
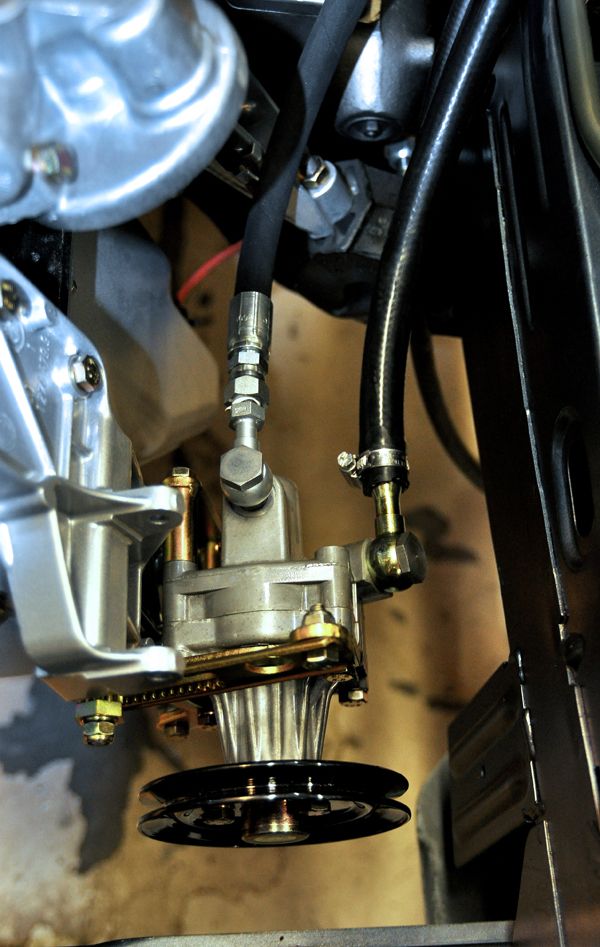
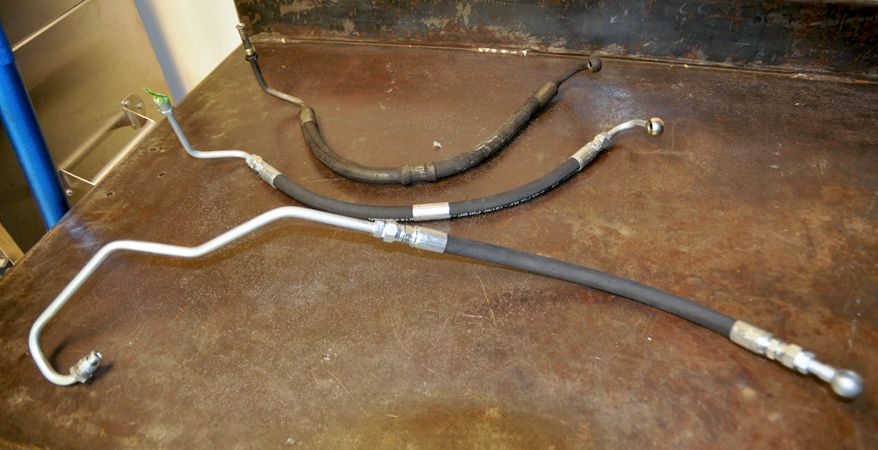
One or two of the High Pressure Lines were new from BMW but I bought three that Antony (buzzbomb) had remade with new hoses and crimped ends with some recycled fittings. I couldn’t control the process otherwise I would have had the fittings and hard pipes re-plated to match the orginals. But these look well made so I’m not complaining. Besides, they will likely be a damned sight better than the 30 year old leaking versions they replaced.
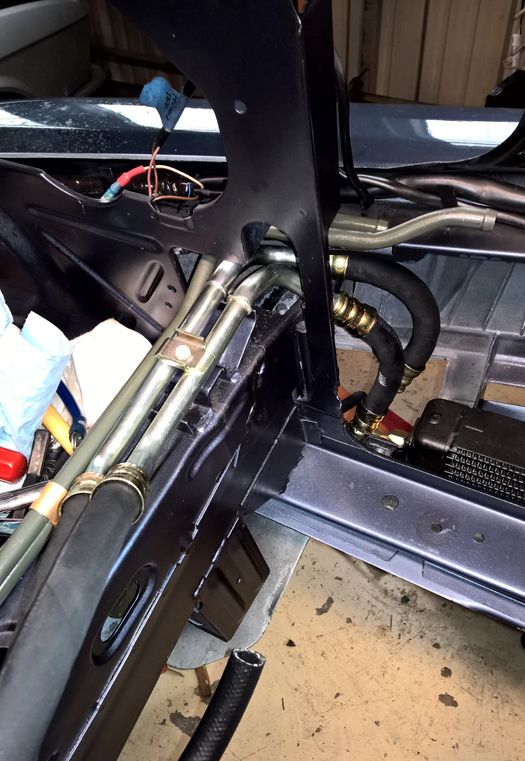
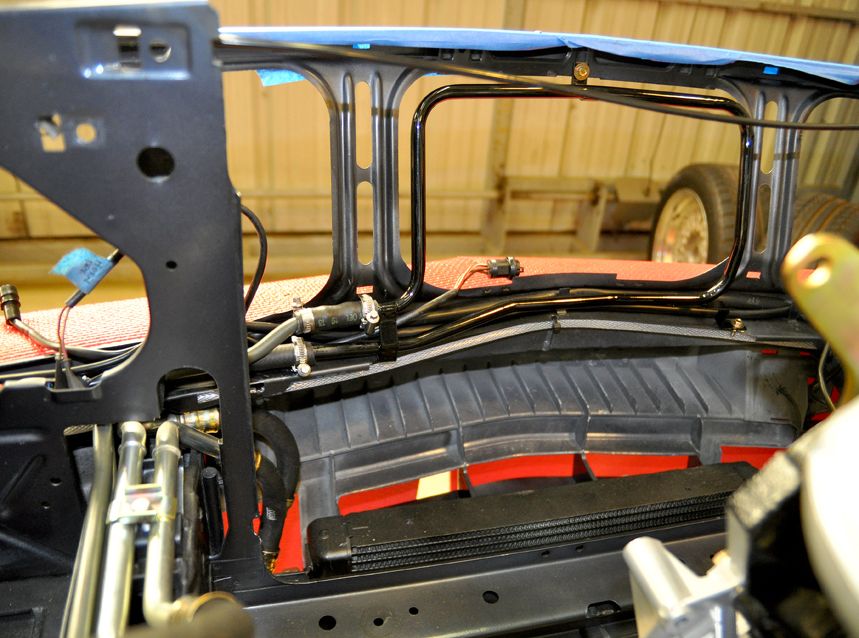
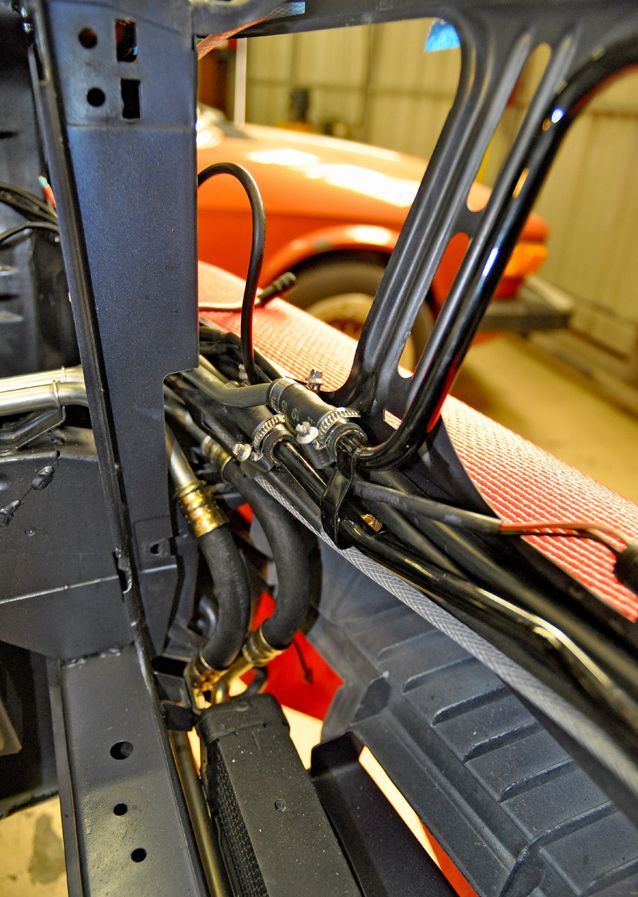
I also completed the installation of the Hydraulic Fluid Cooling loop by installing the hard pipe loop in the front nose. The hardest part of the whole procedure was connecting the loop and the two hard return and supply pipes that are bolted to the frame rail together with small sections of hoses. The two lengths of 12x18mm hose are only about 2” long but it is a bit of challenge getting them on there with the hose clamps while crammed up against the front nose frame.

(Sorry, thought I had photos of the Cooler loop in the nose; I will take a few pics of it next weekend showing those blessed little hose sections)
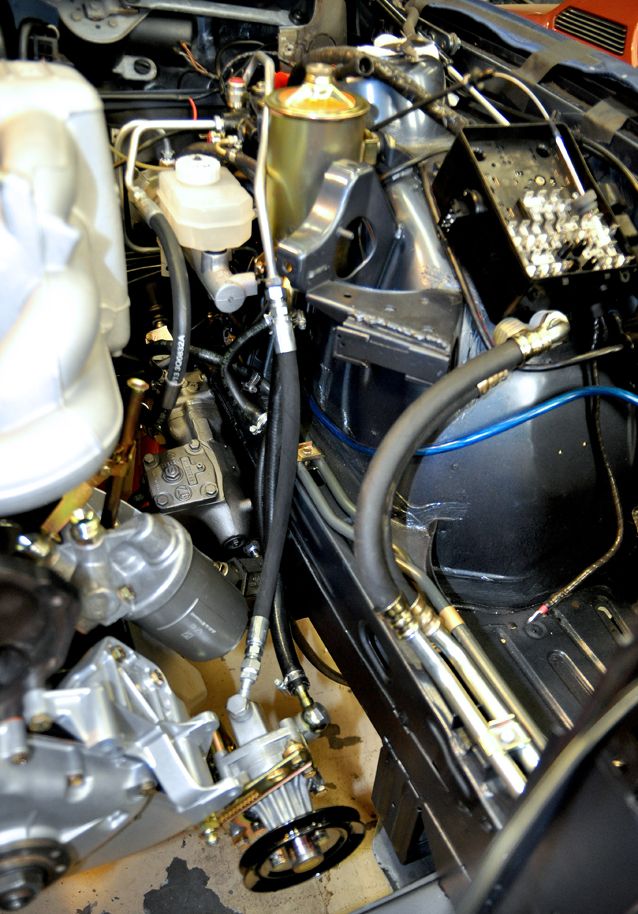
With that done I went ahead and closed up a few loose ends namely the Brake Fluid Reservoir and Oil Filter Housing. I wasn’t planning on installing the latter, but I kind of had to in order to figure out the alignment of the High Pressure Supply Line to the PSP. I will save hooking up the Oil Cooler Lines to the Oil Filter Head until after the Alternator goes in.
ABS PUMP REBUILD:
With all that done, I returned reassembling the ABS Pump that I had left half done so I could get the Engine and Transmission installed. So I had all the parts cleaned and a few items re-plated. Turns out they could not re-plate the pump body itself; the plating process involves flowing the zinc coating through all the openings to get to all the surfaces. Since the two halves of the pump body of are sealed with small channels through them, they wouldn’t be able to do the plating process correctly. So my compromise was to clean the pump body and seal it.
Reassembly was a simple reverse process of the tear-down:
First reassemble each of the four pistons:
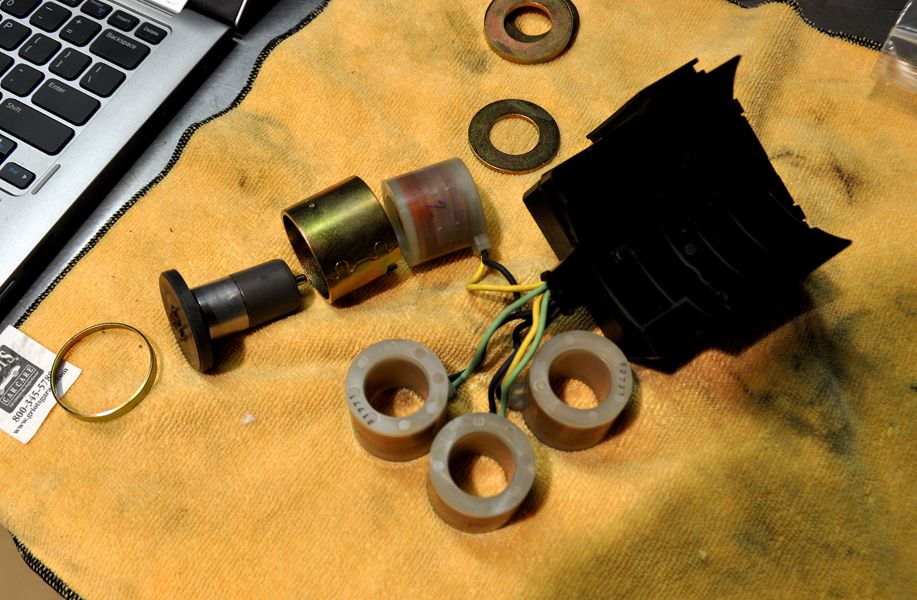
Next install the really small O-rings into the top half of the pump. It is a good idea to place in the white plastic rings at the same time. Then press the pistons down into the holes through the O-rings:
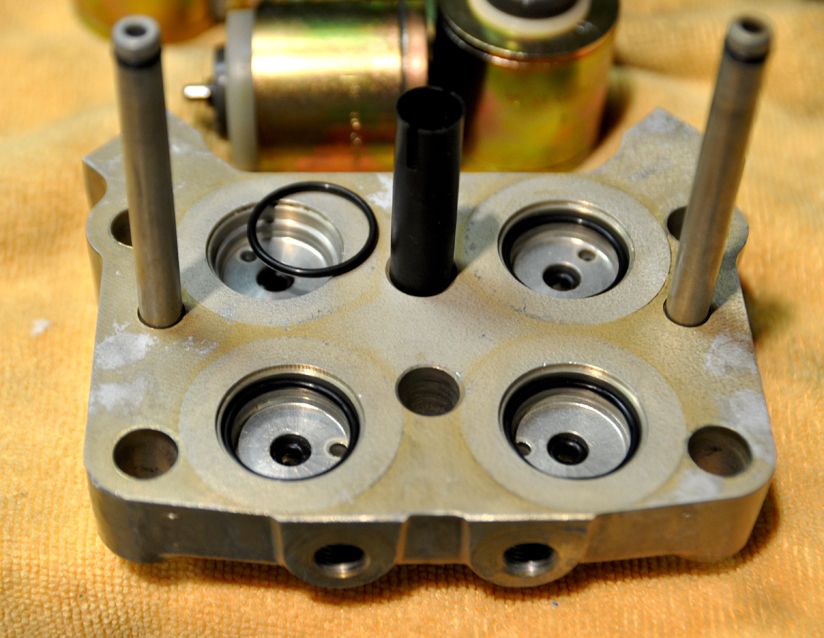
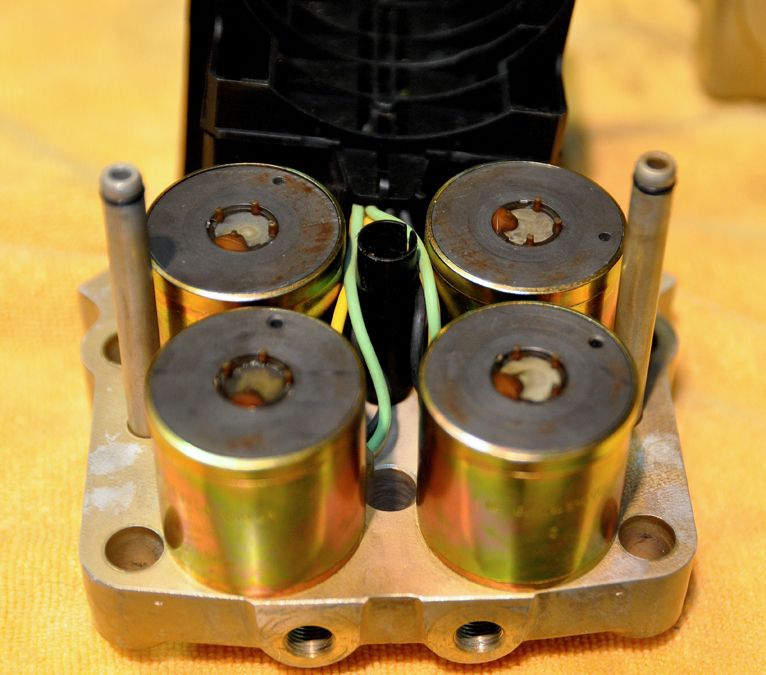
And don't forget the O-Ring gaskets on on the other half of the pump body:
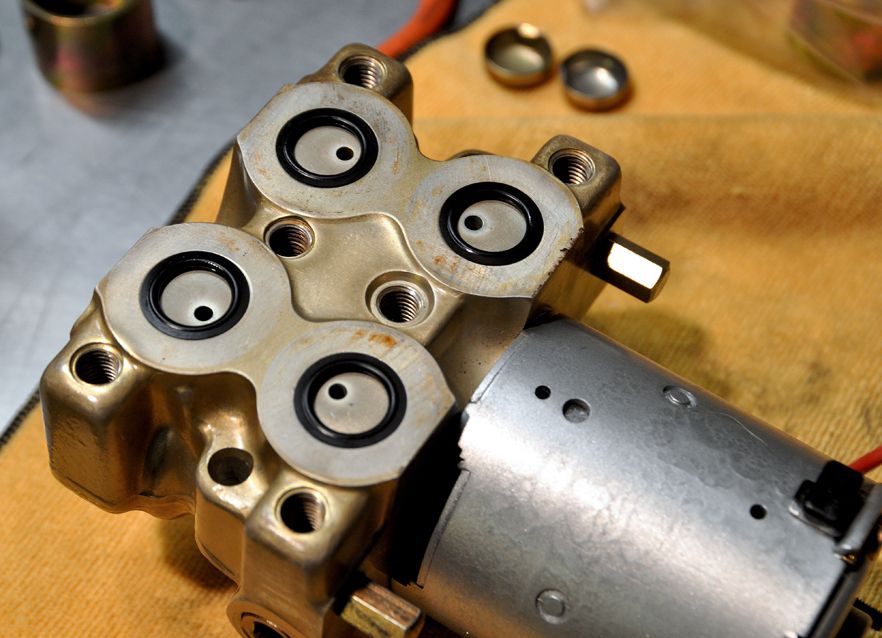
Set that aside and focus on getting the pump cylinder installed back into the pump body. Remember that small spring loaded piston and ball bearing that pumps up inside the shaft opening?
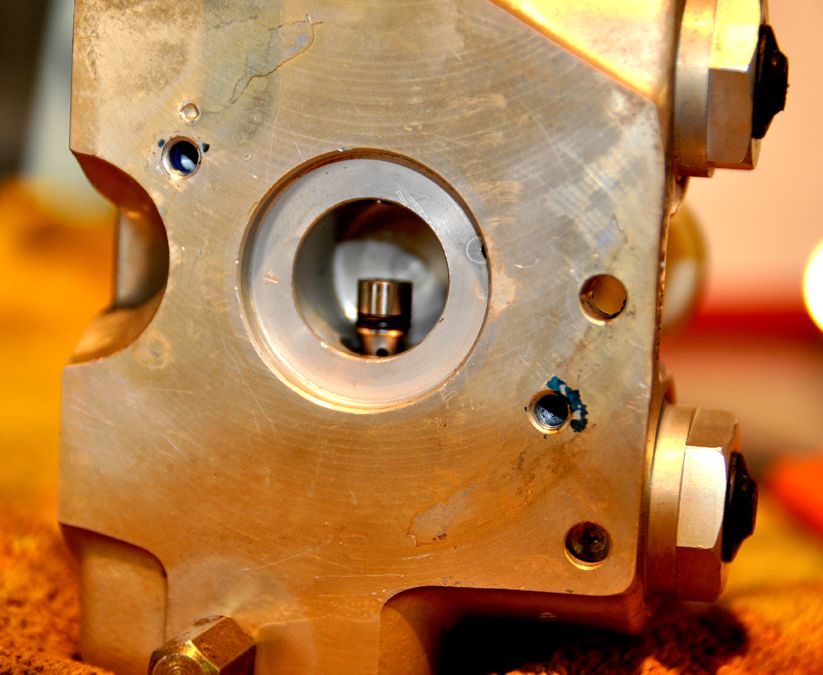
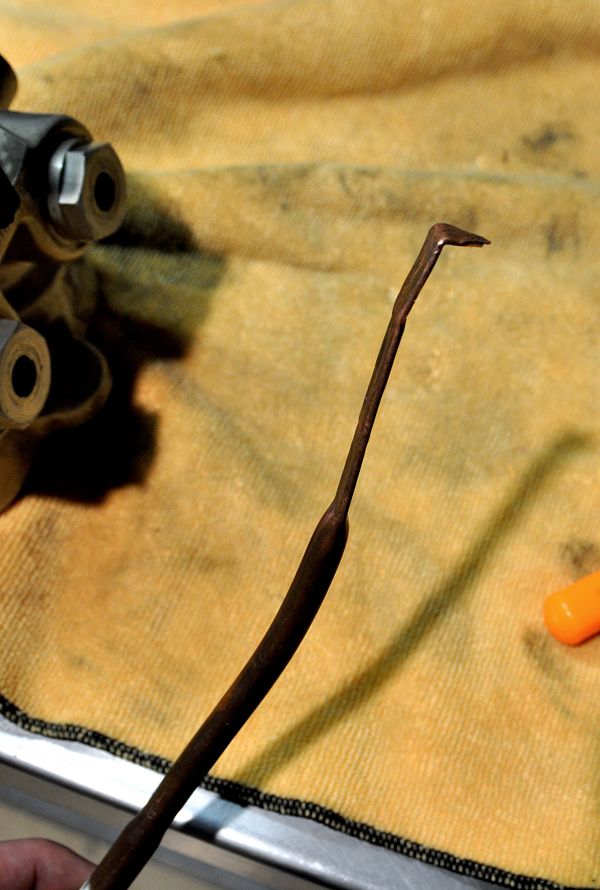
Now it was time to find a way to depress that little cylinder; turns out it is under quite a bit of pressure from the two springs. The cylinder has to be completely depressed in order to get the pump shaft into the hole. After some experimentation, I came up with modifying this piece of copper pipe by cutting the end into spiked tip and flattening and bending the tip:
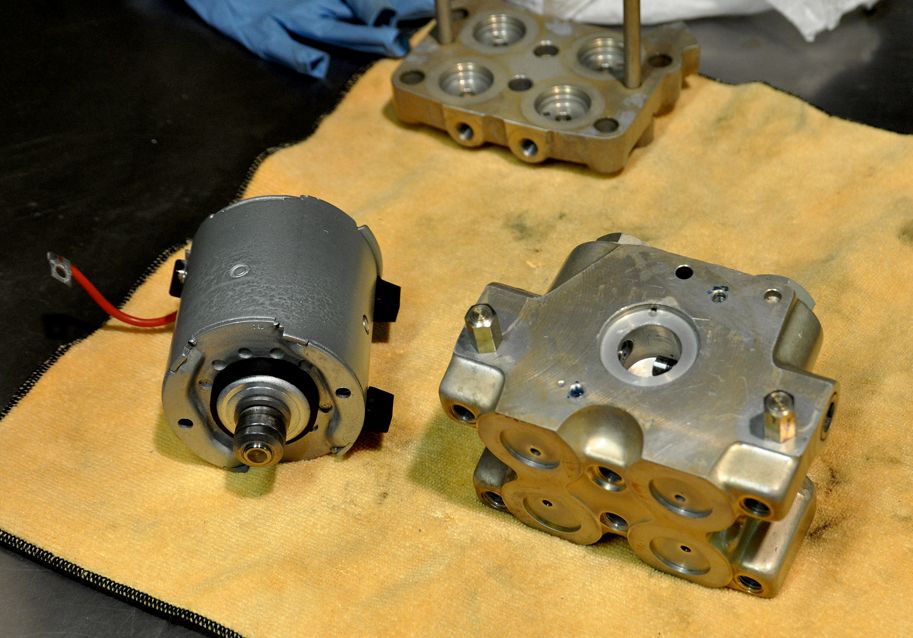
It took a bit but it worked. Kind of needed a third hand at times, but I eventually slipped the pump shaft down past the cylinder. (Okay it took several attempts where that little cylinder popped out and I had to chase the spring and ball bearing across the bench). To keep from losing your progress once you get them together, quickly install the two long case screws through the pump and into the pump body to lock them together:
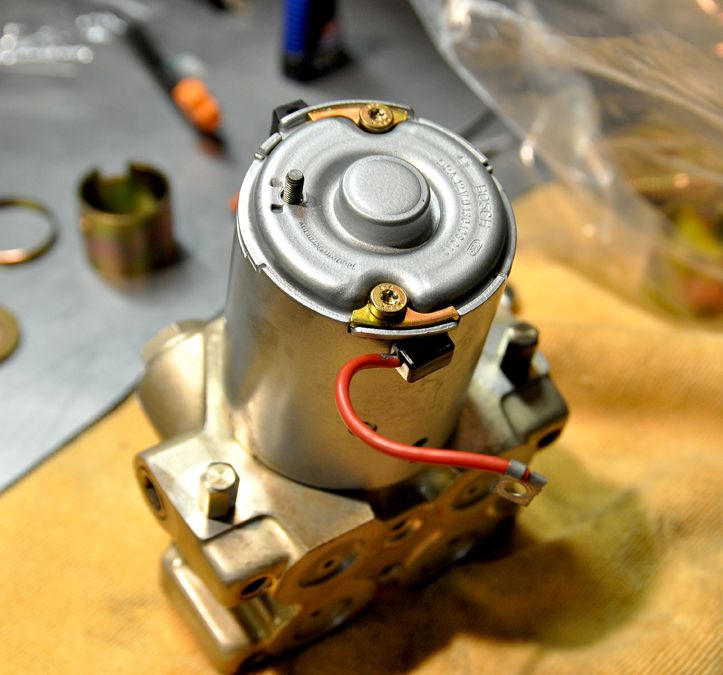
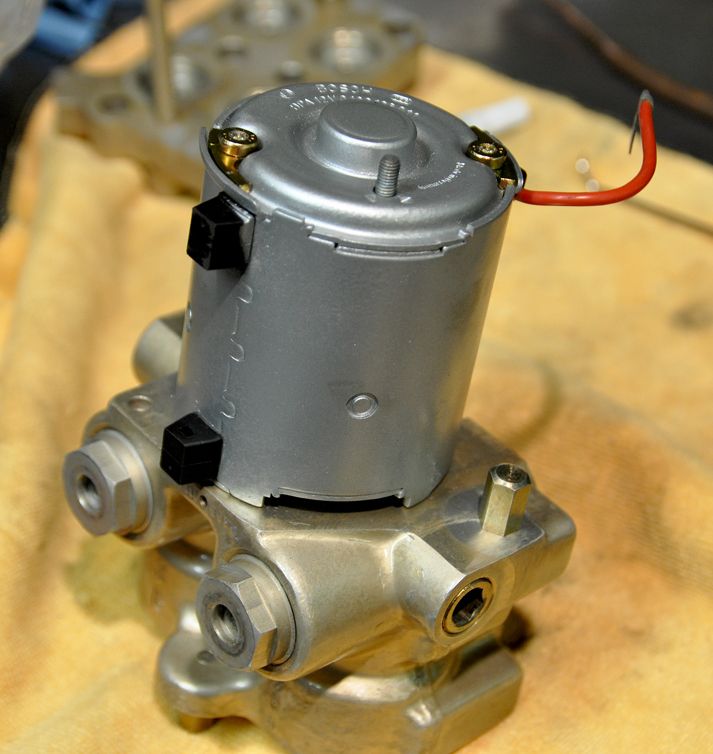
Then take the lower half of the pump body, flip it over and slip to the two pump body halves together. Careful to keep the pistons aligned and in place, press them together while making sure the wires are clear the case bolt holes. Install the six case screws with Loctite and tighten them down.
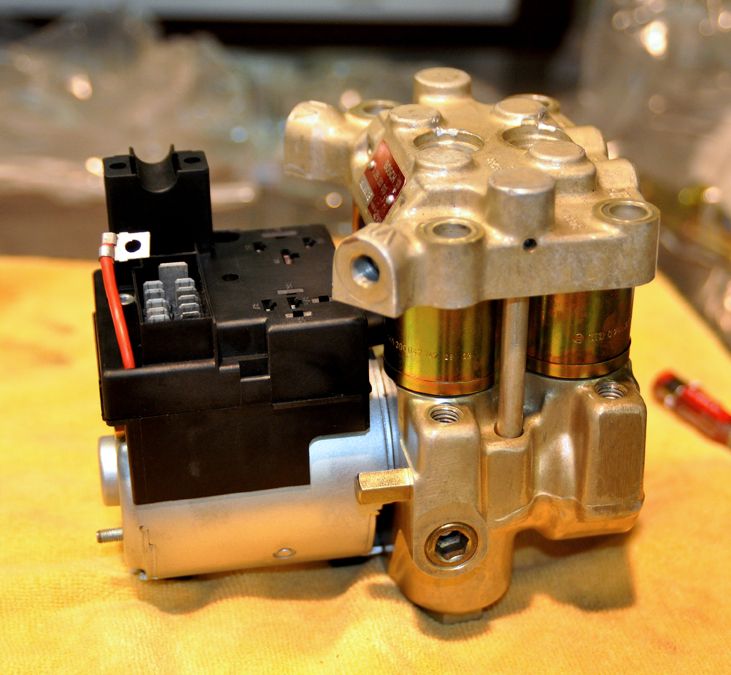
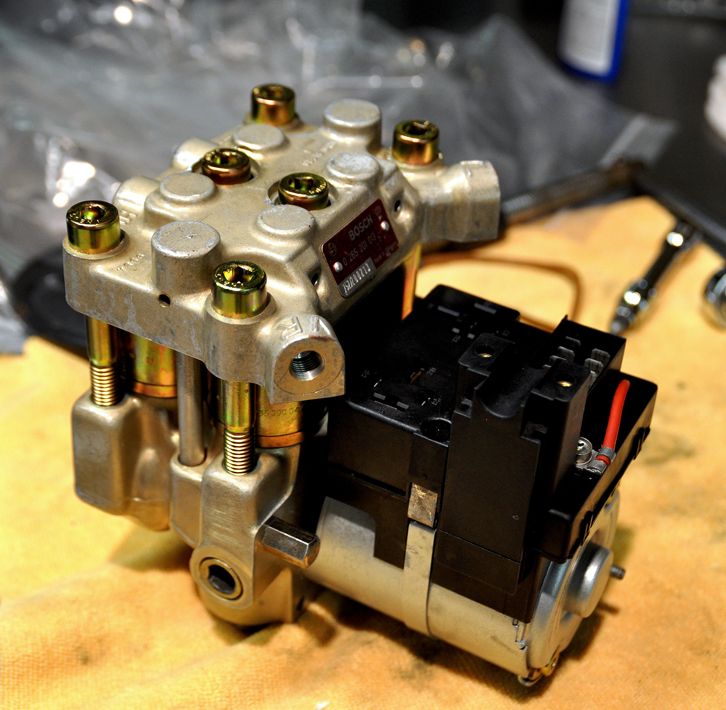
Now install the band clamp around the pump cylinder to connect the electrical Fuse Block and pump together. I had to employ C-clamp to squeeze the connector on the end of the band clamp into the Fuse Block (you could use another set of hands to do the same thing if available). Remember to feed the red power wire up through the back slot in the Fuse Block.
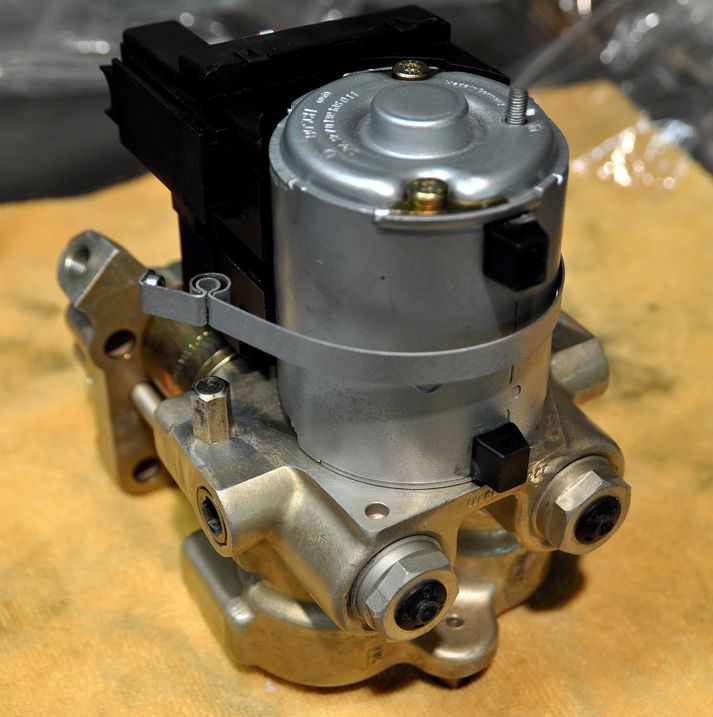
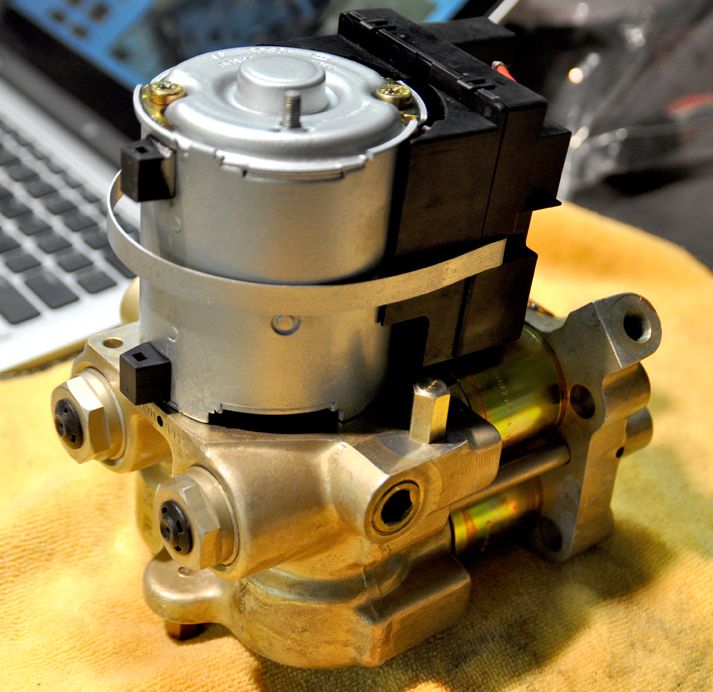
Now you are done with reassembly and ready to install it back into the Engine Bay:
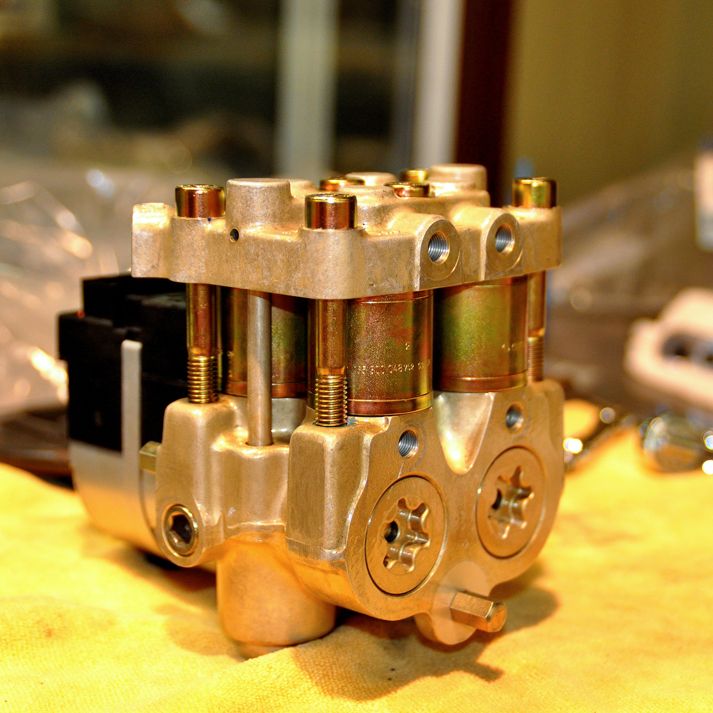
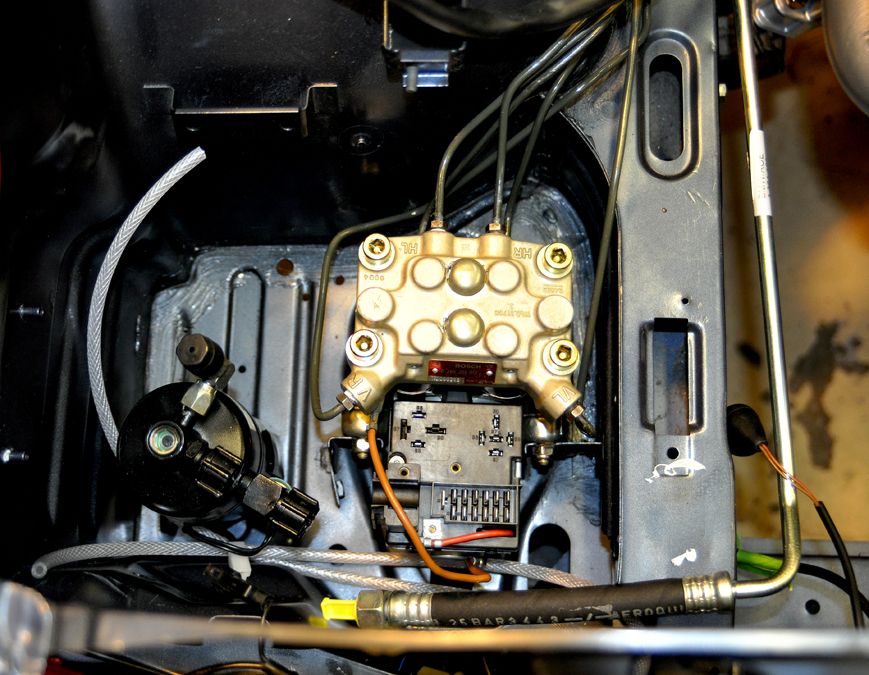
Set the ABS Pump into the front fender well, secure it down to mounting points and start reconnecting the Brake Lines back into the pump. This time I was sure not to cross-thread the lines:
BRAKE SYSTEM:
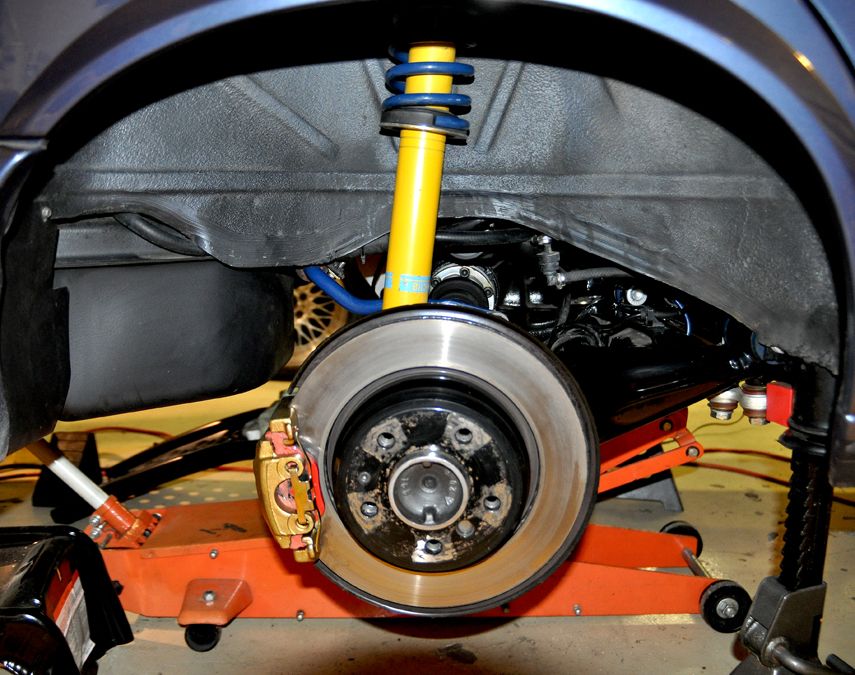
Not a whole lot here except installing the Rear Brake Calipers (after I cleaned the rear wheel wells, of course). I finished out the Front Calipers also (Anti-Rattle Clips) as well as installing all the UUC Stainless Steel Brake Lines:
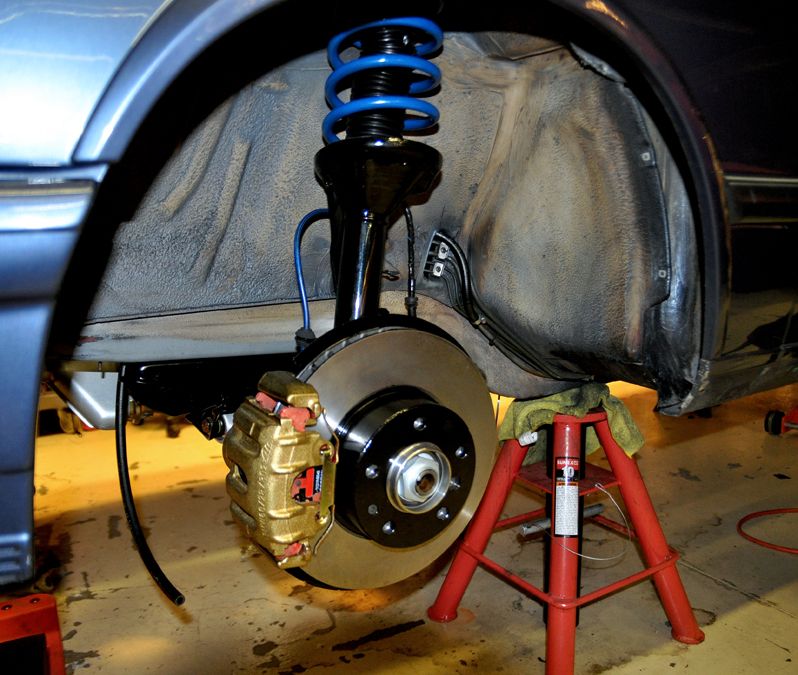
That closed up the Hydraulic and Brake System. All that is left is to fill and bleed everything.
Next week is on to Fuel and Electrical.
Sometimes updating this thread takes as much effort as the actual work itself. But it is therapeutic and I enjoy relating my experiences in hopes that it helps others.
The work is progressing hot and heavy (finally) as I am checking off systems. This past weekend I was focused on finalizing one system:
HYDRAULIC SYSTEM:
It was time to install the last of the components in hopes to get the system closed up, starting with the Power Steering Pump. The pump has been sitting on a shelf since I assembled it last month along with a box full of hoses and High Pressure Lines. First up was installing the PSP onto the bottom of the Alternator Bracket, along with all new hardware & components:


Then it was hooking up the High Pressure Hoses from the Accumulator (Bomb), Fluid Reservoir, Steering Gear Box, and the Cooling Lines. The Accumulator and one of the lines went in a while back as well as the Cooling Lines. A certain amount of the hoses went in previously also:


One or two of the High Pressure Lines were new from BMW but I bought three that Antony (buzzbomb) had remade with new hoses and crimped ends with some recycled fittings. I couldn’t control the process otherwise I would have had the fittings and hard pipes re-plated to match the orginals. But these look well made so I’m not complaining. Besides, they will likely be a damned sight better than the 30 year old leaking versions they replaced.

I also completed the installation of the Hydraulic Fluid Cooling loop by installing the hard pipe loop in the front nose. The hardest part of the whole procedure was connecting the loop and the two hard return and supply pipes that are bolted to the frame rail together with small sections of hoses. The two lengths of 12x18mm hose are only about 2” long but it is a bit of challenge getting them on there with the hose clamps while crammed up against the front nose frame.


(Sorry, thought I had photos of the Cooler loop in the nose; I will take a few pics of it next weekend showing those blessed little hose sections)
With that done I went ahead and closed up a few loose ends namely the Brake Fluid Reservoir and Oil Filter Housing. I wasn’t planning on installing the latter, but I kind of had to in order to figure out the alignment of the High Pressure Supply Line to the PSP. I will save hooking up the Oil Cooler Lines to the Oil Filter Head until after the Alternator goes in.

ABS PUMP REBUILD:
With all that done, I returned reassembling the ABS Pump that I had left half done so I could get the Engine and Transmission installed. So I had all the parts cleaned and a few items re-plated. Turns out they could not re-plate the pump body itself; the plating process involves flowing the zinc coating through all the openings to get to all the surfaces. Since the two halves of the pump body of are sealed with small channels through them, they wouldn’t be able to do the plating process correctly. So my compromise was to clean the pump body and seal it.
Reassembly was a simple reverse process of the tear-down:
First reassemble each of the four pistons:

Next install the really small O-rings into the top half of the pump. It is a good idea to place in the white plastic rings at the same time. Then press the pistons down into the holes through the O-rings:


And don't forget the O-Ring gaskets on on the other half of the pump body:

Set that aside and focus on getting the pump cylinder installed back into the pump body. Remember that small spring loaded piston and ball bearing that pumps up inside the shaft opening?

Now it was time to find a way to depress that little cylinder; turns out it is under quite a bit of pressure from the two springs. The cylinder has to be completely depressed in order to get the pump shaft into the hole. After some experimentation, I came up with modifying this piece of copper pipe by cutting the end into spiked tip and flattening and bending the tip:


It took a bit but it worked. Kind of needed a third hand at times, but I eventually slipped the pump shaft down past the cylinder. (Okay it took several attempts where that little cylinder popped out and I had to chase the spring and ball bearing across the bench). To keep from losing your progress once you get them together, quickly install the two long case screws through the pump and into the pump body to lock them together:


Then take the lower half of the pump body, flip it over and slip to the two pump body halves together. Careful to keep the pistons aligned and in place, press them together while making sure the wires are clear the case bolt holes. Install the six case screws with Loctite and tighten them down.


Now install the band clamp around the pump cylinder to connect the electrical Fuse Block and pump together. I had to employ C-clamp to squeeze the connector on the end of the band clamp into the Fuse Block (you could use another set of hands to do the same thing if available). Remember to feed the red power wire up through the back slot in the Fuse Block.


Now you are done with reassembly and ready to install it back into the Engine Bay:

Set the ABS Pump into the front fender well, secure it down to mounting points and start reconnecting the Brake Lines back into the pump. This time I was sure not to cross-thread the lines:

BRAKE SYSTEM:
Not a whole lot here except installing the Rear Brake Calipers (after I cleaned the rear wheel wells, of course). I finished out the Front Calipers also (Anti-Rattle Clips) as well as installing all the UUC Stainless Steel Brake Lines:


That closed up the Hydraulic and Brake System. All that is left is to fill and bleed everything.
Next week is on to Fuel and Electrical.
Re: 1985 Arktisblau M535i Renovation - New Year's Update
It is therapeutic for me ass well. And I know the ABS stuff will help me. Don't stop, please.vinceg101 wrote:But it is therapeutic and I enjoy relating my experiences in hopes that it helps others.
-
maybeillbuyit
- Posts: 535
- Joined: Feb 01, 2014 12:00 PM
- Location: Vancouver BC
Re: 1985 Arktisblau M535i Renovation - New Year's Update
This is really great. I love ZINC
-
stuartinmn
- Posts: 9472
- Joined: Feb 12, 2006 12:00 PM
- Location: Minneapolis
Re: 1985 Arktisblau M535i Renovation - New Year's Update
It's always interesting to me how grey market cars were Federalized by the different companies back then - each one had their own methods. On my M535i, I only discovered a couple years ago that while there was a Johnson Box installed, it apparently had never actually been connected to anything - the wires from the box were just run up inside the factory harness, with the unconnected ends hidden from view, so it that it looked legitimate. I'm not sure how it passed emissions testing back then, but somehow it must have.vinceg101 wrote:Weekend Update: Saturday 1/7 & Sunday 1/8:
Johnson Box care of Valentine Research (yes the very same guy that brings you radar detectors):
We were hoping that when they Federalized the car they merely spliced the J-Box into directly into the ECU so we could just keep the whole assembly intact and store it for the future (I have a spare 061 ECU so this was an ideal plan). But they didn’t. Instead they spliced the 8 wires from the Valentine into the Main Wire Harness Connector at the ECU, cutting many very short in the process:
Re: 1985 Arktisblau M535i Renovation - New Year's Update
Ralph and I were really hoping to find the shortcuts that so many people have mentioned, but alas, whomever did this car actually knew what to do and followed through with it. With the exception of the Charcoal Canister; here they grabbed a Mercedes part off their shelf, hack-welded a mounting bracket onto the bracket next to the Fuse Box and then never connected the breather lines from the trunk. It was there for pure visuals. Come to think of it, their retrofit for the Turn Signals was pretty much a hack job too. So maybe I take that back, maybe the only guy who knew what he was doing was the guy in charge of the J-Box and O2 Sensor.stuartinmn wrote:It's always interesting to me how grey market cars were Federalized by the different companies back then - each one had their own methods. On my M535i, I only discovered a couple years ago that while there was a Johnson Box installed, it apparently had never actually been connected to anything - the wires from the box were just run up inside the factory harness, with the unconnected ends hidden from view, so it that it looked legitimate. I'm not sure how it passed emissions testing back then, but somehow it must have.vinceg101 wrote:Weekend Update: Saturday 1/7 & Sunday 1/8:
Johnson Box care of Valentine Research (yes the very same guy that brings you radar detectors):
We were hoping that when they Federalized the car they merely spliced the J-Box into directly into the ECU so we could just keep the whole assembly intact and store it for the future (I have a spare 061 ECU so this was an ideal plan). But they didn’t. Instead they spliced the 8 wires from the Valentine into the Main Wire Harness Connector at the ECU, cutting many very short in the process:
Re: 1985 Arktisblau M535i Renovation - New Year's Update
How the hell did I miss this thread!?!?
I'm stunned! You and I are gonna talk in March dude.
It better be driving down to Sandyeggo on it's own!
I'm stunned! You and I are gonna talk in March dude.
It better be driving down to Sandyeggo on it's own!
Re: 1985 Arktisblau M535i Renovation - New Year's Update
Indeed, how did you?ovide wrote:How the hell did I miss this thread!?!?
I'm stunned! You and I are gonna talk in March dude.
It better be driving down to Sandyeggo on it's own!
I always look forward to our talks. Don't forget my other Turn Signal; we can make it the final piece of the puzzle right their in Darin's driveway.
Well, that certainly is the plan. I have been punching down dates in the calendar and it looks like the revised Road Test date is 2/25/17. Maybe a week earlier if the sequence of things goes my way.
-
Adam W in MN
- Posts: 5053
- Joined: Feb 12, 2006 12:00 PM
- Location: Don't waste my motherf***in' time!
- Contact:
Re: 1985 Arktisblau M535i Renovation - New Year's Update
This is like watching the James May "Reassembler" videos.
Re: 1985 Arktisblau M535i Renovation - New Year's Update
I will wrench along with you on the driveway with a nice cocktail on the porch!vinceg101 wrote:Indeed, how did you?ovide wrote:How the hell did I miss this thread!?!?
I'm stunned! You and I are gonna talk in March dude.
It better be driving down to Sandyeggo on it's own!
I always look forward to our talks. Don't forget my other Turn Signal; we can make it the final piece of the puzzle right their in Darin's driveway.
Well, that certainly is the plan. I have been punching down dates in the calendar and it looks like the revised Road Test date is 2/25/17. Maybe a week earlier if the sequence of things goes my way.
You need this calender to punch down your dates!
Re: 1985 Arktisblau M535i Renovation - New Year's Update
I'm wondering the same thing! Just spent a couple hours of my Saturday night reading through all of it; lots of great info!ovide wrote:How the hell did I miss this thread!?!?
Awesome job on that hydraulic system! That was one of the things that annoyed me most about my e32 735i; the hydraulics had been leaking for years, and the oil & grime that had accumulated on the bronzit paint was pretty disgusting. Always meant to clean that up and replace/fix what was leaking, but...
I've always wondered what kind of magic gadgetry was inside an ABS box. I can't help but wonder though that there would be an easier way to get that pump cylinder back into the pump body. I also can't help but wonder if there is a screw holding the spring & whatnot in place, and that funny little round thing on the side looks like it might be doing something... I'd bet the factory assembly process was much smoother.
In this pic it looks like that is right in line with it. Of course, if it is a screw, you'd need some funky Bosch special tool to do the job, or hack one together.

Re: 1985 Arktisblau M535i Renovation - New Year's Update
davintosh wrote:I'm wondering the same thing! Just spent a couple hours of my Saturday night reading through all of it; lots of great info!ovide wrote:How the hell did I miss this thread!?!?
Awesome job on that hydraulic system! That was one of the things that annoyed me most about my e32 735i; the hydraulics had been leaking for years, and the oil & grime that had accumulated on the bronzit paint was pretty disgusting. Always meant to clean that up and replace/fix what was leaking, but...
I've always wondered what kind of magic gadgetry was inside an ABS box. I can't help but wonder though that there would be an easier way to get that pump cylinder back into the pump body. I also can't help but wonder if there is a screw holding the spring & whatnot in place, and that funny little round thing on the side looks like it might be doing something... I'd bet the factory assembly process was much smoother.
In this pic it looks like that is right in line with it. Of course, if it is a screw, you'd need some funky Bosch special tool to do the job, or hack one together.
D'OHHH! You are probably absolutely correct in that being the access port for that little do-dad. Sometimes you have to think logically as to how they built this stuff in the factory; of course the engineers came up with a way to put it together simply.
Leave it to me to totally overlook that little detail. But in my defense, I did try to back that screw out (it doesn't look it, but it is just a run-of-the-mill hex head screw) on the old unit and I ended up starting to strip it. Smartly I stopped and just let it be.
Re: 1985 Arktisblau M535i Renovation - New Year's Update
Hi Vince, first class work you're doing here. And thank you for documenting it so well, not a simple task. The power steering pump alone, giddyup!
Best of the new year to ya.
Best of the new year to ya.
Re: 1985 Arktisblau M535i Renovation - New Year's Update
Weekend Update: Saturday 1/21 & Sunday 1/22:
Progress is moving forward, this past weekend was about three systems:
-Fuel & Intake
-Alternator & ECU
-Driveshaft
Happy to report that I got them mostly checked off the list with a few straggling items, but those are easy enough to pick up along the way (just have to make a note of them and not forget them).
FUEL SYSTEM:
I had already installed the three 8x13 Fuel Hoses (Supply, Return and Vapor Canister) coming up through the Driver’s Wheel Well before the engine went in. So the real items to install were the Fuel Rail, Fuel Pressure Regulator Valve and Fuel Injectors; then it was a matter of connecting the Supply & Return Hoses to Rail and FPR and securing them in the engine bay.
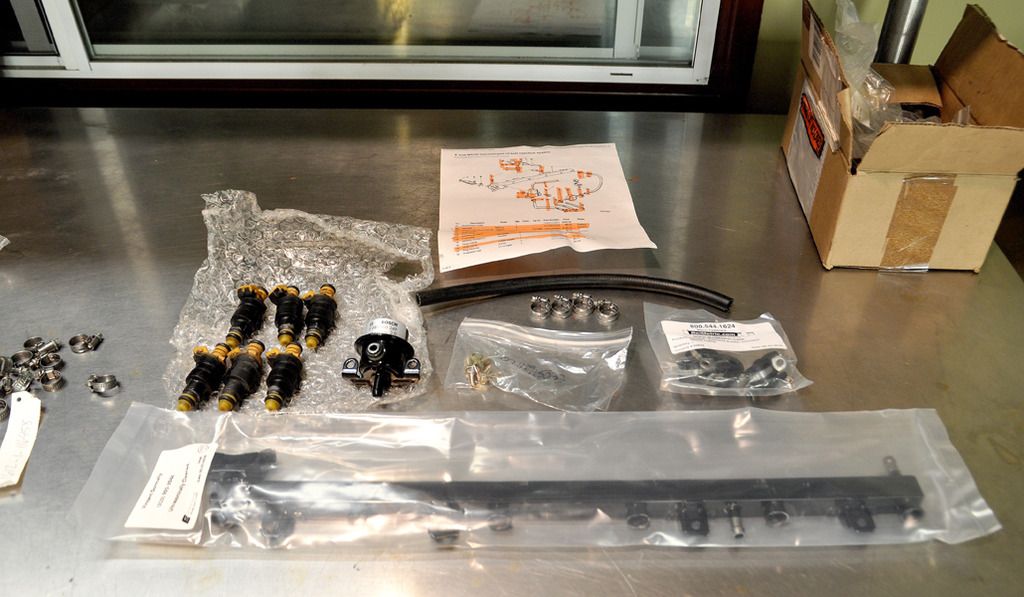
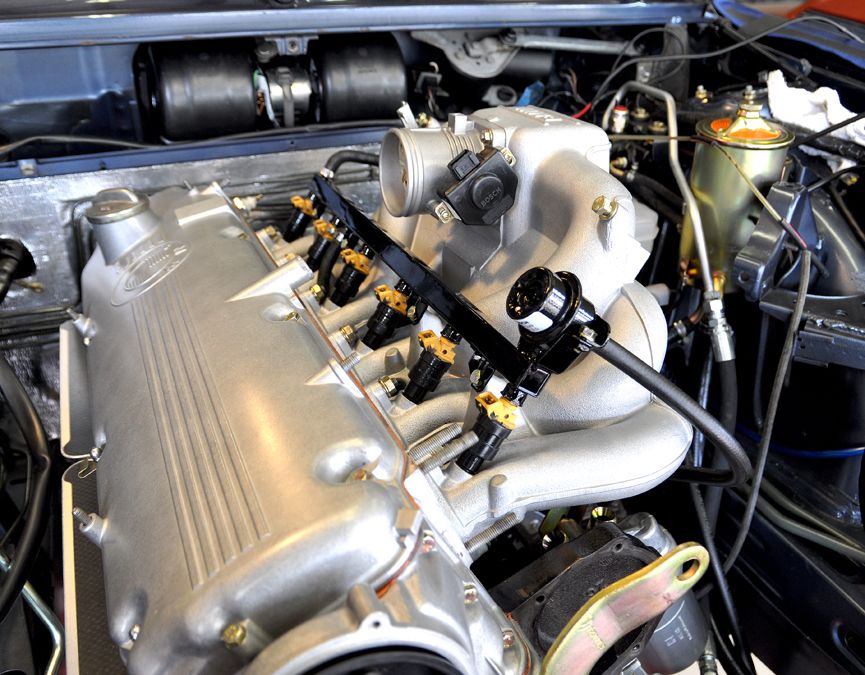
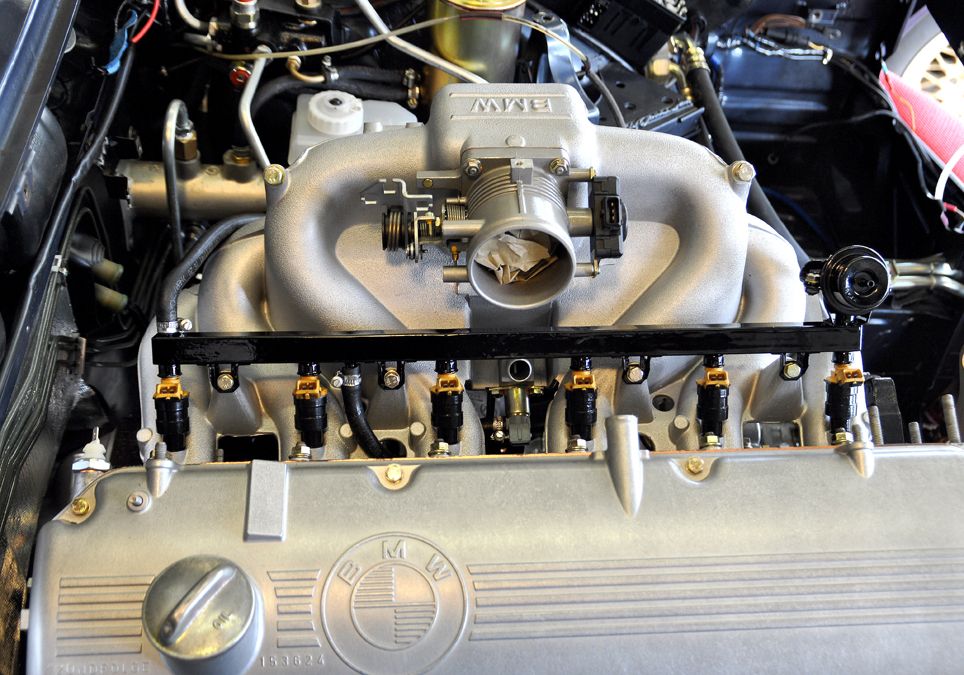
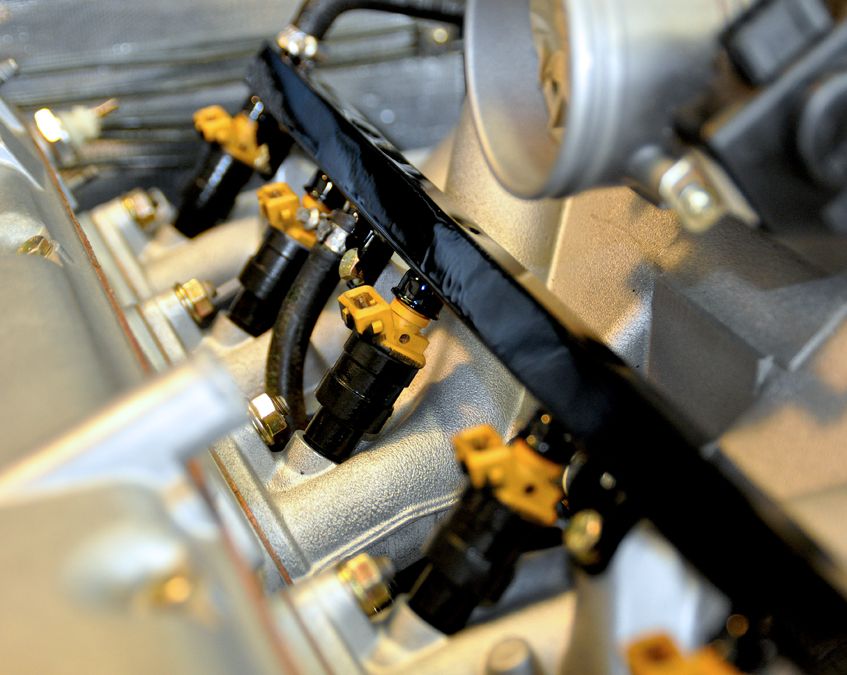
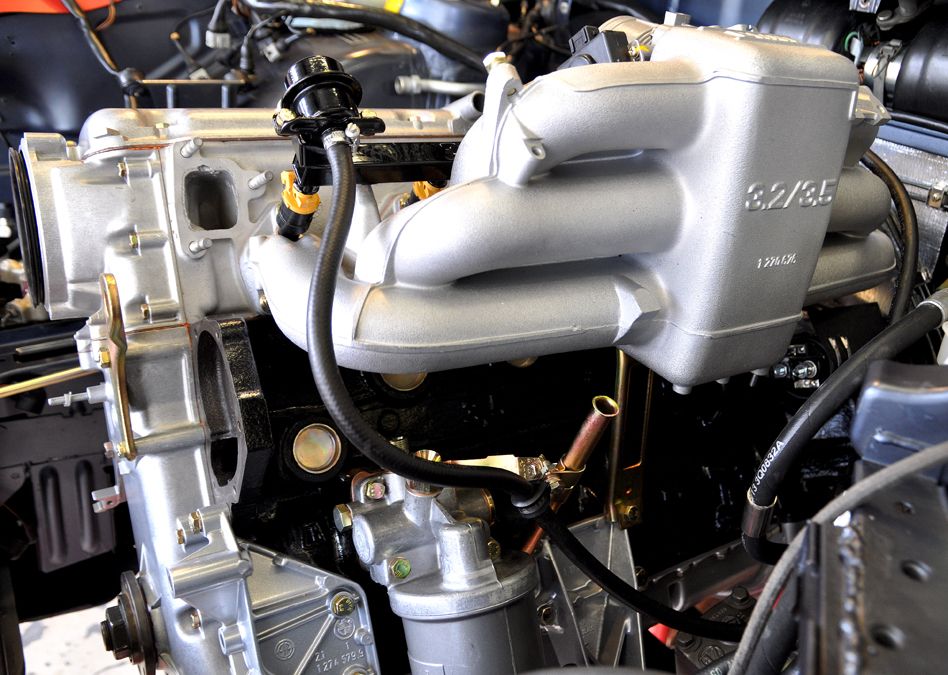
Since I have eliminated the Charcoal Canister from the Vapor Recovery System (in all honesty it wasn’t even attached or hasn’t been for some time), I will just terminate the Hose here in the engine bay. I’ll cut it short (+/-6”), turn it down and secure it off the fender. If I ever have to install it again, it is a simple connection and re-installation of a Canister.
I have also decided to return the FPR to the original stock Bosch 3.0 unit in lieu of re-installing the previous BMP Adjustable Fuel Regulator Valve. I had countless people ask me what the advantage of it was over the fixed Bosch unit and I honestly couldn’t come up with an answer. I’m sure there is one (or was one when it was originally installed), I just don’t know it; I’m sure someone out there can shed some light on it. [I don’t think I have promised it to anyone so the BMP is up for sale]
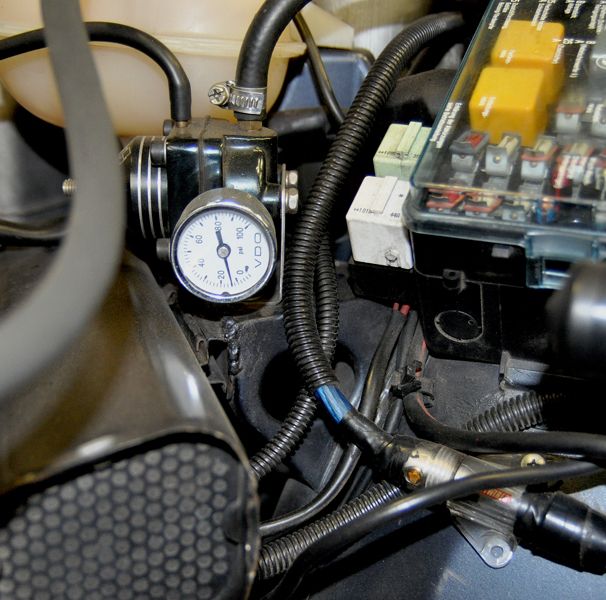
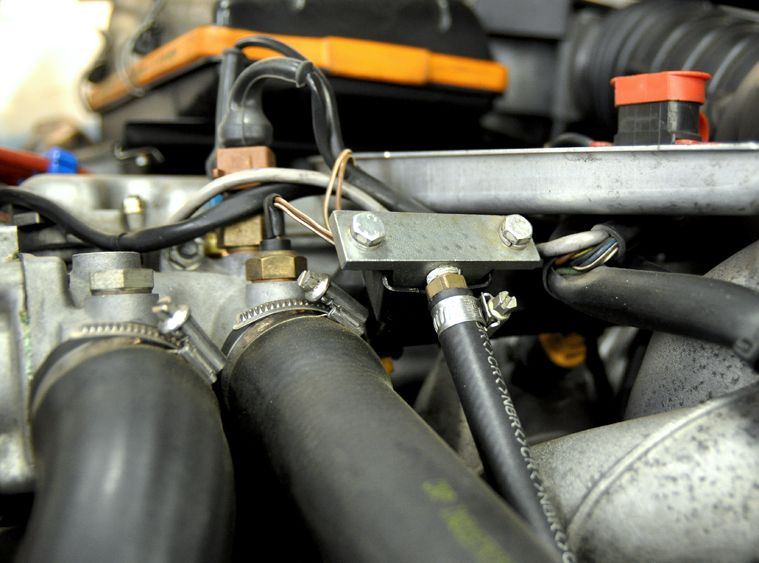
ELECTRICAL: ALTERNATOR & ECU
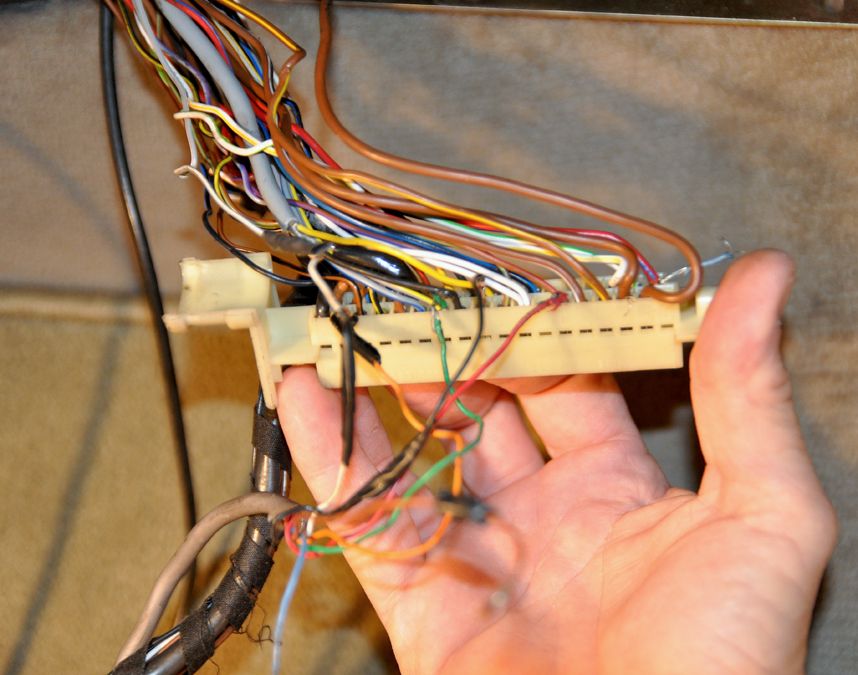
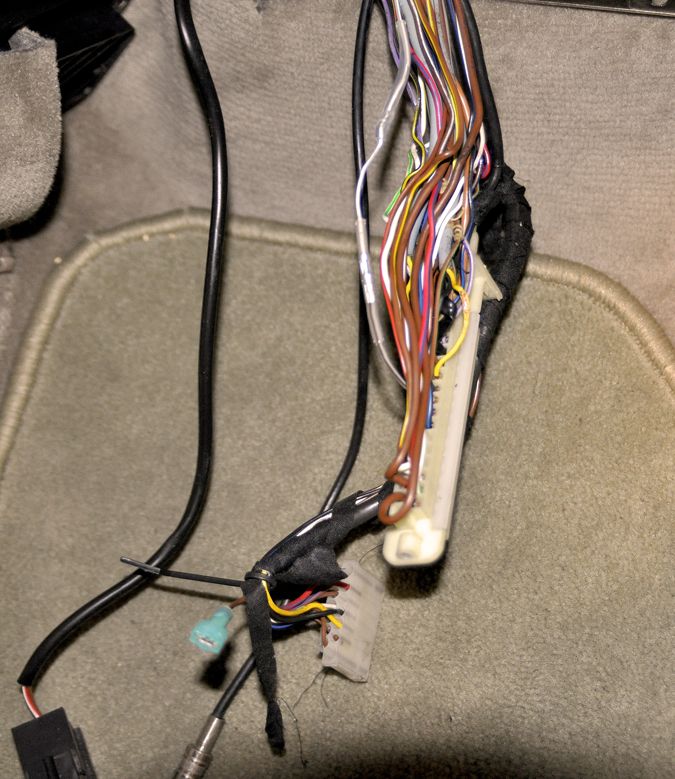
Ralph and I worked on getting the last of the Johnson Box and its’ wiring removed from the ECU Connector and Main Harness. Turned out it wasn’t as bad as we first assumed; there was only one wire they cut and spliced into, the rest of the wires from the J-Box were piggy-backed into the ECU connector slots. Ralph meticulously removed them (I knew buying that Terminal Pick kit was the right move) and then handed me the former J-Box wire harness like some screaming alien. Simple repairs to the existing Main Harness wiring, re-taping it all and we can button the whole connector back up and reinstall the ECU and put the Glove Box area back together. Before:
After:
Alternator:
With that handled, I put the Alternator on the bench for some cosmetic touches. I had some parts off of a donor plated (fan wheel and some washer/spacers) so I swapped those out with those that came with the remanufactured 130A unit. Also gave it a quick layer of clear coat heat resistant enamel.
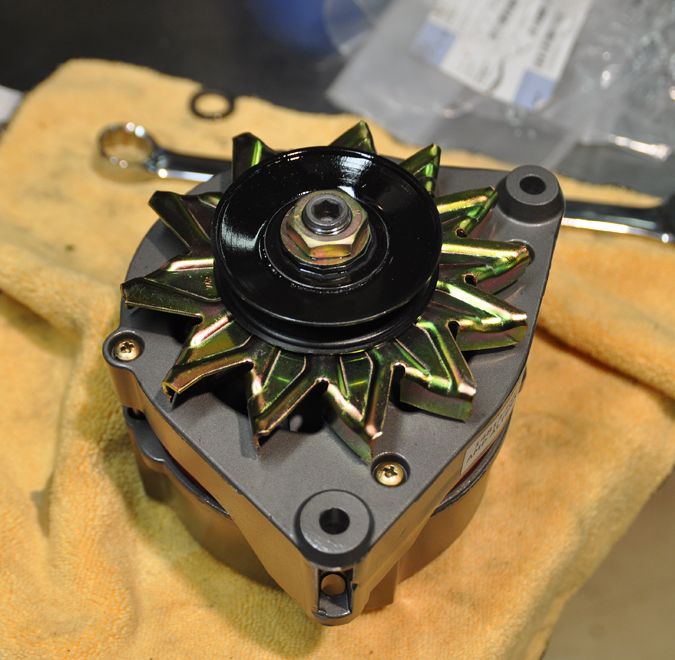
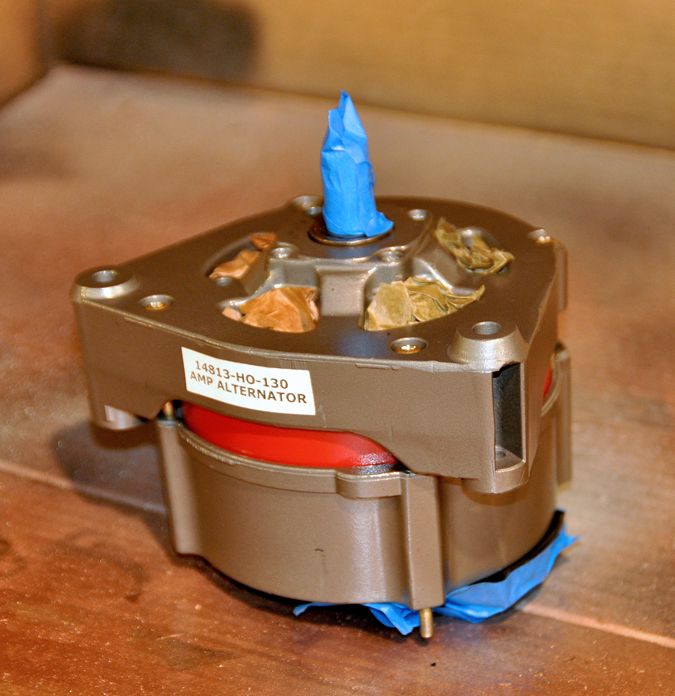
This is a later model AL-140X with the non-bushed mounts that matched the later Alternator Bracket. The later models do not require a separate ground strap wire as the unit is essentially grounded through the bracket and mounting bolts. This unit also utilizes the later U-shaped Adjusting Bracket instead of the single front bar type on the older units. This change should result in more stability and easier adjustments.
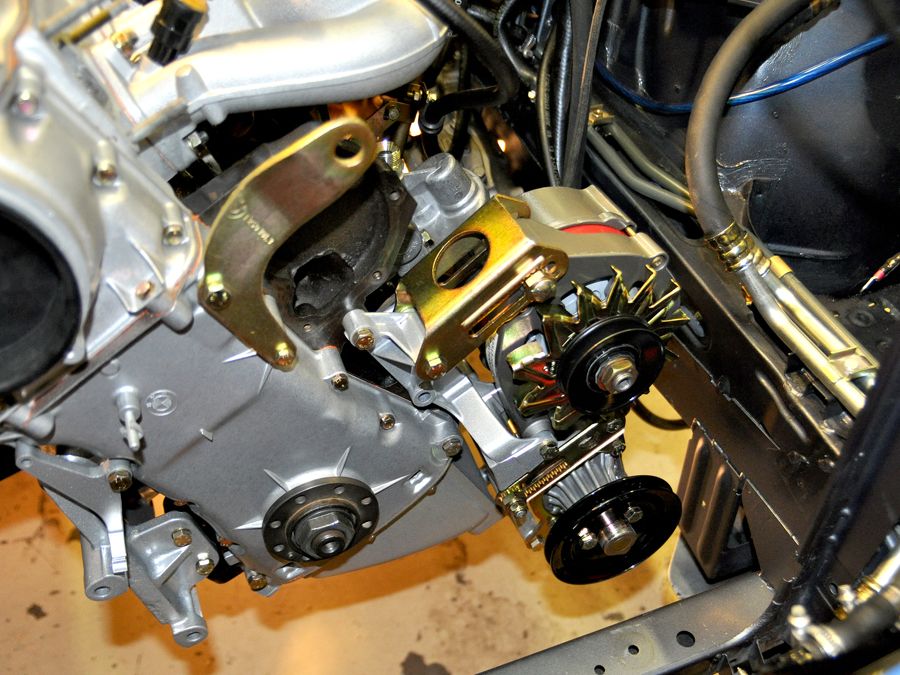
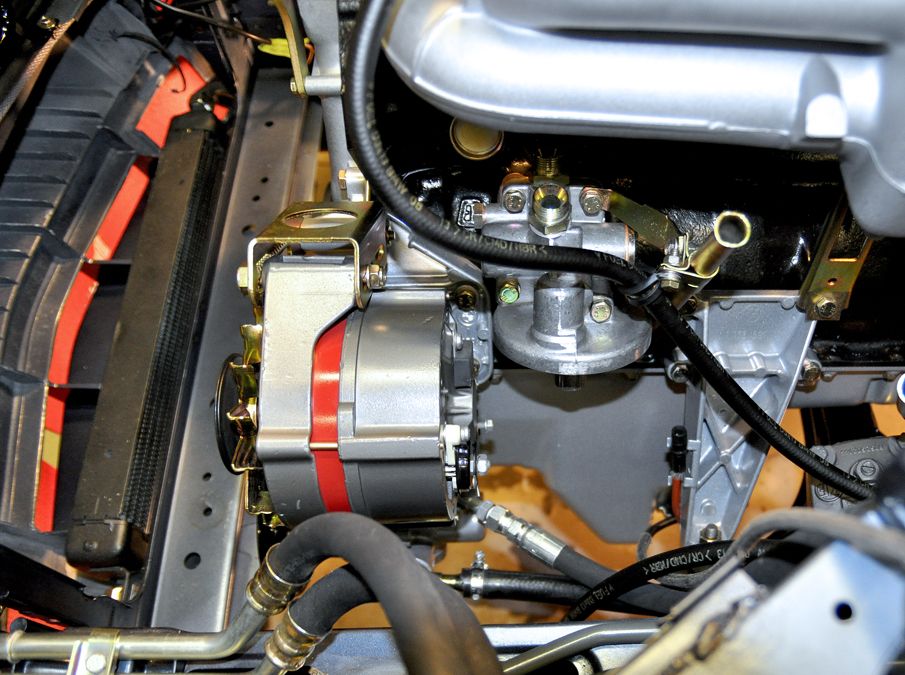
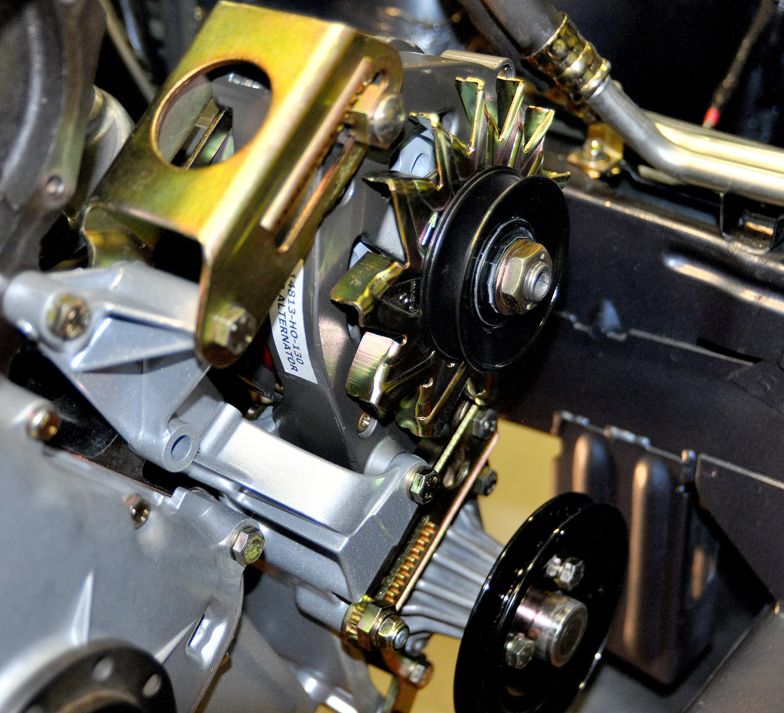
All that is left is to do the electrical connections and final adjustments after we get the pulleys and belts installed.
DRIVESHAFT:
All the missing components for the Driveshaft rebuild came in last week so Ralph and I embarked on putting it back together and installed into the car. The big push here is so I can get the car back down on the ground so we can final torque the Crank Hub Nut (Jesus Nut) and then get the Cooling System installed.
Not too many pictures here since both Ralph and I had our hands full wrestling the Dust Shields and Center Bearing into place. Suffice it to say, it all goes back together reverse of removal. The hardest part, which should have been the easiest, was getting the first Dust Shield squarely seated on the Spindle Shaft. Had we had a pipe that was the correct diameter to marry to the lip of the Shield, it would have been easier; but alas we did not so it was a struggle. It also put up a fight on the last ½” so we had to find a way to really drive it on without totally destroying it at the same time.
Once that was achieved we got the rest of the Center Bearing (cover & mount bracket) and other components installed. I re-painted the rest of the Driveshaft last week so it was ready for installation:
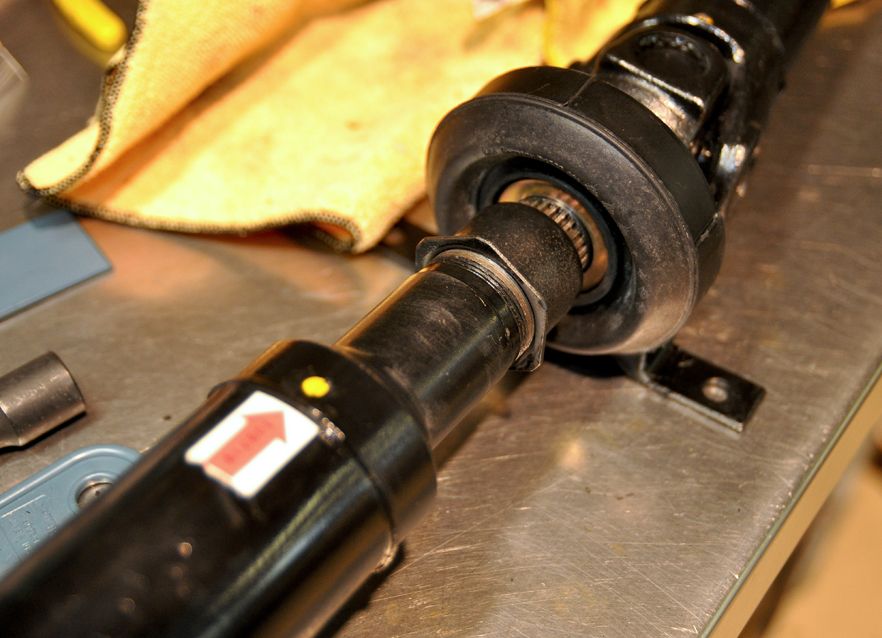
Installation:
With that done, we hopped under the car and lined up the Shaft for installation. Here is where we discovered that Jim Blanton likely forgot to install the three M10x55 bolts that face rearward to bolt into the Guibo on the back of the Transmission. Ralph refused to do what had been done previously and install all six bolts facing the front of the car. After some frustrating attempts at trying to slip those long bolts through the holes between the Input Shaft and Transmission case (futile), we then had to loosen the 30mm rear mounting nut on the Input Shaft to move that bracket out. That took a bit of work that only was achieved through pneumatics. Upside was I got to use both the Sanborn Compressor and my new Aircat 1150; nice combo that made short work of that nut.
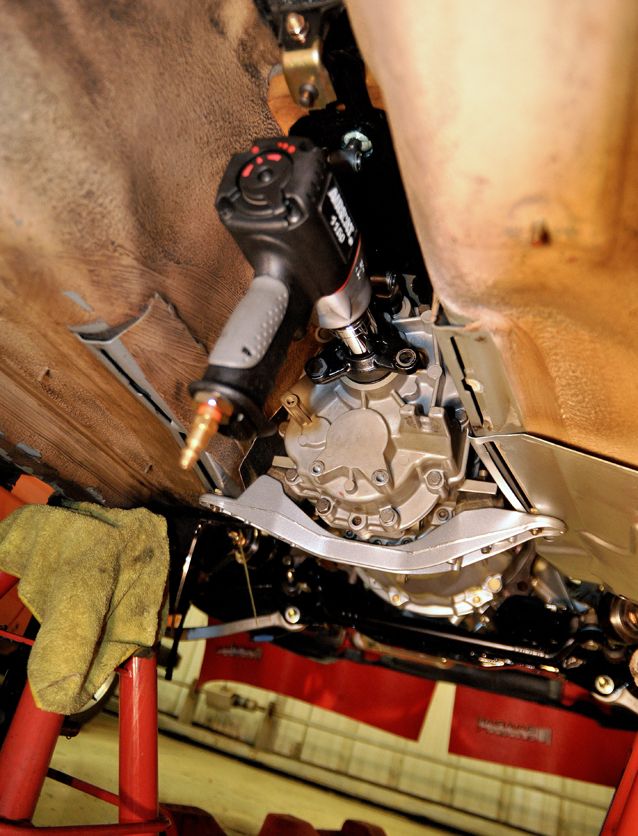
Now with those three in the correct orientation, we were back in business and got the shaft mounted front and back (Transmission and Differential). Realizing we didn’t have the correct thread pitched M10 hardened lock nuts, we had to forgo the final torque and Center Mount locking and setting in place. [Those nuts just arrived in today’s mail so we are good for Saturday for this procedure.]
GEAR SHIFT RE-VISITED:
I didn’t do anything here to what we did previously, only I realized that I had not taken any pictures of the Z3 Gear Shifter and Linkage installed. Thought I would take a few pictures of it before the DS gets finalized and the Heat Shield gets installed covering to the whole Magilla:
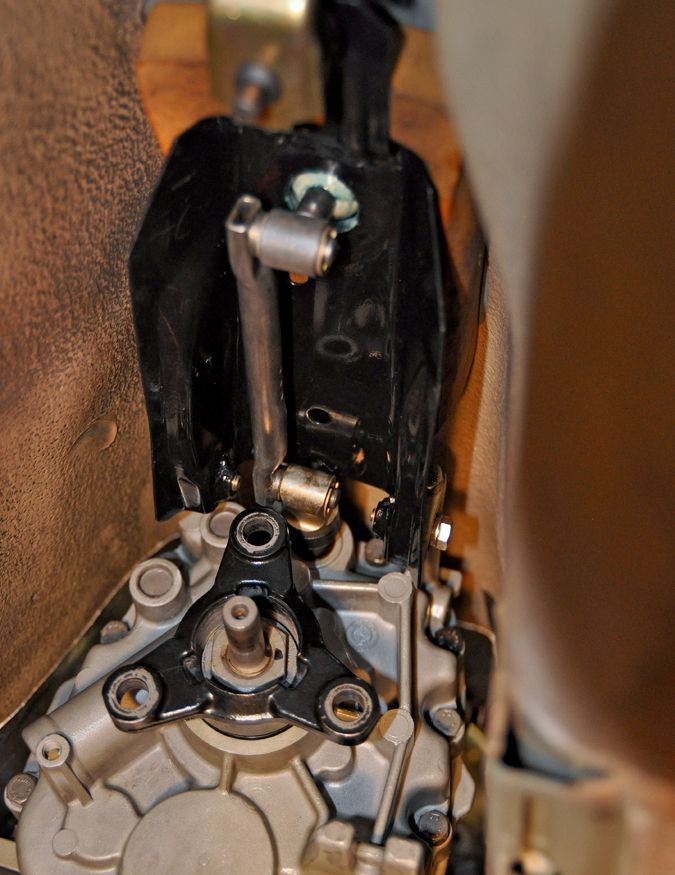
Ralph said I should mention that one critical upgrade everyone should do regarding Gear Shifters is to replace the stock older E28 Linkage (Gearshift Rod Joint in BMW parlance) with a newer E46 version. Someone had done this more recently in the cars’ past before I got it since this Transmission and Shift Kit went in around 1994 (unless this is an E36 unit?): Here are some examples for illustration:

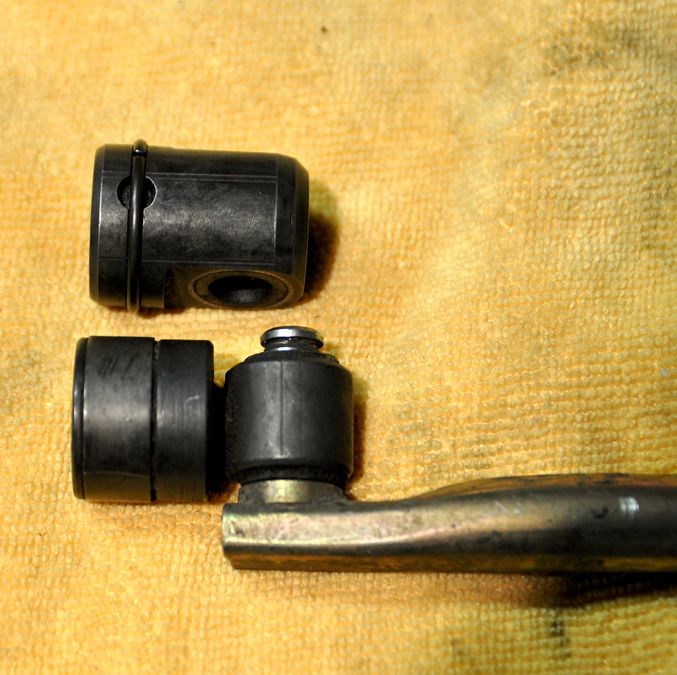
The newer unit has a solid body instead of the weaker smaller shaft style of the older one; the old ones were prone to shear off at the junction. Good upgrade.
HYDRAULIC SYSTEM RE-VISITED:
Specifically the Fluid Cooling Loop. I said I would return with some pictures of it installed so here you go:
Well, that was this weekend. Next weekend is A/C System and removing the exterior Door Trim so I can run them down to be refinished at Speedway next week.
Progress is moving forward, this past weekend was about three systems:
-Fuel & Intake
-Alternator & ECU
-Driveshaft
Happy to report that I got them mostly checked off the list with a few straggling items, but those are easy enough to pick up along the way (just have to make a note of them and not forget them).
FUEL SYSTEM:
I had already installed the three 8x13 Fuel Hoses (Supply, Return and Vapor Canister) coming up through the Driver’s Wheel Well before the engine went in. So the real items to install were the Fuel Rail, Fuel Pressure Regulator Valve and Fuel Injectors; then it was a matter of connecting the Supply & Return Hoses to Rail and FPR and securing them in the engine bay.


Since I have eliminated the Charcoal Canister from the Vapor Recovery System (in all honesty it wasn’t even attached or hasn’t been for some time), I will just terminate the Hose here in the engine bay. I’ll cut it short (+/-6”), turn it down and secure it off the fender. If I ever have to install it again, it is a simple connection and re-installation of a Canister.
I have also decided to return the FPR to the original stock Bosch 3.0 unit in lieu of re-installing the previous BMP Adjustable Fuel Regulator Valve. I had countless people ask me what the advantage of it was over the fixed Bosch unit and I honestly couldn’t come up with an answer. I’m sure there is one (or was one when it was originally installed), I just don’t know it; I’m sure someone out there can shed some light on it. [I don’t think I have promised it to anyone so the BMP is up for sale]


ELECTRICAL: ALTERNATOR & ECU
Ralph and I worked on getting the last of the Johnson Box and its’ wiring removed from the ECU Connector and Main Harness. Turned out it wasn’t as bad as we first assumed; there was only one wire they cut and spliced into, the rest of the wires from the J-Box were piggy-backed into the ECU connector slots. Ralph meticulously removed them (I knew buying that Terminal Pick kit was the right move) and then handed me the former J-Box wire harness like some screaming alien. Simple repairs to the existing Main Harness wiring, re-taping it all and we can button the whole connector back up and reinstall the ECU and put the Glove Box area back together. Before:

After:

Alternator:
With that handled, I put the Alternator on the bench for some cosmetic touches. I had some parts off of a donor plated (fan wheel and some washer/spacers) so I swapped those out with those that came with the remanufactured 130A unit. Also gave it a quick layer of clear coat heat resistant enamel.


This is a later model AL-140X with the non-bushed mounts that matched the later Alternator Bracket. The later models do not require a separate ground strap wire as the unit is essentially grounded through the bracket and mounting bolts. This unit also utilizes the later U-shaped Adjusting Bracket instead of the single front bar type on the older units. This change should result in more stability and easier adjustments.


All that is left is to do the electrical connections and final adjustments after we get the pulleys and belts installed.
DRIVESHAFT:
All the missing components for the Driveshaft rebuild came in last week so Ralph and I embarked on putting it back together and installed into the car. The big push here is so I can get the car back down on the ground so we can final torque the Crank Hub Nut (Jesus Nut) and then get the Cooling System installed.
Not too many pictures here since both Ralph and I had our hands full wrestling the Dust Shields and Center Bearing into place. Suffice it to say, it all goes back together reverse of removal. The hardest part, which should have been the easiest, was getting the first Dust Shield squarely seated on the Spindle Shaft. Had we had a pipe that was the correct diameter to marry to the lip of the Shield, it would have been easier; but alas we did not so it was a struggle. It also put up a fight on the last ½” so we had to find a way to really drive it on without totally destroying it at the same time.
Once that was achieved we got the rest of the Center Bearing (cover & mount bracket) and other components installed. I re-painted the rest of the Driveshaft last week so it was ready for installation:

Installation:
With that done, we hopped under the car and lined up the Shaft for installation. Here is where we discovered that Jim Blanton likely forgot to install the three M10x55 bolts that face rearward to bolt into the Guibo on the back of the Transmission. Ralph refused to do what had been done previously and install all six bolts facing the front of the car. After some frustrating attempts at trying to slip those long bolts through the holes between the Input Shaft and Transmission case (futile), we then had to loosen the 30mm rear mounting nut on the Input Shaft to move that bracket out. That took a bit of work that only was achieved through pneumatics. Upside was I got to use both the Sanborn Compressor and my new Aircat 1150; nice combo that made short work of that nut.

Now with those three in the correct orientation, we were back in business and got the shaft mounted front and back (Transmission and Differential). Realizing we didn’t have the correct thread pitched M10 hardened lock nuts, we had to forgo the final torque and Center Mount locking and setting in place. [Those nuts just arrived in today’s mail so we are good for Saturday for this procedure.]
GEAR SHIFT RE-VISITED:
I didn’t do anything here to what we did previously, only I realized that I had not taken any pictures of the Z3 Gear Shifter and Linkage installed. Thought I would take a few pictures of it before the DS gets finalized and the Heat Shield gets installed covering to the whole Magilla:

Ralph said I should mention that one critical upgrade everyone should do regarding Gear Shifters is to replace the stock older E28 Linkage (Gearshift Rod Joint in BMW parlance) with a newer E46 version. Someone had done this more recently in the cars’ past before I got it since this Transmission and Shift Kit went in around 1994 (unless this is an E36 unit?): Here are some examples for illustration:


The newer unit has a solid body instead of the weaker smaller shaft style of the older one; the old ones were prone to shear off at the junction. Good upgrade.
HYDRAULIC SYSTEM RE-VISITED:
Specifically the Fluid Cooling Loop. I said I would return with some pictures of it installed so here you go:


Well, that was this weekend. Next weekend is A/C System and removing the exterior Door Trim so I can run them down to be refinished at Speedway next week.
Last edited by vinceg101 on Jan 25, 2017 8:17 PM, edited 1 time in total.
Re: 1985 Arktisblau M535i Renovation - New Year's Update
DO NOT FORGET THIS. Like I did.final torque the Crank Hub Nut
Re: 1985 Arktisblau M535i Renovation - New Year's Update
On the final pic you might want to turn the hose clamp around to avoid possible interference... Might be nothing but I remember things being tight there.
Otherwise, I'm super jelly about how great it looks.
BIG
Otherwise, I'm super jelly about how great it looks.
BIG
Re: 1985 Arktisblau M535i Renovation - New Year's Update
ElGuappo wrote:On the final pic you might want to turn the hose clamp around to avoid possible interference... Might be nothing but I remember things being tight there.
Otherwise, I'm super jelly about how great it looks.
BIG
Well I'd definitely rotate the clamps since once the AC condenser is back in there, you won't be able to get a nut driver on those.
Re: 1985 Arktisblau M535i Renovation - New Year's Update
Good points and will rotate them. Frankly I was getting pretty frustrated with them that once I got them on, I just left them the way they landed. Easy enough to rotate them upwards.wkohler wrote:ElGuappo wrote:On the final pic you might want to turn the hose clamp around to avoid possible interference... Might be nothing but I remember things being tight there.
Otherwise, I'm super jelly about how great it looks.
BIG
Well I'd definitely rotate the clamps since once the AC condenser is back in there, you won't be able to get a nut driver on those.
(Just don't ask me to take them all apart. Again. I lost track of how many times I put them together and tore them apart. Cost me a few scraped knuckles in the process.)
Re: 1985 Arktisblau M535i Renovation - New Year's Update
Just make sure you can get to them from the top or with the grille removed.
Re: 1985 Arktisblau M535i Renovation - New Year's Update
Especially since the design was apparently engineered to leak.wkohler wrote:Just make sure you can get to them from the top or with the grille removed.
Re: 1985 Arktisblau M535i Renovation - New Year's Update
I don't believe that. Each car I've purchased had the original hoses there and only some leaked. The ones I've changed are doing well so far.cek wrote:Especially since the design was apparently engineered to leak.wkohler wrote:Just make sure you can get to them from the top or with the grille removed.
Re: 1985 Arktisblau M535i Renovation - New Year's Update
I'm 0 for 5. Must be me.wkohler wrote:I don't believe that. Each car I've purchased had the original hoses there and only some leaked. The ones I've changed are doing well so far.cek wrote:Especially since the design was apparently engineered to leak.wkohler wrote:Just make sure you can get to them from the top or with the grille removed.
-
maybeillbuyit
- Posts: 535
- Joined: Feb 01, 2014 12:00 PM
- Location: Vancouver BC
Re: 1985 Arktisblau M535i Renovation - New Year's Update
vinceg101 wrote: Ralph said I should mention that one critical upgrade everyone should do regarding Gear Shifters is to replace the stock older E28 Linkage (Gearshift Rod Joint in BMW parlance) with a newer E46 version. Someone had done this more recently in the cars’ past before I got it since this Transmission and Shift Kit went in around 1994 (unless this is an E36 unit?): Here are some examples for illustration:
The newer unit has a solid body instead of the weaker smaller shaft style of the older one; the old ones were prone to shear off at the junction. Good upgrade.
This looks like a great upgrade, much beefier.I notice the e46 unit looks shorter than the original. Any issue with that or is the selector rod a longer one?
-
Ralph in SoCal
- Posts: 113
- Joined: Feb 02, 2010 1:03 AM
- Location: High Desert of SoCal
Re: 1985 Arktisblau M535i Renovation - New Year's Update
I'll actually be investigating this further with Vince's car as his shifter in neutral position is a little forward for my taste. He's OK with it as it is functional but hopefully there's an easy solution. I think he still has the SSK Shift Rod Joint in place and that could be the reason why. Because of this scenario I've got plans for an adjustable shift rod so that neutral location can be dialed in easily.maybeillbuyit wrote:vinceg101 wrote: Ralph said I should mention that one critical upgrade everyone should do regarding Gear Shifters is to replace the stock older E28 Linkage (Gearshift Rod Joint in BMW parlance) with a newer E46 version. Someone had done this more recently in the cars’ past before I got it since this Transmission and Shift Kit went in around 1994 (unless this is an E36 unit?): Here are some examples for illustration:
The newer unit has a solid body instead of the weaker smaller shaft style of the older one; the old ones were prone to shear off at the junction. Good upgrade.
This looks like a great upgrade, much beefier.I notice the e46 unit looks shorter than the original. Any issue with that or is the selector rod a longer one?
Anyway, hoping for an update from Mr. G himself as this is progressing and I'm sure there's a few folks waiting for anything tangible.
Ralph
Re: 1985 Arktisblau M535i Renovation - New Year's Update
Great work Ralph and Vince!
This car is really going to be a nice one when the refresh is complete!
This car is really going to be a nice one when the refresh is complete!
