FAQ M30 Starter R&R

E28 technical advice asked and given! Troubleshooting, modifications and more.
Post Reply
TheLazyDog
Posts: 916
Joined: Oct 26, 2011 9:08 PM
Location: Elgin, Illinois
Contact:

FAQ M30 Starter R&R

Post by TheLazyDog »

<<<<<<<<<<<<<<<<<<<<<<<<<<<<<<<<<<<<<<<<<<<<<<<
  • Currently being revised;
    functionality is retained.

>>>>>>>>>>>>>>>>>>>>>>>>>>>>>>>>>>>>>>>>>>>>>>>


Problem: You have tested and come to the conclusion that your starter motor, solenoid, or both have failed.

Cause: These things just happen.

How to fix: Remove and replace the starter.

-----------------------------------------------------------------

Foreword

Read this fire-side, feet up, relaxing in your favorite chair while sipping a good tea the night before you plan to replace your starter. That is my recommendation.

Time to complete obviously depends on the route you decide to take, but plan to spend 3 hours.

------------------------------------------------------------------------------

The write-up

------------------------------------------------------------------------------


First steps...

-Disconnect the battery completely. Disconnect the negative connection at the battery first, then disconnect the positive.

-Once you've found them, spray the starter bolts with a penetrating oil.

------------------------------------------------------------------------------
------------------------------------------------------------------------------

Locating and surveying the starter...
Image
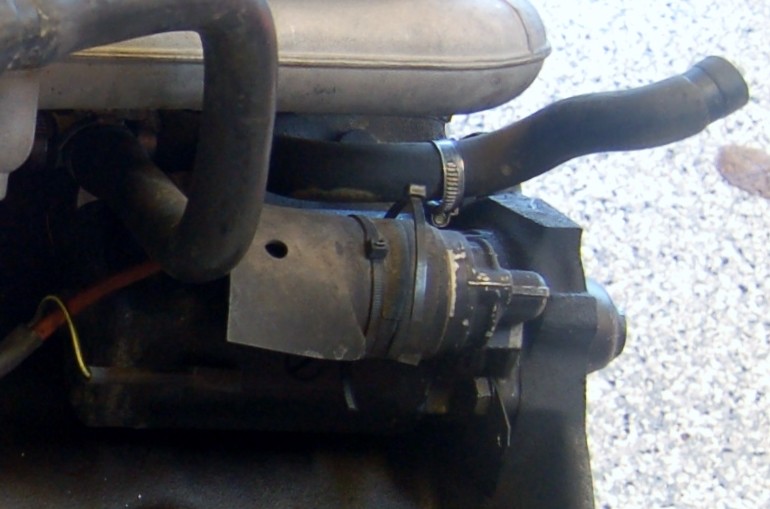
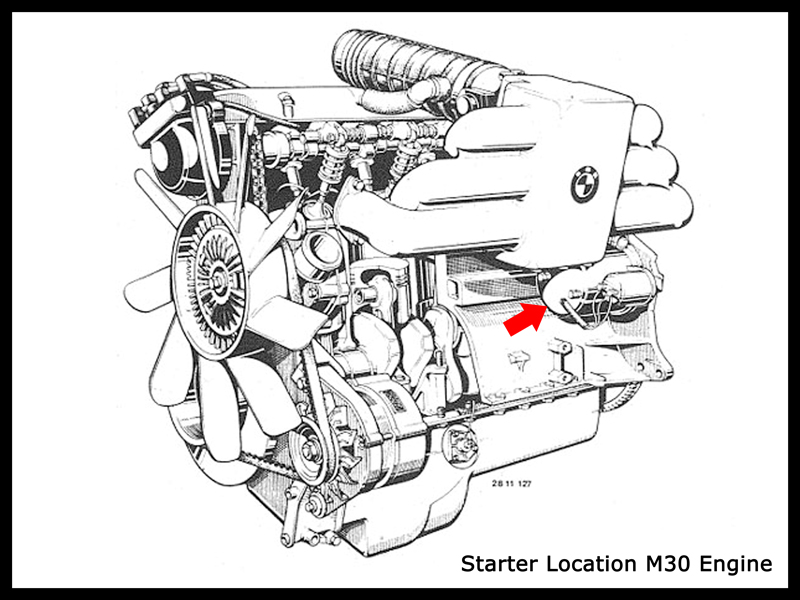
The starter is located at the back of the driver's side of the engine block, under
the intake manifold. It is held to the engine block by (2) 17 mm hexagonal-head
M10X25 bolts.

The starter is an electric Bosch non-gear reduction starter. The solenoid switch
can be removed and replaced separately.
Image
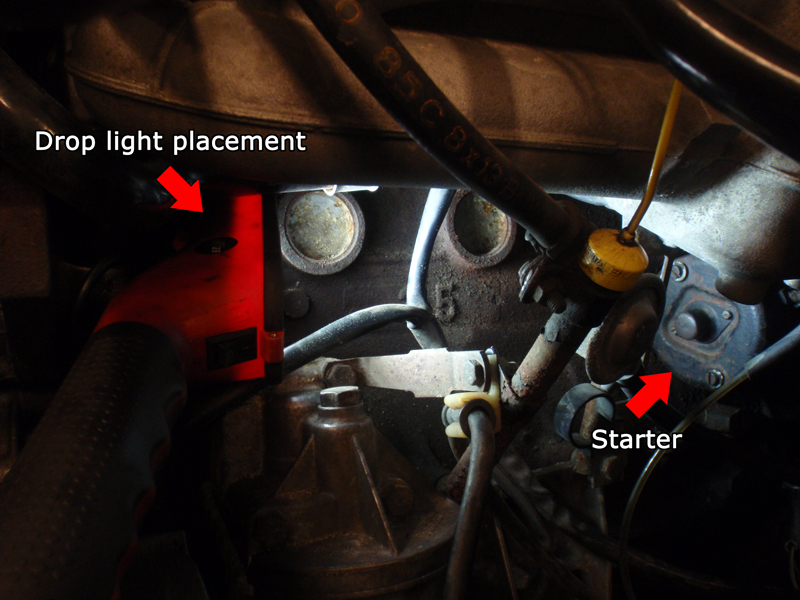
The best place to put a light is mate with the block, at the front of the engine, facing
the starter. This position illuminates both mounting bolts and the electrical
connections on the solenoid.

------------------------------------------------------------------------------
------------------------------------------------------------------------------

Disconnecting wiring...

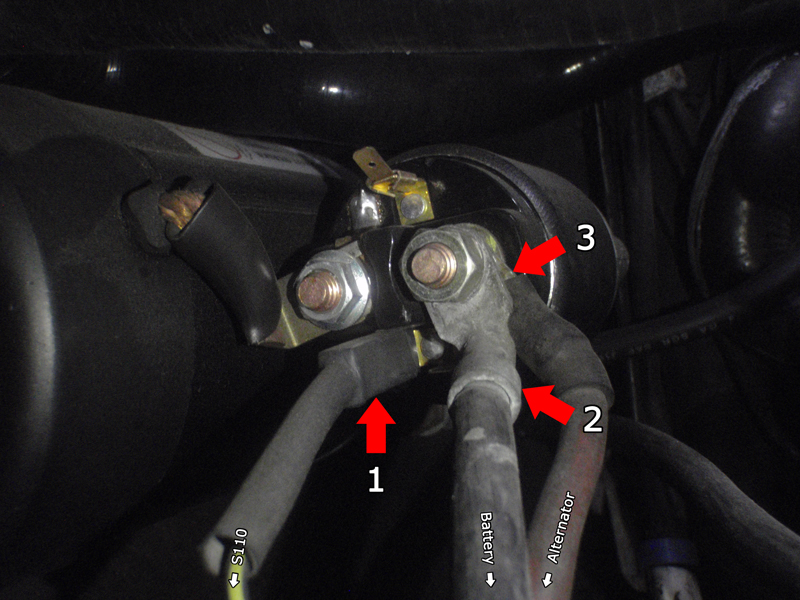
There are a total of 3 insulated electrical connections made to the starter. They all need to be disconnected. All of them are on the starter solenoid.

1. Start signal - a black and yellow wire leads to this connection. It is terminated with a slide connector. Just pull it off.

2. (+) Battery - a heavy black wire leads from the positive battery terminal to this connection. It is terminated with a ring terminal. A nut holds it to a post on the solenoid, it can be removed with a 13mm wrench or deep socket.

3. (+) Alternator - a red wire leads from the alternator output wire to this connection. It is terminated by a ring terminal to the same threaded post as the battery cable is. Both are removed by removing the same nut.
Image
  • Note-
    If you wish to download the electrical troubleshooting manual for your model and year BMW, go here.
------------------------------------------------------------------------------
------------------------------------------------------------------------------

Removing the infamous top bolt...

Removing the top bolt is made out to be much worse than it actually is.
  • Note-
    You can remove whichever bolt you want first.
    The top bolt is harder to take off, so it is best to start there.


    Why the top bolt is so infamous...
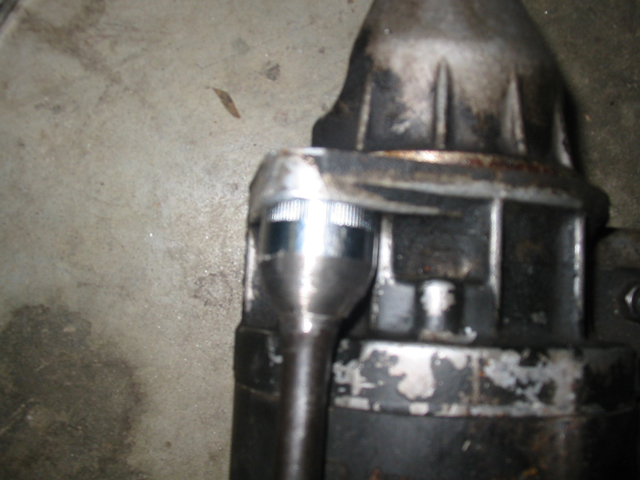
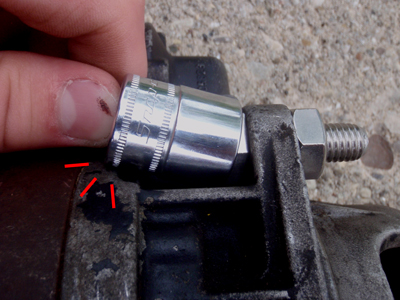
    It is because the housing of the Bosch SR41X starter will interfere with a
    standard socket attempting to mate with the mounting bolt known as the
    "top bolt". See the picture below.
    Image
    As you see, the housing does not allow the socket to seat completely on
    the head of the bolt.

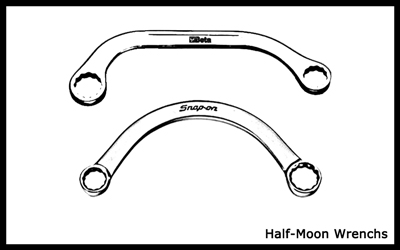
    This bolt is intended to be removed using a half-moon wrench
    (sometimes "obstruction" or "bent" wrench). But there are other means.

    We cover 6 methods here.
    Image
    These are examples of what half-moon wrenches look like.


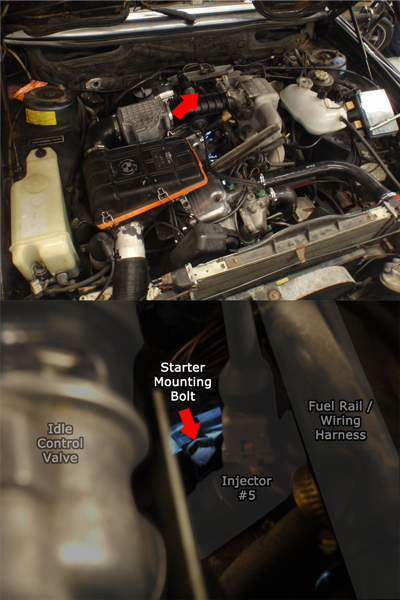
    Seeing the top mounting bolt
    To see the bolt, position your head above the rubber intake boot that joins
    the air flow meter and throttle. Look through the gap in the intake manifold
    between intake port 5 and 6. You should see it.
    Image


Here are the 6 methods we will be covering for removing the upper mounting bolt. Use whichever you feel most comfortable with.

********************************* Method #1 *********************************
  • The manuals' way

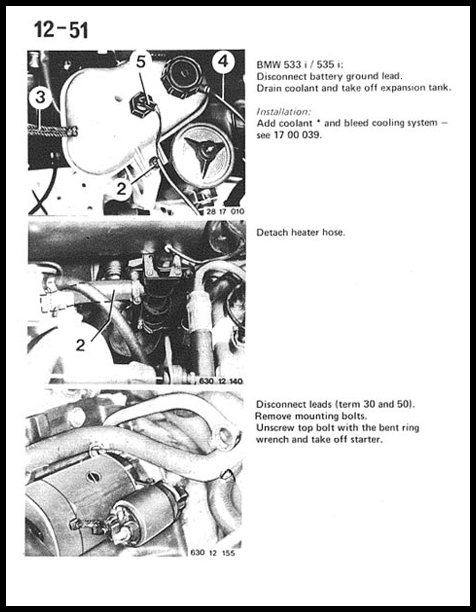
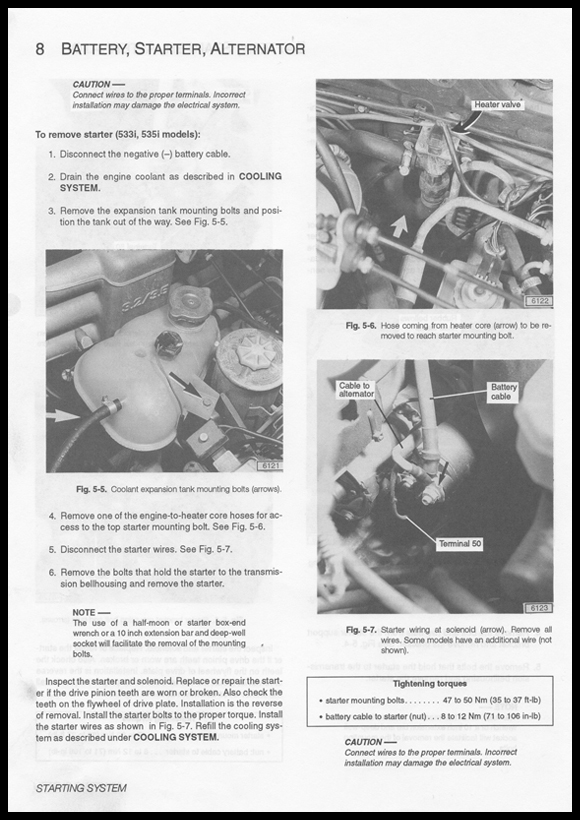
Below are the pages from the BMW repair manual and Bentley service manual with the pertinent information.
  • BMW Factory Repair Manual
Image
For the 528e / M20
  • Bentley Service Manual
Image
For the 528e / M20

********************************* Method #2 *********************************
  • Using the wrench in the trunk tool kit

This is a very popular way to remove the top bolt. It is very easy. The coolant does not have to be drained. No coolant hose has to be removed. Nothing has to be removed or even loosened.
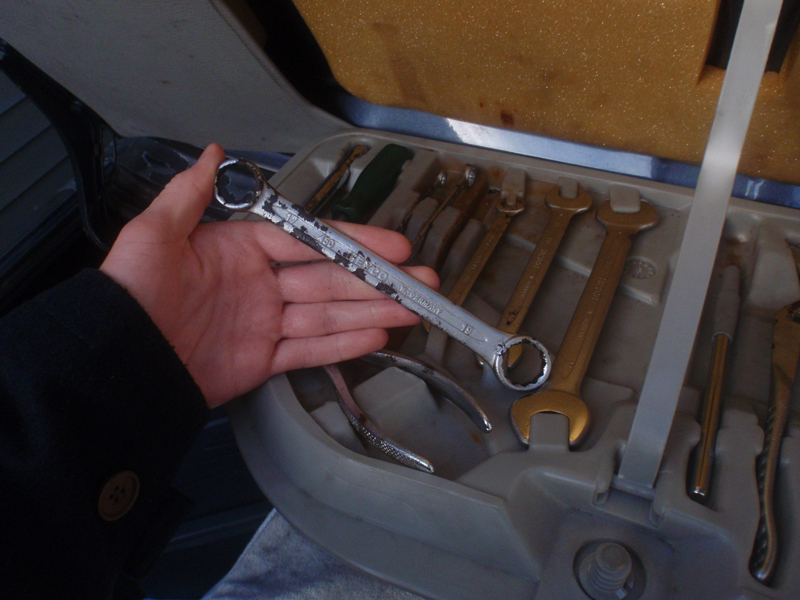
Image
This is that wrench from the trunk tool kit.

The wrench in the trunk tool kit is used because its ends are not bent. I do not know the name of this bend. See the picture below.
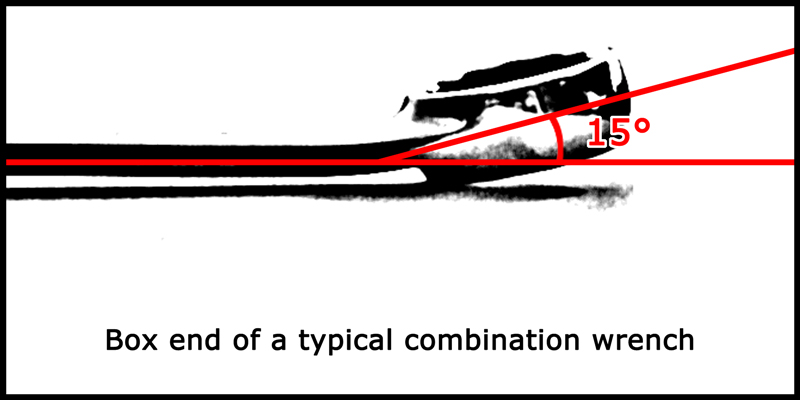
Image
The bend wrenches often have.

The wrench in the trunk tool kit is not bent. The angle is 0. The lack of this bend will line the wrench up between the firewall and intake manifold once it is seated on the bolt.

This method is not perfect. The intake manifold will slightly obscure a portion of the rotation of the wrench when tightening or loosening the bolt. It won't be a problem. Just know it.

Again, nothing needs to be removed or unbolted to make room for the wrench.

I would describe how this method is done but whatever I write would pale in comparison to what "Lee in LA" already wrote on the topic. So here is what he wrote. His full write-up can be found here.
    • " The upper mounting bolt is difficult to reach. I first located
      it by reaching down and back from the opening in front of
      the coolant reservoir. I got my hand on the starter motor,
      and was able to locate the bolt by feel. You have to slide
      your left hand back between the starter and the coolant
      hose that runs on top of it and then feel around until you
      locate the bolt head. Once you locate it you can use the
      17/19mm box end wrench from the trunk tool kit, and feed
      it down from directly above with your right hand. Here's
      where you need an extra set of hands again. I had my father
      reach over from the passenger side and put a little tension
      on the wrench. While he was holding it in place, I got our
      trusty cheater bar ( a 20 inch piece of 1 1/4 inch galvanized
      pipe) and a hammer. I placed the end of the cheater bar
      against the 19mm end of the wrench at a 90 degree angle
      (wrench is vertical and pipe is horizontal) so that I could get
      a good blow in the correct direction on the end of the pipe
      with the hammer. Once we broke the upper bolt loose it
      was just a matter of slowly backing the bolt out using the
      wrench. You can only turn it about 1/8th of a turn each
      time, until you can get it out by hand.
      "
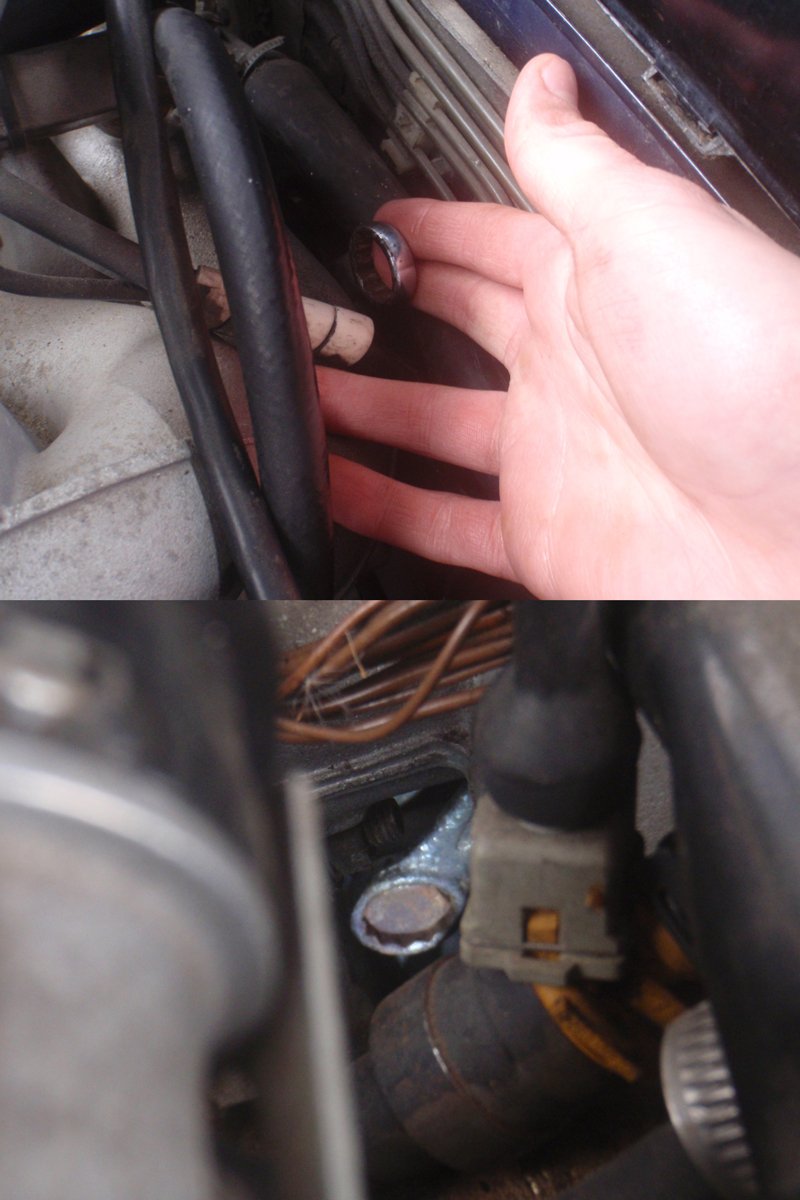
Image
The placement of the wrench.

********************************* Method #3 *********************************
  • Using a regular wrench

A regular 17 mm combination wrench with the 15 degree bend will also seat on the top bolt. But the end of the wrench that is not on the bolt will hit the firewall and it will be very annoying. I would not recommend using a regular wrench.
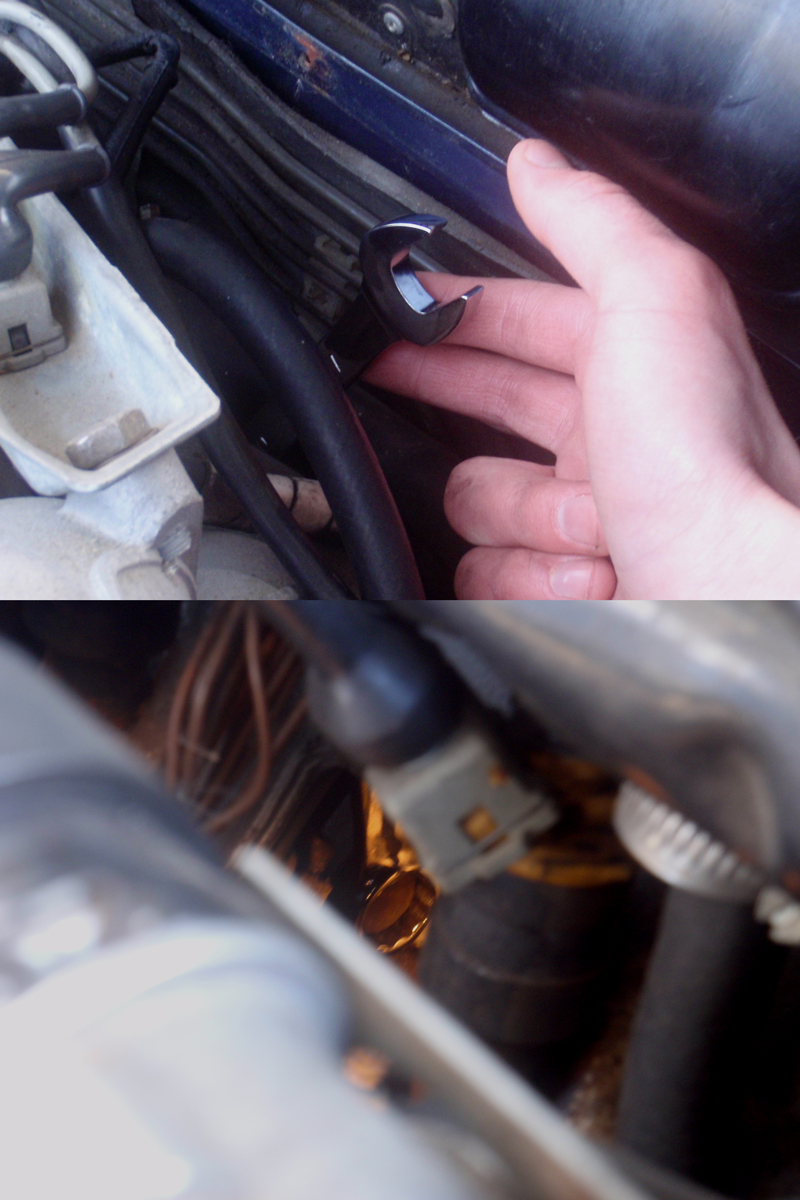
Image
The placement of the wrench.

********************************* Method #4 *********************************
  • Making your own tool

This is quoted from Michael (Skeen) as seen, already in the Tech FAQ, here.
Skeen wrote:Problem: Starter went bad! How do I get the freakin' thing off?!

Cause: That stinkin' top bolt!

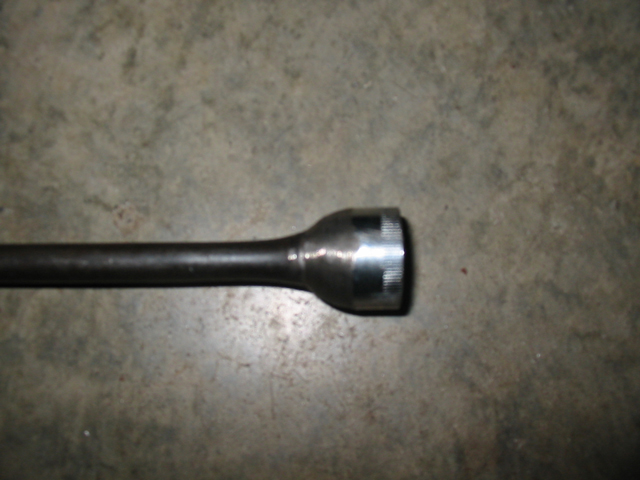
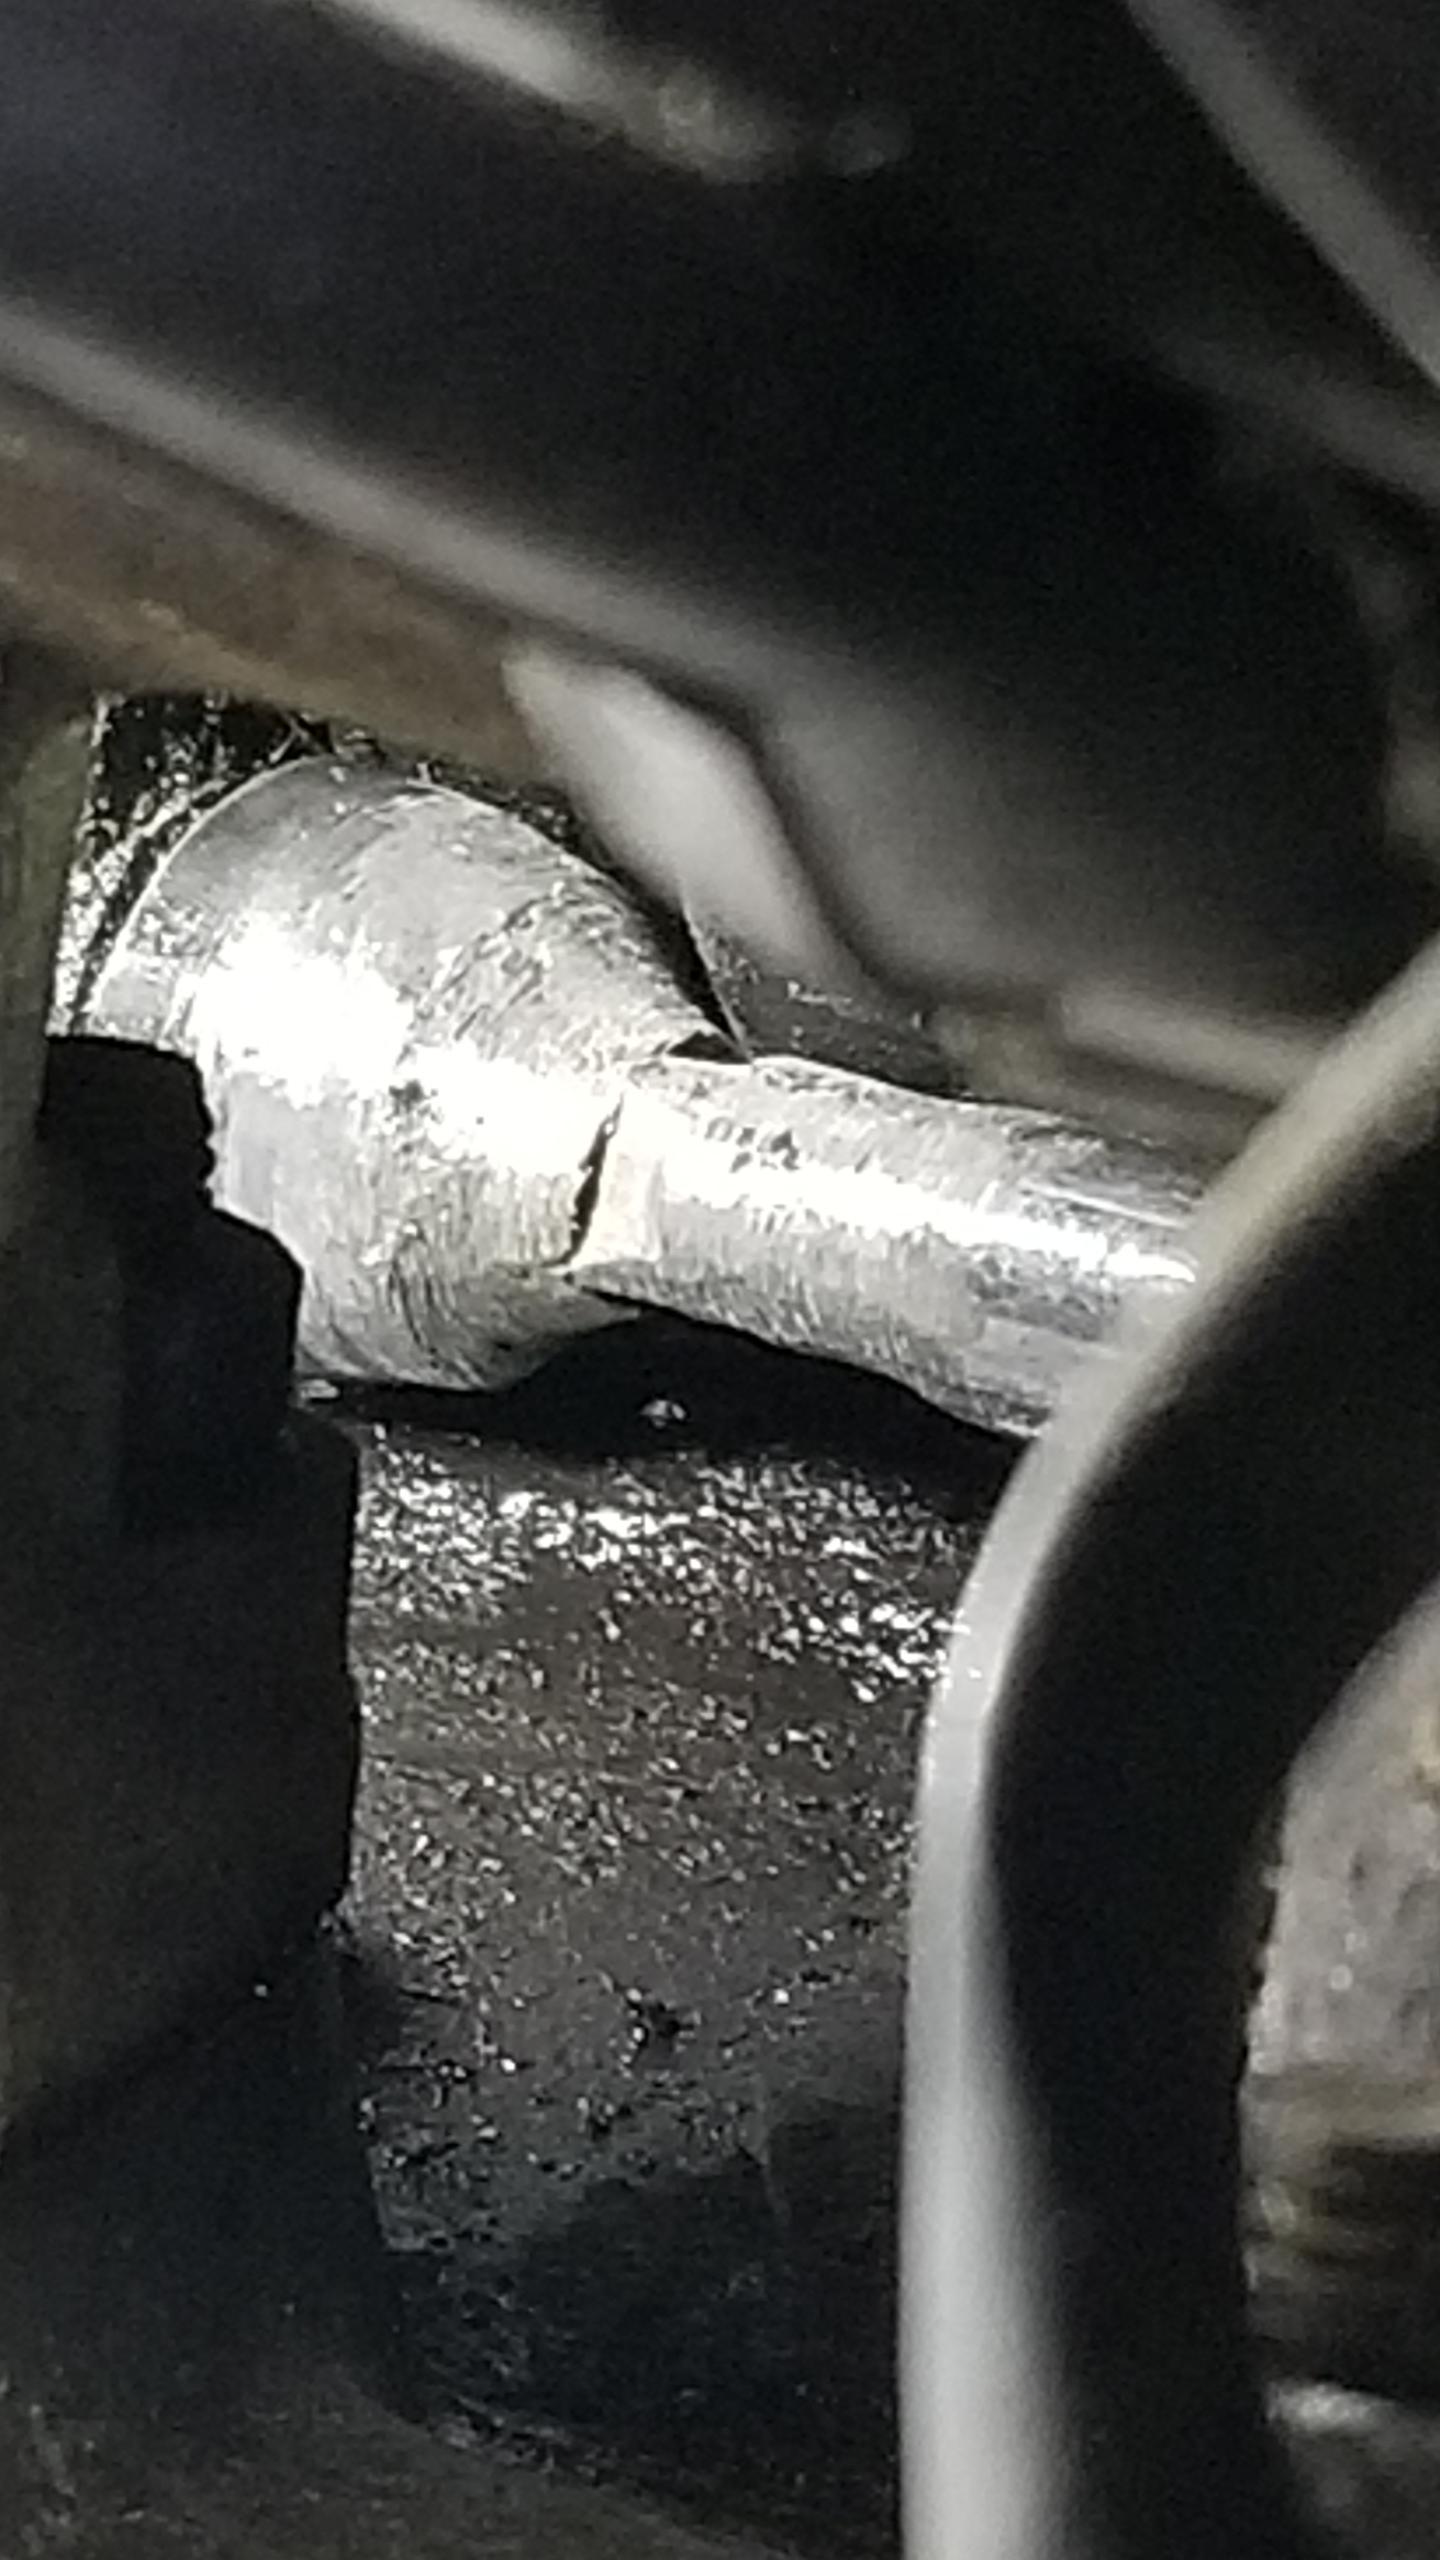
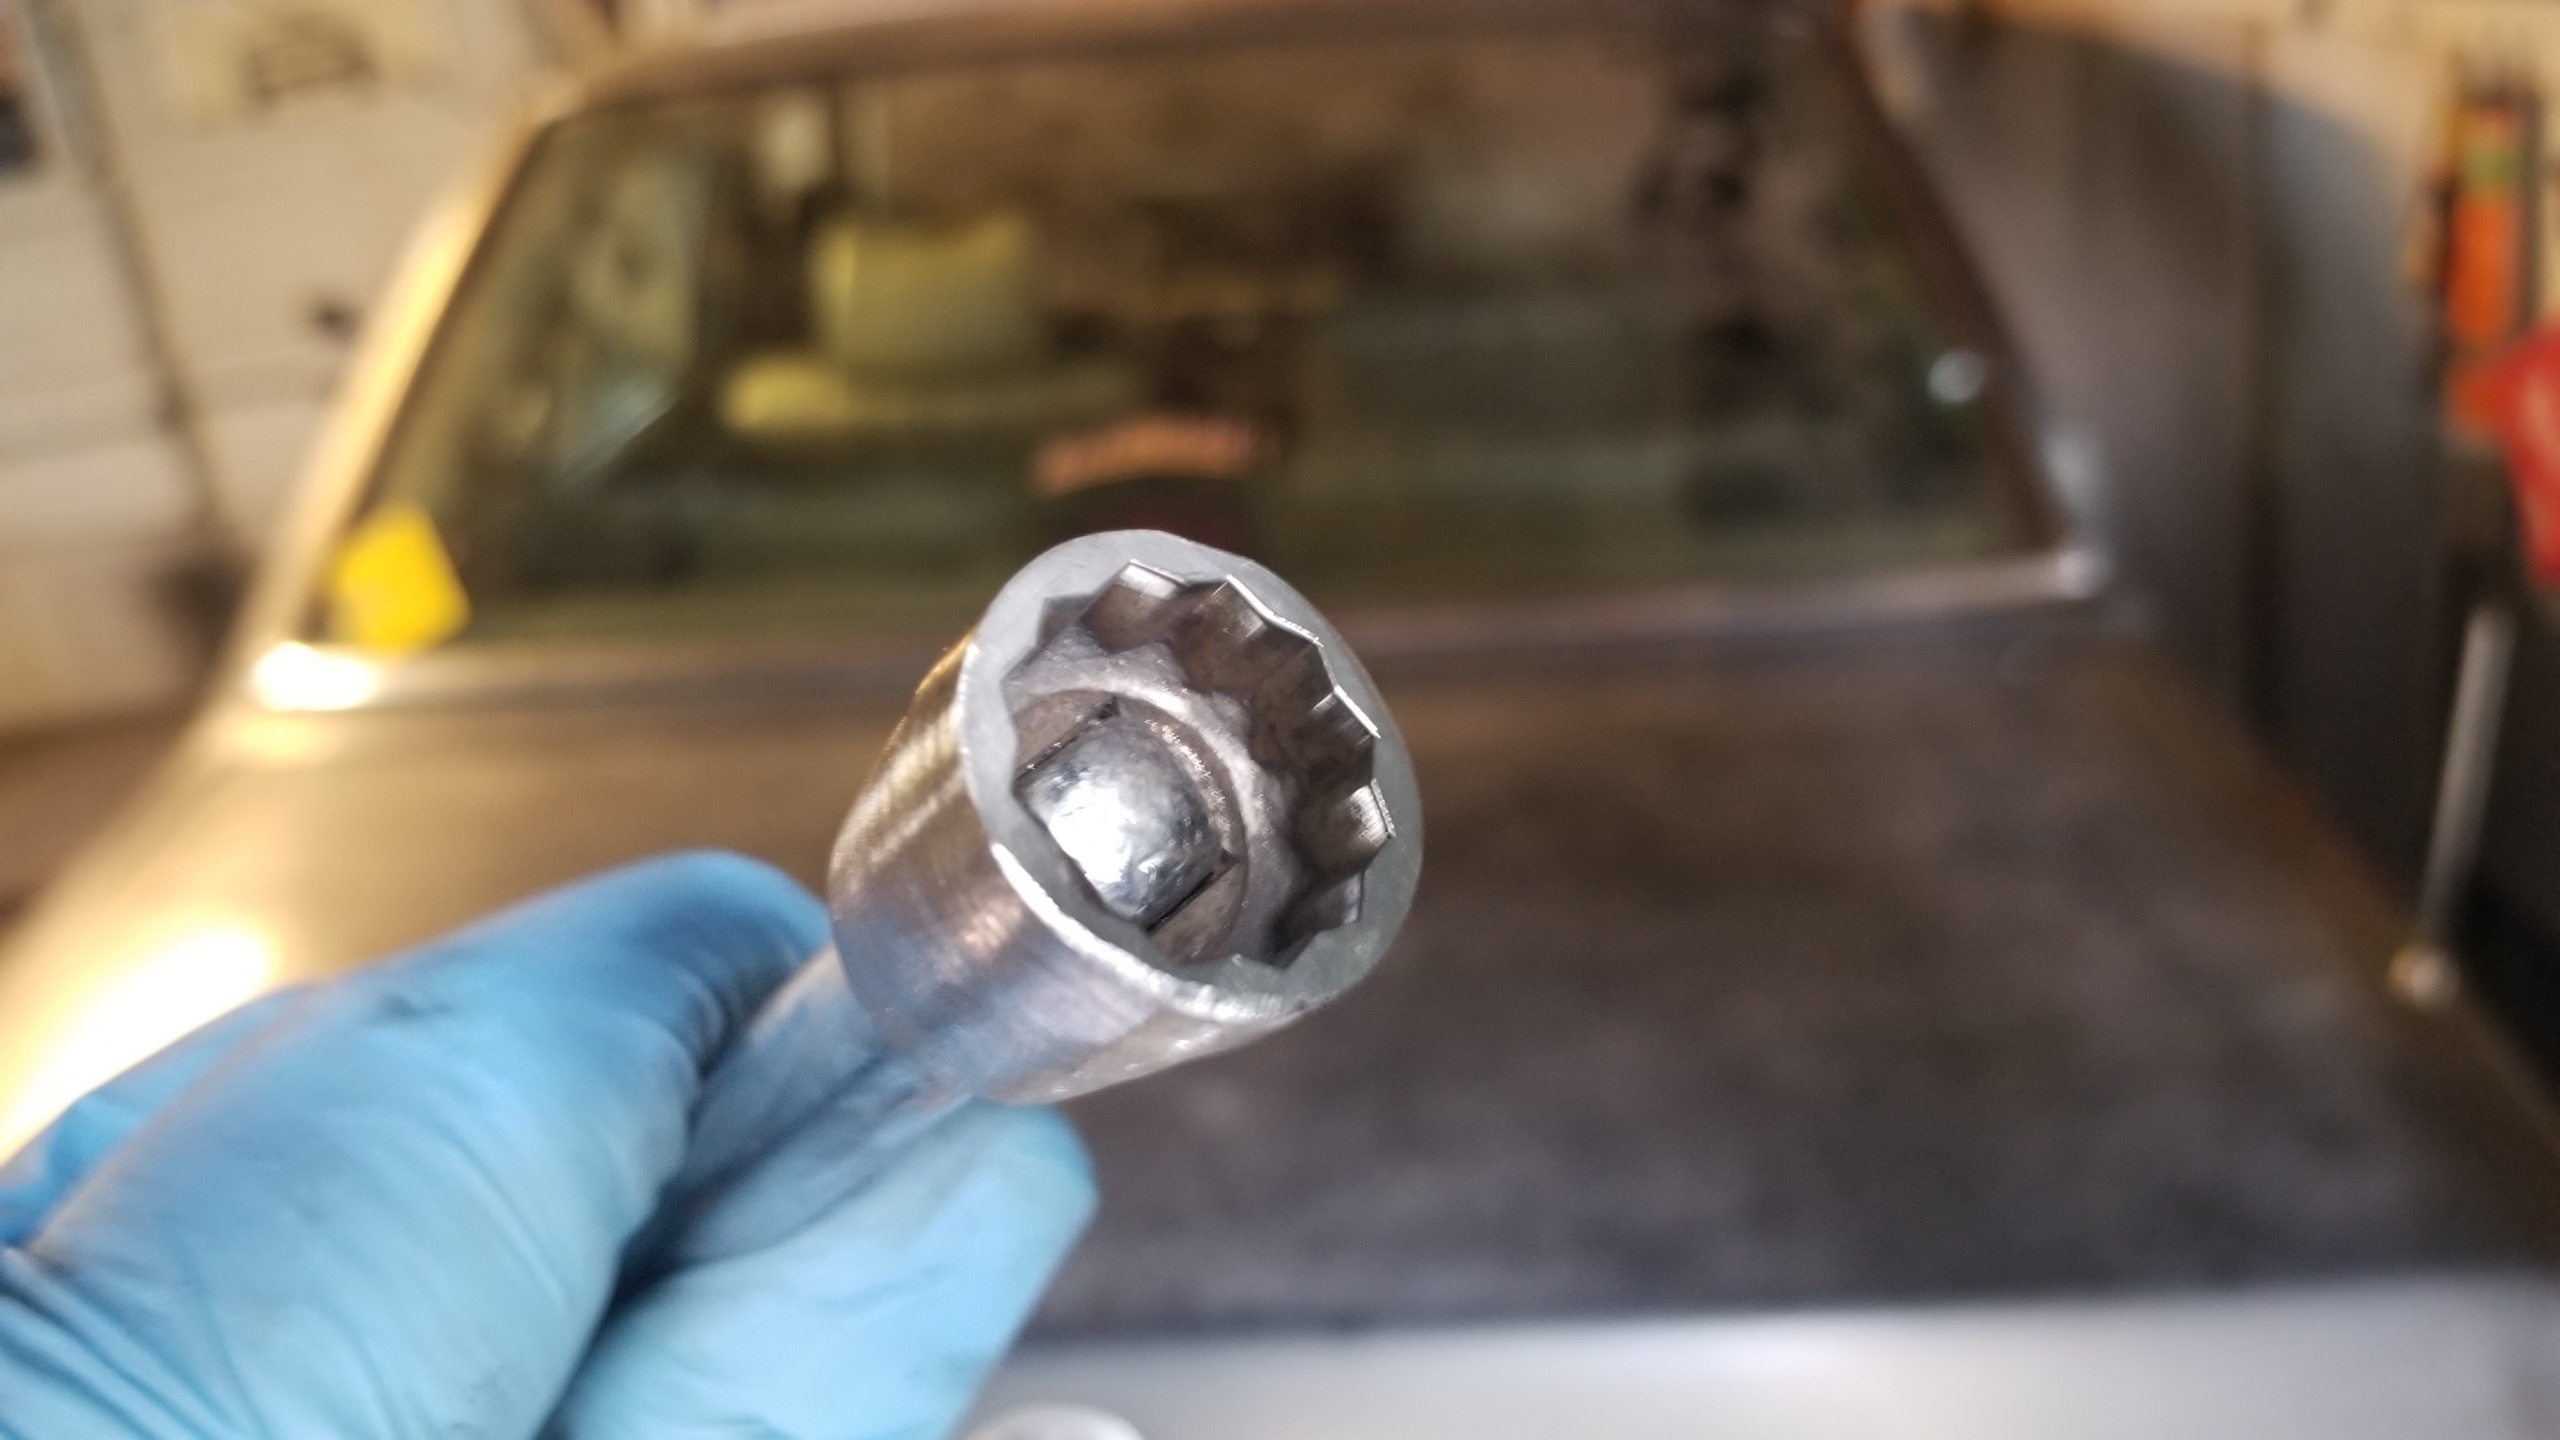
How to fix: Take a 3/8" drive 17mm shallow socket and streamline it. Shorten up the hex side of it to just the depth of the bolt head (~.25") and then grind off some of the shoulder on the ratchet side. Use a small diameter extension that's at least as long as the starter (if it's too fat, you'll have some clearance problems).

Your tool should look something like this:
Image

Image

When you're using this tool to take a starter off, you'll want to take the bottom bolt out first because when the top one starts coming out it will trap your tool between the bolt and the starter body if you can't pull the starter out of the block.

Installation: I suggest using a bit of Anti-Seize goop on the threads of the bolts you put on so it'll be easier if you have to take the starter off in the future.

-Michael
********************************* Method #5 *********************************
  • Removing the intake manifold
If you take off the intake manifold, the top bolt will come out very easily with just about any kind of wrench.

********************************* Method #6 *********************************
  • A very bad method
    This method is stupid. You do not need to resort to this. But for giggles, here's how it's done.

    Image

    You have been warned.

Image
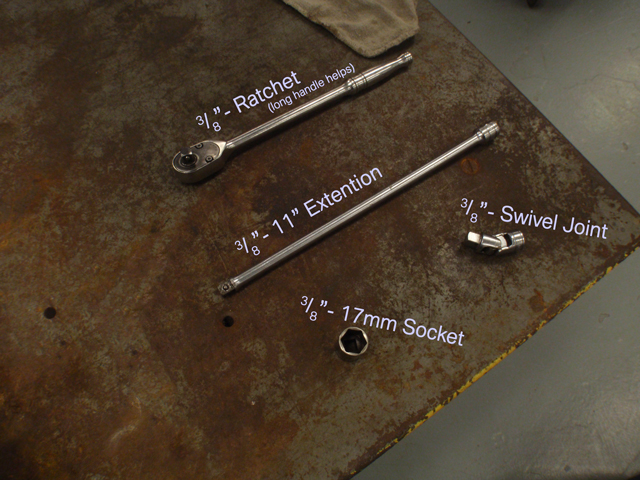
You'll need:
-3/8" ratchet (long handle is better)
-3/8" 11" extension
-Swivel joint (a.k.a. universal joint)
-Standard 3/8" 17mm socket
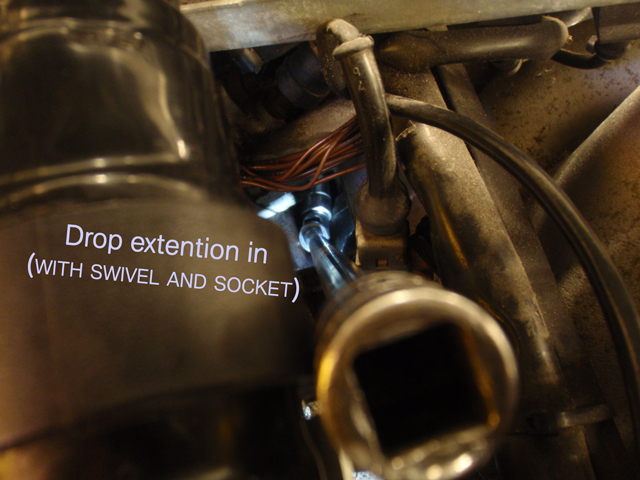
Image
Connect your extension to your swivel joint to your socket and drop it through
the "hole" in the intake manifold that you can see the top bolt from. Get it as
close to the bolt as you can.
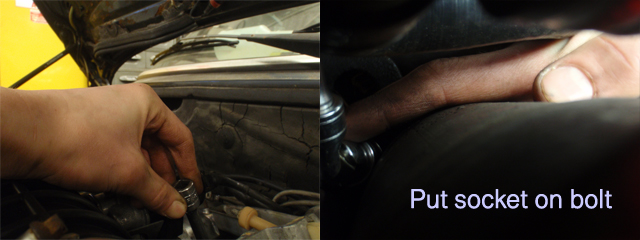
Image
With your right hand, reach behind the starter and find the bolt (it'll feel like it's
way back there) and the socket you just lowered there, put it on the bolt. Twist
the whole getup with your left hand if you need to.

This is the dodgy part... remember the bit about the top bolt interfering with a
regular socket? You won't be able to put the socket on completely. Use your
judgment and make sure it's on good enough not to round the bolt. If you fear
you will round the bolt, STOP. Use a different method to remove the top bolt.
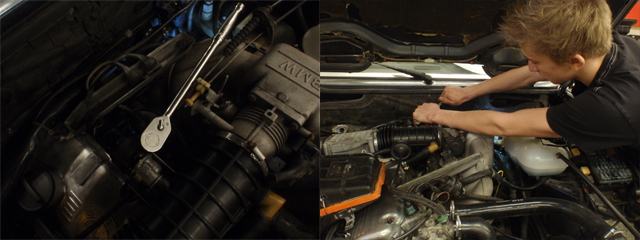


Image
Textbooks will tell you to pull on a wrench when loosening a bolt... but textbooks
can bite it. Push to loosen the bolt. Use your left hand as a fulcrum on the head of
the ratchet and push. Bad words may ensue. Once you broke the bolt loose, spin
it the rest the way off. Whee!

------------------------------------------------------------------------------
------------------------------------------------------------------------------

Removing the bottom bolt...
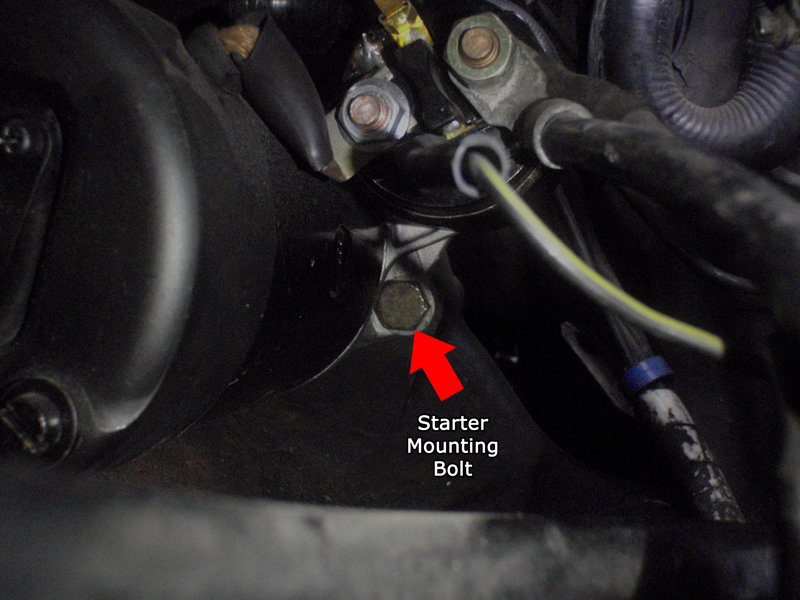

Image
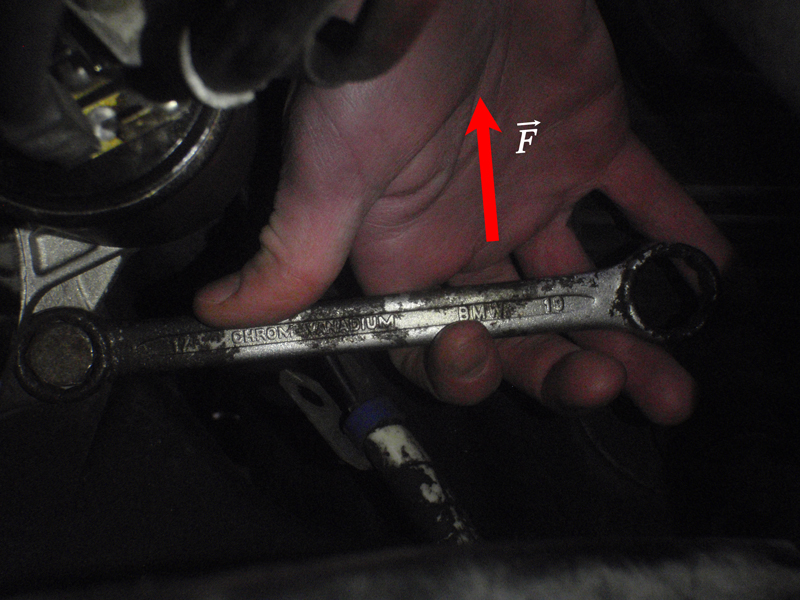
Removing the bottom bolt is as easy as pie. It is hard to see, though. Find it by
the feeling in your hand. Then put a wrench on it. I would recommend using
the trunk tool kit wrench. It is short. It fits well in the small space.
Image
Once it's on, you should find the wrench by the firewall, under the master cylinder.
Pull up and break the bolt loose, then take it the rest of the way off.
  • Note-
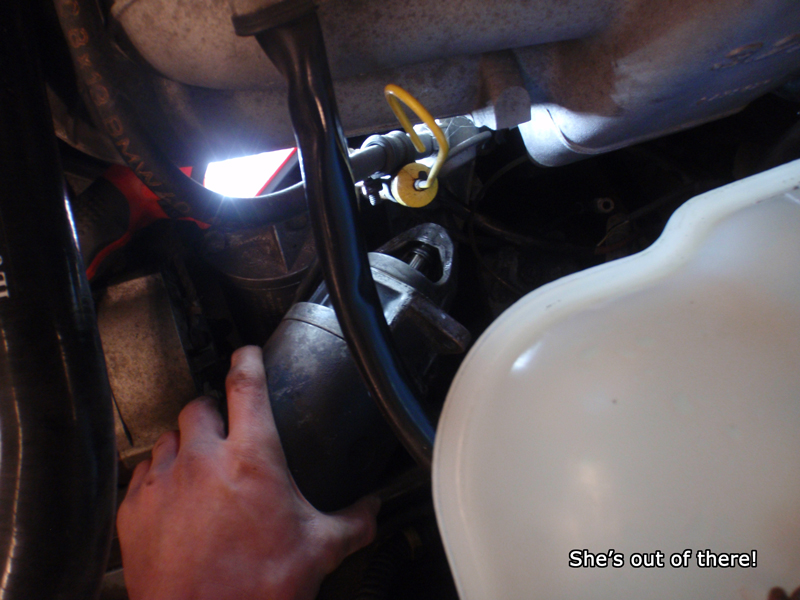
    There is nothing holding the starter in place; its weight sits on the one bolt
    that is still in. Hold the starter up with one hand to relieve stress on the bolt.
Image

Eureka! You did it, now feel good about yourself.

------------------------------------------------------------------------------
------------------------------------------------------------------------------

Replacing the starter...
  • Note-
    Before installing a replacement starter, test the old one to verify it is bad.
    If the old starter tests good... that indicates it was and/or is not the issue.

Install is reverse of removal.


You may want a friend to help hold the starter when starting the mounting bolts. It can be done alone, though.

It is best to put the bottom bolt in first, as you have more access. Thread both bolts in a few revolutions before tightening them to the specification.

Speaking of the specification, here are the torque specifications courtesy of Bentley Publishers.
Image

------------------------------------------------------------------------------

Here are 4 notable choices for your replacement starter:
  • Find a known-good used one.
    • I would not recommend this.
    Rebuild/have rebuilt the one you removed.
    • Here is a respected member's take on rebuilds.
    a wrote:a rebuild is always a crap shoot.
    Buy a remanufactured one
    • Bosch has discontinued this model starter. But they do still refurbish them
      and sell the remanufactured units. Please only buy a starter remanufactured
      by Bosch. Any other and you are better off using a goat for starting your car.
    Upgrade to the B35 starter.
    • Read the next section about this upgrade.

*A remanufactured Bosch starter is your best option. It seems some have been known to not function properly right out of the box. Always test a starter before installing it. I have yet to hear bad news about a working remanufactured Bosch starter.

------------------------------------------------------------------------------

The B35 starter upgrade...

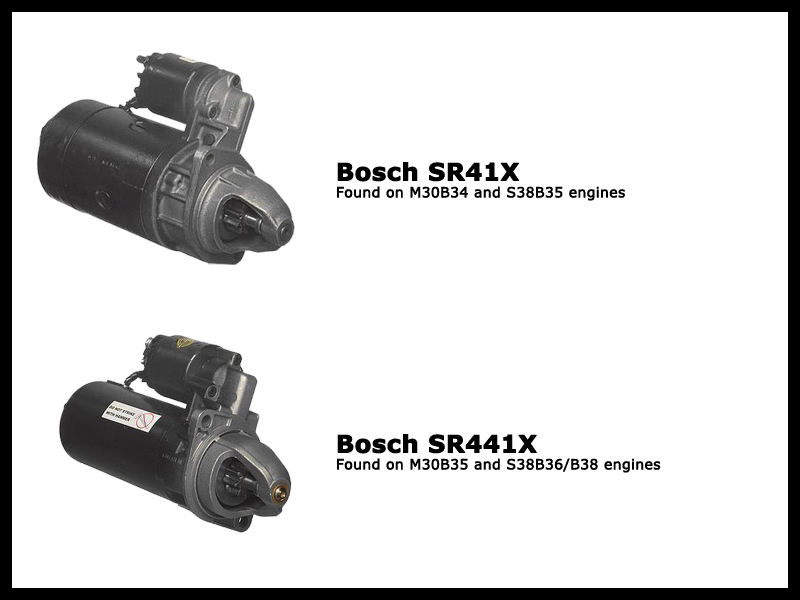
The starter used in M30B35 engines is a direct bolt-on upgrade for the M30B34 and S38B35. No modification is needed to fit it to either engine.

In the E28 community, it is know as the "B35 starter". But using the Bosch part number is more specific, as more than one BMW engine has the designation "B35".
Image
Notice how small the SR441X's casing is compared to the SR41X's


Why is the B35 starter better?
ahab wrote:It is well worth the added effort to source and install a B35 starter whenever you have your B34 out. There are a few reasons it's superior, smaller size resulting in ease of installation/removal being the relevant one here.
As ahab mentioned, a huge upside to installing the B35 starter is its casing's smaller diameter. It allows you to install/remove the upper mounting bolt using a 17 mm socket, extension, and ratchet.

In addition, the B35 starter is lighter. It weighs ~10lbs whereas the B34 starter weights ~16lbs. And, allegedly, the B35 starter has more torque. I cannot prove it, but everyone says it does. Especially your boy "Jays535is".
Jays535is wrote:I would go with a B35 starter if you can, more torque, lighter...
Jays535is wrote:...easier to install & remove, & supposedly have more torque.
Jays535is wrote:...B35 unit. It's smaller, lighter and supposedly has more torque.
Jays535is wrote:...Newer B35 starter, more torque and lighter ...


********************************* Where to get a B35 starter *********************************


You can try get a "known good" used one by posting a wanted ad here, finding one at a junkyard, taking one off a parts car, etc.
  • The B35 starter was found originally installed on these BMWs:
    • E24 635CSi

      E32 735i
      E32 735iL

      E34 535i
      E34 M5 3.6
You can also buy a B35 starter that was remanufactured by Bosch from a store that sells it. There will most likely be a core charge. As I write this, BMW still sells the remanufactured starter as well.
  • The Bosch part number for this starter is SR441X

    The BMW part number for this starter is 12411720664.

For the M20 engine:

The SR43X is the OE starter
The SR443X is the equivalent 'upgrade'

------------------------------------------------------------------------------
ahab wrote:If you must reinstall the B34 starter, you can use a "collar screw" (p/n 31121125714) from the support bar that mounts behind the subframe on many BMW models and stiffens the frame rails. It's the right size bolt and has a 15mm hex head which allows you to use a smaller socket in the confined space.
------------------------------------------------------------------------------
------------------------------------------------------------------------------
Skeen wrote:I suggest using a bit of Anti-Seize goop on the threads of the bolts you put on so it'll be easier if you have to take the starter off in the future.
2nd.

------------------------------------------------------------------------------
------------------------------------------------------------------------------

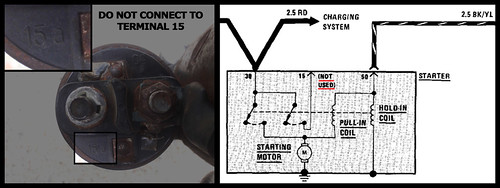
When reconnecting wires to the starter, connect the slide connector
(black&yellow wire) to terminal 50.

There are two male contacts on the starter, the connector will fit both,
you want to connect to terminal 50.

If you put everything back together, turn the ignition to 'START' position and nothing happens,
you may have put the connector on the wrong terminal (thanks for the tip, Jeremy).

Nothing "bad" will happen, but your engine will not crank.
Image

------------------------------------------------------------------------------
------------------------------------------------------------------------------
------------------------------------------------------------------------------
Thank you to Hoffman Estates High School and David Ligman for allowing me to use their facilities.

additional resources:
This is where I found how to see the top bolt in the first place (thank you @Coldswede)
http://www.m535i.org/officers/ra/article.html#motor

Lee's full write-up using the wrench in the trunk tool kit
http://www.mye28.com/viewtopic.php?t=49600

Starter removal tip from FAQ
http://www.mye28.com/viewtopic.php?t=27427

"Rick's No Start Shark Page", this is also already in the FAQ.
Make sure your starter is indeed the problem before you remove it.
http://pwp.att.net/p/s/community.dll?ep ... 160912&ck=

Printer-friendly version of this write-up in .pdf format
[working on it, will post here when done]

If you haven't already, BUY A BENTLEY MANUAL! Do it!
Last edited by TheLazyDog on Mar 14, 2013 6:20 PM, edited 119 times in total.
Funfive
Posts: 124
Joined: Apr 23, 2008 12:50 AM
Location: go west young man

Post by Funfive »

bent ring wrench? BMW causeth confusion!

Here's the bent ring wrench, the most standard cheap-ass box end wrench in your box. It must bend like in the picture where the box end is.

Drain coolant, remove heater hose to heater valve, disconnect hose to expansion tank. It's probably easier after that to pull main heater hose, tee and all, off the bracket under the intake and get all the hoses out of the way for wrench clearance. Everything stays connected up front at the thermostat.

Now then, with the bent ring wrench [I get a kick out of that one!], the standard cheap-ass box end with most maker's bend in it, loosen and remove top bolt that's holding starter. The end of the wrench you hold [open end] with your hand, is going to swing between the rear of the motor and the firewall. You end up with a reasonable 1/4 turn, or 90 degrees, at a time.

Bent ring wrench! BWAHAHAHAHAHAHAHA. That's a good one, BMW!

Image
TheLazyDog
Posts: 916
Joined: Oct 26, 2011 9:08 PM
Location: Elgin, Illinois
Contact:

Post by TheLazyDog »

Funfive wrote:bent ring wrench? BMW causeth confusion!

Here's the bent ring wrench, the most standard cheap-ass box end wrench in your box. It must bend like in the picture where the box end is.

Drain coolant, remove heater hose to heater valve, disconnect hose to expansion tank. It's probably easier after that to pull main heater hose, tee and all, off the bracket under the intake and get all the hoses out of the way for wrench clearance. Everything stays connected up front at the thermostat.

Now then, with the bent ring wrench [I get a kick out of that one!], the standard cheap-ass box end with most maker's bend in it, loosen and remove top bolt that's holding starter. The end of the wrench you hold [open end] with your hand, is going to swing between the rear of the motor and the firewall. You end up with a reasonable 1/4 turn, or 90 degrees, at a time.

Bent ring wrench! BWAHAHAHAHAHAHAHA. That's a good one, BMW!

Image
What are you on about? BMW is right.
Elliott
Posts: 163
Joined: Jun 08, 2008 5:52 PM
Location: Elkridge, MD

Post by Elliott »

Just did my starter R&R this Saturday....took about 3 hours. I tried the socket through the manifold and the 3-4 times I had the socket on the bolt, applied some force it would slip off. Didn't want to take a chance in rounding off the bolt head...back to the drawing board and BMW's 17/19mm wrench! Through squeezing my left hand along the starter, got the wrench on the bolt head but not enough of the wrench was available for me topside to add any force to break the bolt loose. Needed to extend the wrench a few more inches. Finally came up with a deep socket that would slip over the 19mm end and with a 6" extension gave me just enough torque to break it loose. Everything else just fell into place. Also took the advice of everyone and purchased the B35 replacement starter which helped with the installation. Seems like there's more torque when starting the car....or it's just a starter that's doing what it's supposed to do and not on its last leg. Thanks for the write up CanisLupusRobotus, came in handy.
Matt
Posts: 2351
Joined: Feb 12, 2006 12:00 PM
Location: Fargo

Post by Matt »

I did my S38 starter a while back. The trunk toolkit 17mm wrench is key.

The goal is to break the bolt loose. Once it's broken lose, you can bullshit it the rest of the way out using whatever method upsets you the least.

To break the bolt lose, I used a method not listed here.

1) I had a spare "gate straightening kit", like you get from home depot. These consist of a long peice of stranded metal wire, and the right connectors to make loops at each end. You use these kits to hold your sagging gates under diagonal tension to keep them square. They are rated for hundreds of pounds of tension.

Image

2) I took the trunk tool kit wrench. I threaded one end of the stranded gate cable through the non-17mm end of the wrench. Then I closed the loop of threaded cable with the provided fastener. This securely attaches the cable to the wrench.

3) I dropped the wrench straight down onto the starter, from above. I routed the stranded cable so that it has a relatively clear shot out of the passenger side of the engine bay -- so that anything it would rub on, I am ok with it rubbing on.

4) I put the 17mm end of the wrench on the top bolt. If I was standing infront of the car, looking at the engine, I think the wrench was probably positioned at 1 or 2pm, and if I broke the bolt lose, I could perhaps turn it to around 11am (maximum).

5) After leaving the wrench in proper position on the top bolt, I stood next to the passenger side of the car, about even with the firewall.

6) I grabbed the other end of the stranded cable, and wrapped it around my fist a few times, to give me a tremendous grip. It is actually possible to make a 2nd loop on the gate cable using the other fastener package, so you have a nice solid loop to pull with. Another alternative is to create the 2nd loop, then place it around a ratchet or cheater bar, which you then hold like you are water skiing. This protects your delicate feminine hands.

7) with the cable (or cheater bar) firmly grasped, I slowly pulled on the cable, able to use the strength of both arms and leaning my entire body backwards to add tension to the cable, and thus torque onto the end of the wrench. Holding the cable at the right angle will increase the torque you transmit for a given amount of effort on your part.

8) the bolt finally breaks loose and moves through its limited arc of travel before coming to rest on whatever obstruction is particular to your engine.

Congratulations: you have broken the top bolt lose
John McA
Posts: 201
Joined: May 14, 2006 4:21 PM
Location: So Cal

Post by John McA »

Matt wrote:I did my S38 starter a while back. The trunk toolkit 17mm wrench is key.

The goal is to break the bolt loose. Once it's broken lose, you can bullshit it the rest of the way out using whatever method upsets you the least.

To break the bolt lose, I used a method not listed here.

1) I had a spare "gate straightening kit", like you get from home depot. These consist of a long peice of stranded metal wire, and the right connectors to make loops at each end. You use these kits to hold your sagging gates under diagonal tension to keep them square. They are rated for hundreds of pounds of tension.

Image

2) I took the trunk tool kit wrench. I threaded one end of the stranded gate cable through the non-17mm end of the wrench. Then I closed the loop of threaded cable with the provided fastener. This securely attaches the cable to the wrench.

3) I dropped the wrench straight down onto the starter, from above. I routed the stranded cable so that it has a relatively clear shot out of the passenger side of the engine bay -- so that anything it would rub on, I am ok with it rubbing on.

4) I put the 17mm end of the wrench on the top bolt. If I was standing infront of the car, looking at the engine, I think the wrench was probably positioned at 1 or 2pm, and if I broke the bolt lose, I could perhaps turn it to around 11am (maximum).

5) After leaving the wrench in proper position on the top bolt, I stood next to the passenger side of the car, about even with the firewall.

6) I grabbed the other end of the stranded cable, and wrapped it around my fist a few times, to give me a tremendous grip. It is actually possible to make a 2nd loop on the gate cable using the other fastener package, so you have a nice solid loop to pull with. Another alternative is to create the 2nd loop, then place it around a ratchet or cheater bar, which you then hold like you are water skiing. This protects your delicate feminine hands.

7) with the cable (or cheater bar) firmly grasped, I slowly pulled on the cable, able to use the strength of both arms and leaning my entire body backwards to add tension to the cable, and thus torque onto the end of the wrench. Holding the cable at the right angle will increase the torque you transmit for a given amount of effort on your part.

8) the bolt finally breaks loose and moves through its limited arc of travel before coming to rest on whatever obstruction is particular to your engine.

Congratulations: you have broken the top bolt lose

Greetings,
I just read this. I hereby move to elect this as 'Best Shade Tree Tech Award.' !! Seconds anyone?

Just WOW! I was sure ready to read that you were going to connect the gate straightener directly to the wrench. Then: Slam The Gate to break the starter bolt! The 'wrapping around the hand' part just makes the solution that much more portable. This truly a backyard pro solution and a proper method #7. Or, #2a

BTW, a 17mm flex head socket will do the job tool using most of method #6. BTDT, got the T-shirt and messed it up working under a leaky transmission. Doh!

Good Luck,
John McA
John in VA
Posts: 5295
Joined: Feb 12, 2006 12:00 PM
Location: Leesburg, VA

Post by John in VA »

BTW - "gate straightener" = turnbuckle.
E5CAP3
Posts: 83
Joined: Mar 28, 2012 11:04 PM

Post by E5CAP3 »

I just did this. The 17 mm wrench is essential. Seriously it's like magic. Also, buy the B35 starter. The top bolt alone on the old starter took me like 45 minutes (with plenty of stretch breaks). Installation took me a total of half an hour. Finally, on the B34 starter, as I wrenched the top bolt, it became impossible for me to get the wrench off due to the diameter of the starter. When this happens, move the wrench behind the bolts head, rotate, fit it again, and wrench. Finally, the top bolt didn't disconnect fully again due to the diameter of the starter. When it touches the main housing, you'll have to wiggle it to get it loose
E5CAP3
Posts: 83
Joined: Mar 28, 2012 11:04 PM

Post by E5CAP3 »

How do you check the torque on the bolts? I can only fit the bmw wrench through. After installing, car starts every time but starter is loud and fast, and takes maybe 4-5 seconds to catch and start the car. Is this because of the added torque of the B34?
TheLazyDog
Posts: 916
Joined: Oct 26, 2011 9:08 PM
Location: Elgin, Illinois
Contact:

Post by TheLazyDog »

E5CAP3 wrote:How do you check the torque on the bolts? I can only fit the bmw wrench through. After installing, car starts every time but starter is loud and fast, and takes maybe 4-5 seconds to catch and start the car. Is this because of the added torque of the B34?
The B34 starter is of lesser torque, if everyone who says so is correct. You may tighten the bolts to the best of your ability. If you fear they will loosen you may, from time to time, reach to, grasp and vigorously attempt to shake the starter to check for movement. There should not be any. Or you may check the tightness of the bolts by hand.

If your starter is in fact "catching" the flywheel and starting the engine every time, I would not worry that it is different sounding.
E5CAP3
Posts: 83
Joined: Mar 28, 2012 11:04 PM

Post by E5CAP3 »

Sorry, I mistyped. I installed a B35 starter. I tightened them down pretty much as good as I could, just want to make sure alignment is correct
GatorB8
Posts: 135
Joined: Aug 04, 2010 7:28 AM
Location: Anna Maria Island Fl.

Post by GatorB8 »

Method #2 was definetly the best on my 535i. just did this last week and the factory 17/19mm box end wrench worked the best and believe me, i had thousands of dollars worth of tools at my discretion. Did the bottom bolt first to relieve some tension on the top bolt(after disconnecting the positive terminal on the battery). After 28 yrs, those bolts were tuff to break loose. I positioned the wrench almost straight up on the top bolt between the intake and the firewall, placed a pry bar in the top of the wrench and gave it a wak. Voila. No worries.
I might be mistaking, but my early '85 535i might be the only model where the starter bolts thread into the bellhousing (M260/5 trans)?
danc
Posts: 206
Joined: Oct 08, 2010 10:39 AM
Location: Long Island, New York

Post by danc »

Awesome write-up! I used Method #2, wrench in the trunk tool kit. Didn't have to remove anything as mentioned in method #1.
I will add a couple of things...
1 - A standard "bent" 17mm wrench comes in handy when you get the top bolt loose. When it's getting loose, it's further away from the bell housing, and the angle helps for those last few turns.
2 - Replacement starter MUST be the SR441X! It was so easy to reinstall, and I'm sure it will be so easy to remove if necessary (let's hope not). In my opinion, anyone who goes through all of this trouble and then puts a SR41X back in is just plain crazy. Spend the extra few bucks; it's worth it.
trevmmeister
Posts: 847
Joined: Mar 02, 2014 9:20 PM
Location: Newnan, GA

Re: FAQ M30 Starter R&R

Post by trevmmeister »

Just throwing my input in uninvited, but uhh... Wouldn't this all be alot easier from the bottom of the car? Like, park the thing up on ramps/jackstands and knock it out in a couple minutes? Seeing as though it is pretty much on the bottom of the engine, just get past the subframe, steering components, oil pan........ nevermind it's probably not easier. :?
tig
Posts: 9297
Joined: Mar 18, 2013 6:25 PM
Location: Durango
Contact:

Re: FAQ M30 Starter R&R

Post by tig »

What is the rubber "COVERING SOLENOID SWITCH", (PN61131361340) for? Is it really needed? My B34 had it on and it looks so ghetto I assumed it was something the PO installed

Image

The donor 735i B35 I bought didn't have this cover (even though it's shown in the RealOEM diagrams for this car).
http://www.realoem.com./bmw/showparts.d ... g=12&fg=25

The new (reman) starter I bought for the B35 didn't come with one.

Is it super-needed or just nice to have. I'm feeling bad I didn't put one on my nice new motor.
BuzzBomb
Posts: 1672
Joined: Aug 21, 2011 12:14 AM
Location: SoCal

Re: FAQ M30 Starter R&R

Post by BuzzBomb »

cek wrote:What is the rubber "COVERING SOLENOID SWITCH", (PN61131361340) for? Is it really needed? My B34 had it on and it looks so ghetto I assumed it was something the PO installed

Image

The donor 735i B35 I bought didn't have this cover (even though it's shown in the RealOEM diagrams for this car).
http://www.realoem.com./bmw/showparts.d ... g=12&fg=25

The new (reman) starter I bought for the B35 didn't come with one.

Is it super-needed or just nice to have. I'm feeling bad I didn't put one on my nice new motor.
It's only function is to protect the exposed + lead end and terminal from swinging spanners and dropped tools that like to find the most auspicious place to land. It's tucked back far enough that nobody will comment on it, so if ya got one, I say use it. It can only help, and it's cheap insurance.
zackwest24
Posts: 79
Joined: Feb 23, 2014 6:39 PM
Location: Ohio

Re: FAQ M30 Starter R&R

Post by zackwest24 »

Worst..job..ever.
My arms and back are hating me right now.
Hawaiicruz
Posts: 1
Joined: Jul 13, 2015 12:10 AM
Location: Hilo Hawaii

Re: FAQ M30 Starter R&R

Post by Hawaiicruz »

Great thread thank you!
I just picked up my 635CSI (my first BMW) and had the occasional starter clang, so on to a new starter.
I used the 17 mm wrench from the toolkit and hit with a hammer against a breaker bar as described. it worked beautifully I had both bolts out and the stater loose within 30 minutes.
Now the real fun began I tried to bring the starter through the front, but after many tries I realized there was no way it was going to make it past the ABS module.
The way I finally got it out was to loosen the dipstick tube for the auto trans. I could not remove the clamp/hanger that supports the tube. so I just ended up bending the part that supports the tube with some channel locks to free the tube (pretty shade tree I know). I then loosened up the 30mm nut that holds the tube into the transmission pan, with a large crescent wrench and a breaker bar. That nut must have been torqued to at least 100 Lbs.Once I had the dipstick moved over, removing the starter through the top was a snap.Now to order the SR441 upgrade and reinstall.
I will post up some pics after I have the job completed
Thanks again for the great write up!
Neel
Posts: 243
Joined: Apr 17, 2009 11:21 PM
Location: South western Colorado and NY

Re: FAQ M30 Starter R&R

Post by Neel »

I just now finished install of an M10 starter into my 1990 e34 M30B35, as a temp solution until my m30 starter is rebuilt. It has started my car several times now. I know M10 owners have subbed the M30 starter, so i gave it a try because I was in a pinch. It worked. Now i can go to work tomorrow, not sure how i feel about that.
tschultz
Posts: 4102
Joined: Mar 01, 2009 7:58 PM
Location: Denver, Colorado
Contact:

Re: FAQ M30 Starter R&R

Post by tschultz »

Neel wrote:I just now finished install of an M10 starter into my 1990 e34 M30B35, as a temp solution until my m30 starter is rebuilt. It has started my car several times now. I know M10 owners have subbed the M30 starter, so i gave it a try because I was in a pinch. It worked. Now i can go to work tomorrow, not sure how i feel about that.
It should work but it will be larger and slightly less powerful overall.
badgerbill
Posts: 9
Joined: Aug 02, 2016 11:23 PM
Location: Madison, WI

Re: FAQ M30 Starter R&R

Post by badgerbill »

On the advice in this thread, I just replaced a rebuilt stock starter (that I'd put in years ago) with a new SR441x starter on my 88 e28 M5. Took about 3 hours start to finish. Tips like using the 17mm box end wrench from the trunk kit and the terminal 50 connection (not labelled on my SR441x) just used the "bottom" connector (same orientation as it came off the stock starter), made the job easier but it's still a bear to get the airbox out and back in just to see the starter underneath, let alone get to the bolts!

New starter cranks strong, no more cycling the key on and off to get the starter to engage.
Dave_in_VA
Posts: 425
Joined: Feb 12, 2006 12:00 PM
Location: Baltimore, MD

Re: FAQ M30 Starter R&R

Post by Dave_in_VA »

On my euro M30B34 I used a M10 starter. I had no problems. I think the difference in size is due to the M30b34 being a direct drive starter and the M10b18 starter being a gear reduction starter. FYI that same gear reduction starter is rated at 1.1kw and was used on the M30b28. The M30b34 starter is rated t 1.4kw. The M30b35 starter is rated at 1.7kw.
bryanmeara
Posts: 15
Joined: Jan 18, 2017 8:46 AM
Location: Ireland

Re: FAQ M30 Starter R&R

Post by bryanmeara »

Just wanted to write a quick thank you for this fantastic guide.
I just removed my m535i's starter motor using the wrench from the boot. Fantastic solution, thank you so much.
I removed a coolant hose for easier access to the top bolt, but otherwise stuck exactly to the guide and got it out with only mildly grazed knuckles and minimum post-traumatic stress :D :laugh:
DXXXIIIi
Posts: 118
Joined: Dec 05, 2009 7:14 PM
Location: Pittsburgh

Re: FAQ M30 Starter R&R

Post by DXXXIIIi »

MyE28.com saves the day yet again. Thanks to stocks and help from members, my starter
will be replaced.
FYI I dunno why, but after getting the kit's wrench on the top bolt, I couldn't get any room to turn it.

Ended up going the MacGyver route, making my own tool.
Image
Image
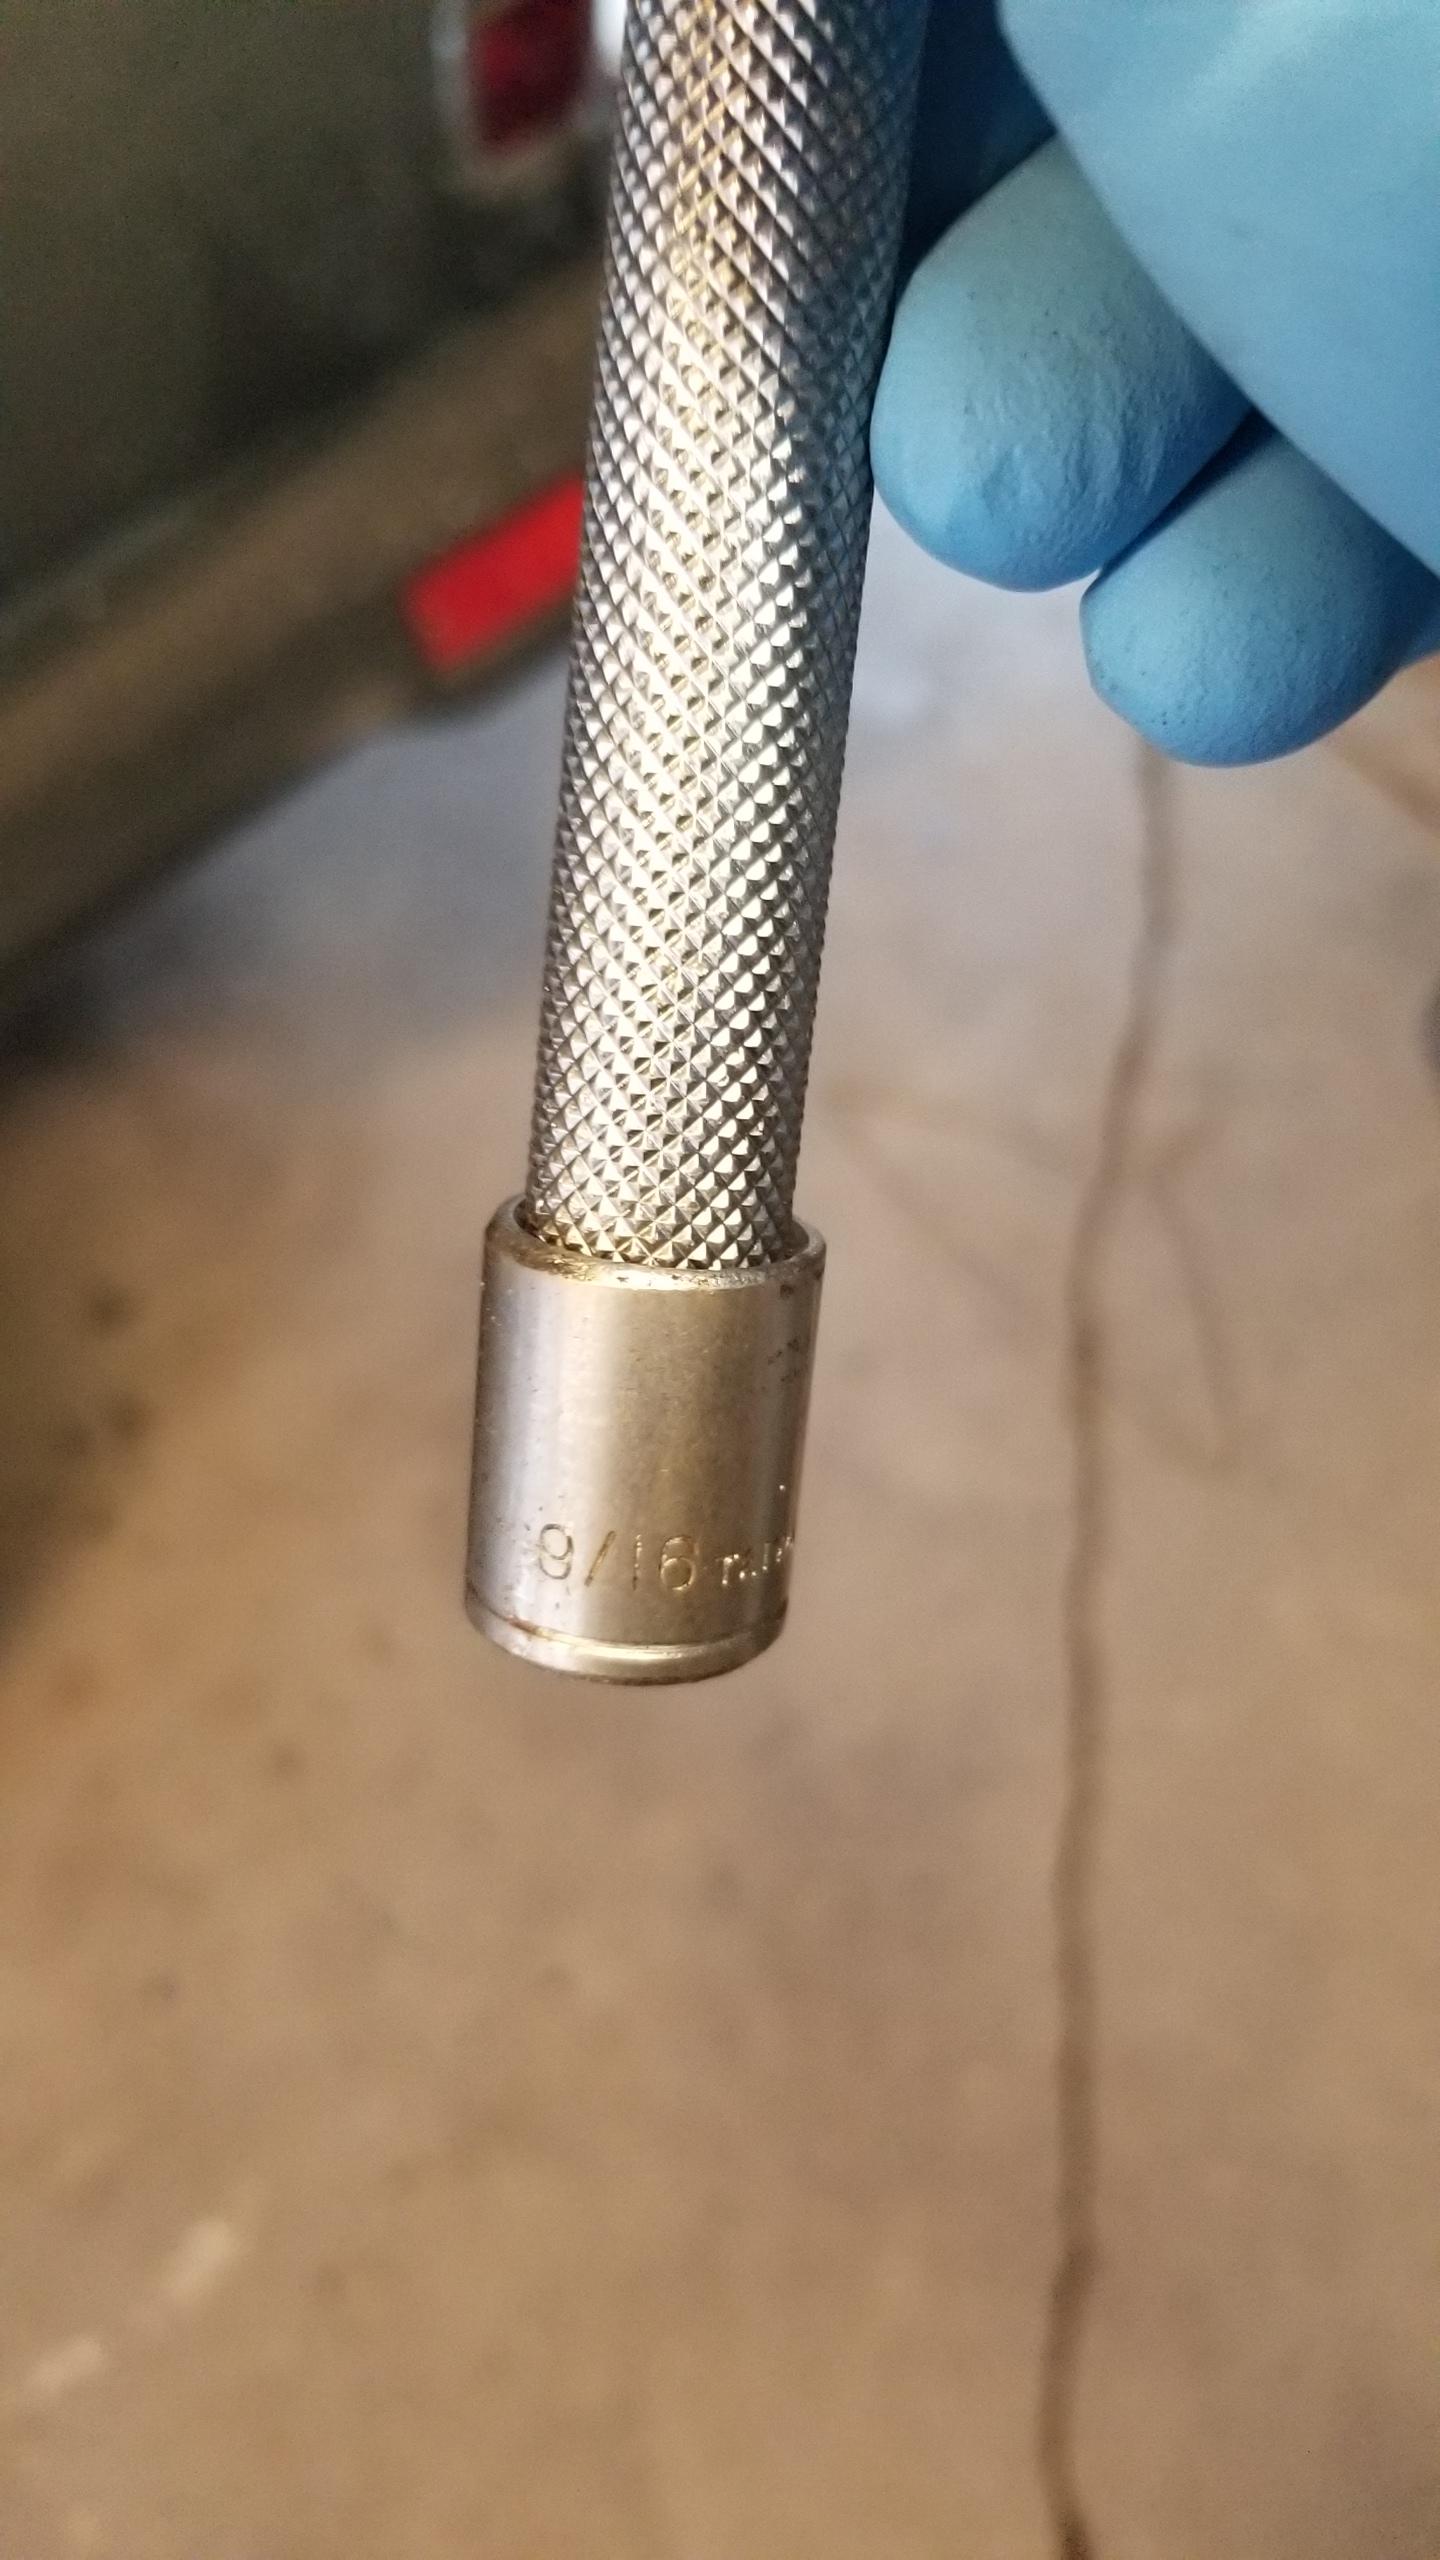
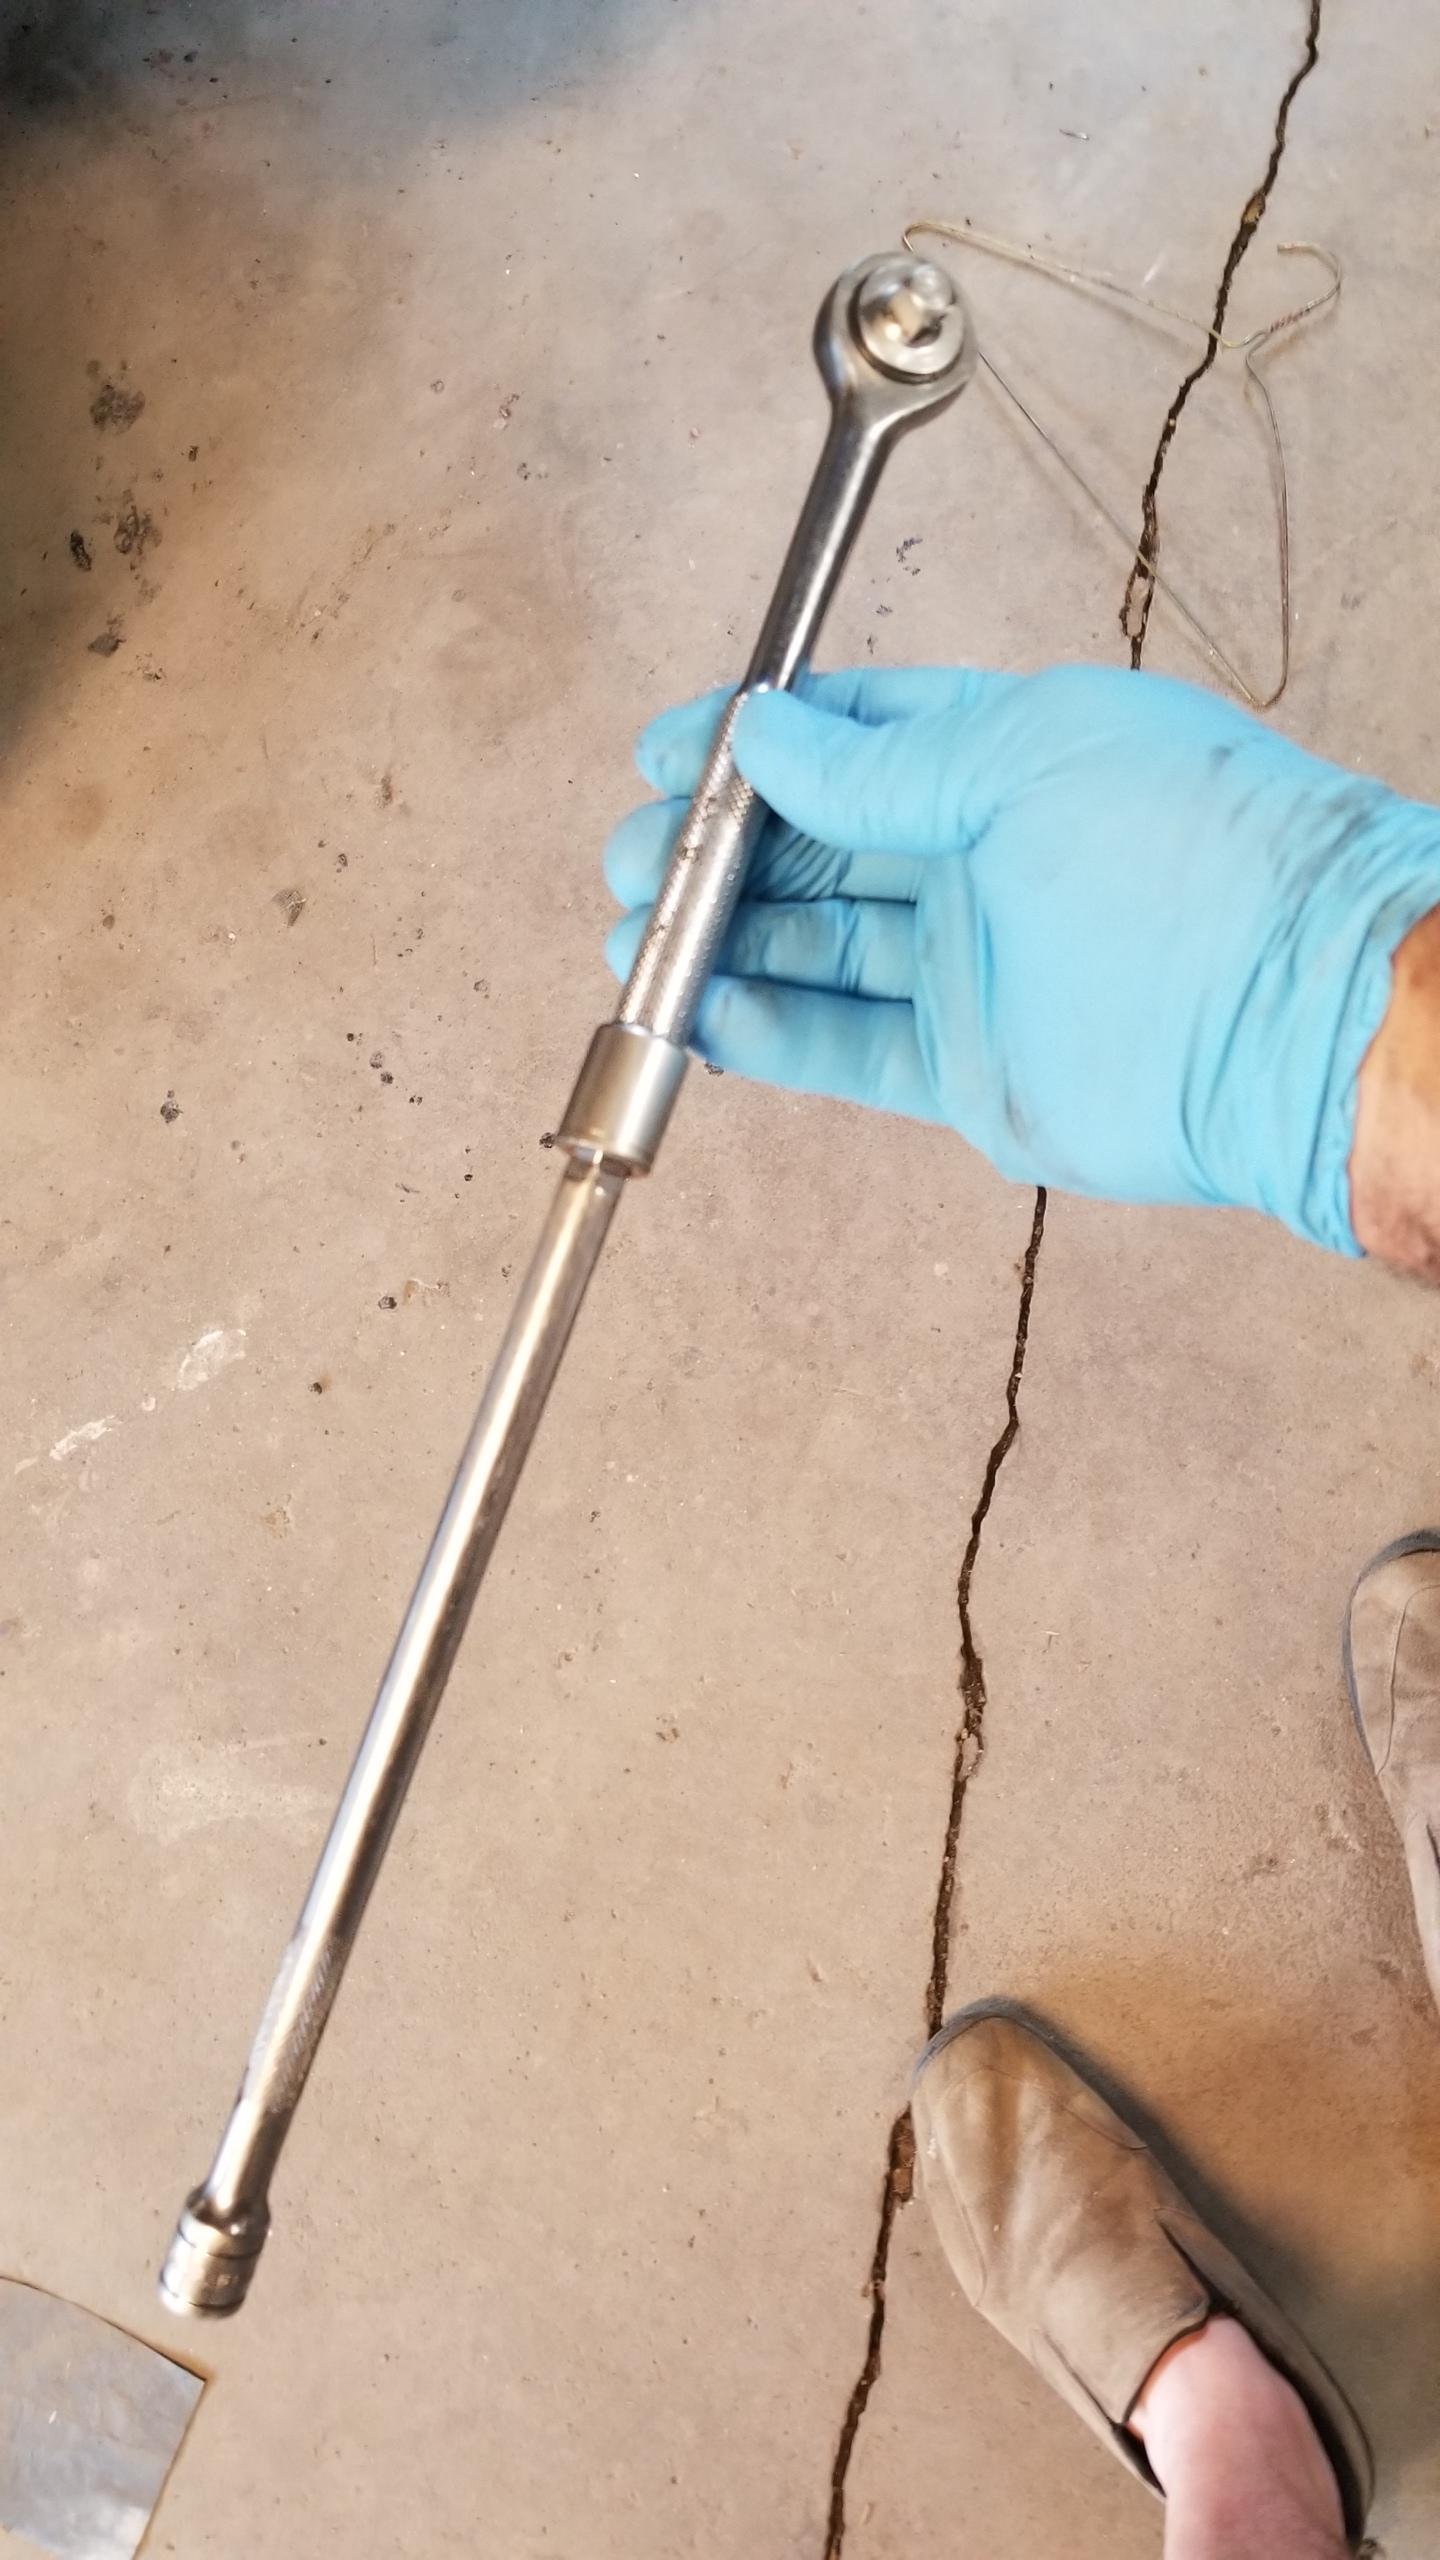
I did need a bit more leverage to break it loose, so I made my own "adjustable" 3/8 breaker bar.
Hammered an old 12pt 9/16 socket on the end of my ratchet.
Image
Now choose which length extension to use based on available space or oomph needed.
Image
:D
And a tip of the hat to Matt for his help.

Starter removal tip from FAQ
http://www.mye28.com/viewtopic.php?t=27427
quadz
Posts: 1
Joined: Oct 31, 2017 3:39 AM
Location: sydney

Re: FAQ M30 Starter R&R

Post by quadz »

Ive recently fitted a b35 starter on to my 1986 m535i however im finding that the slide connector doesnt exactly fit to the point where it doesnt function.

Has anyone else run in to this issue?

I did notice when i was removing from the e34 that the ignition wire was the ring style and not slide on style
1986series6
Posts: 64
Joined: Jul 10, 2017 12:29 PM
Location: West Nyack NY

Re: FAQ M30 Starter R&R

Post by 1986series6 »

Do I understand that the terminal on your harness is a ring and the
starter has a male that needs a female on the harness to connect?

What I did was unbolt the male connector from the starter
and use the ring on the starter stud and nut down the ring onto it.
Owndapwn
Posts: 486
Joined: May 18, 2014 12:22 PM
Location: Kansas City, MO

Re: FAQ M30 Starter R&R

Post by Owndapwn »

Got the starter out. Was going to pull it out and clean and test it. See if I even need a new one. But you know what? It's out. A new one is going back in.
https://i.imgur.com/Bg7xEkq.jpg
I opted to partially remove the intake manifold. Unbolt it and pull it out and away and you have quote-unquote "Plenty™" of room to get it out.
https://i.imgur.com/Mv0iuO8.jpg
Unplugged everything on top, removed the intake boot, removed the fuel pressure regulator from the fuel rail, unclipped the throttle cables, unbolted the manifold, and pulled the front end over the radiator hose (I have a new set of hoses. Damage is possible doing this. Common sense is a better tool than any socket set) and just shift the back end down and away. Leaves you with enough room to get at whatever you need with whatever tools you want without much hassle.
Bonus, I think I found my lack of idle up, if you'll notice the hose that has one end completely ripped off and the other held on with electrical tape. (Fuck you, PO. That hose is $6. That's.. premium burrito money)

https://i.imgur.com/Puym0Xd.jpg
Here's a better but still pretty bad view of the space it leaves you with.

Now, how important do you think new intake gaskets would be? On one hand, they look fine. On the other they're cheap. On the third hand, they're going to be a pain in the ass to clean off from this angle. :dunno:
Sacredratio
Posts: 24
Joined: Dec 12, 2015 9:46 PM
Location: Tampa
Contact:

Re: FAQ M30 Starter R&R

Post by Sacredratio »

This was a job that I had built up in my head like crazy. When it came down to it, the 17mm boxed end wrench from the ttrunk tool kit was the only tool I used (aside from the necessary tools to disconnect the wires)

I removed the old one and put in the much lighter, easier 441x

This requires the removal of 0 coolant lines, intakes, or anything else.

All said and done I think the entire job took me 50 minutes from start to finish.
seriously111
Posts: 74
Joined: Feb 02, 2017 5:46 PM
Location: Los Angeles

Re: FAQ M30 Starter R&R

Post by seriously111 »

Just taking an exhausted angry breather from this bear of a job. I hope I don’t curse here.

Notes:

Bought a reman Bosch sr442x from Pelicanparts.
Word was the 442 and 441 are same units (ie smaller OE SR41

Well- despite its label my SR442x was exactly the same size as SR41x. It’s the same unit. Same weight. Same stupid bolt hole problem.

Actually it’s worse. Not sure if this due to the reman process but the space around bolt head is now EVEN smaller!! Seriously. The factory wrench will barely fit.
(Forget about using any thin wall sockets)

I will persevere, of course. But I caution those buying a 442x thinking it will be a smaller unit than 41x. Mine wasn’t.
Post Reply