szacsi72's 1984 Zinnoberrot 535i Build
Re: szacsi72's E28 535i build thread - "The Reddie"
Thanks for the support guys. I'm a bit better now, I can walk and eat and whatnot, just don't have any power - both physically and mentally - but my friend is coming over tomorrow to help a bit, so that the project can continue. I'll need to wait quite a lot for the machine shop Anyway, so I really want to at least get the engine block and cylinder head there..
Re: szacsi72's E28 535i build thread - "The Reddie"
I'm also wishing you a restful and full recovery.
Re: szacsi72's E28 535i build thread - "The Reddie"
Thanks Mdreamer!
So my friend came over on Saturday, and "helped me" (read: did everything while I observed.) Here are some updated.
1. Good news: All the pistons, and rings came out undamaged. So my fear of having broken rings or damanged pistons is gone. There's some wear, and minor scrape on all pistons. I will measure the cylinders and pistons next week and see how bad the wear is, and continue after I've got the data.
I'm also considering coating them with Cerakote C110 and C186. I don't think it would gain much, I'm mostly just interested in the technology, + the skirt coating could help with the minor wear and scrathes. We'll see!
2. news: we removed the clutch and flywheel and had quite a surprise. When I bought this powertrain - engine to transmission - I was told "resurfaced, double mass flywheel, with a new sachs clutch".
Well, the flywheel wasn't resurfaced, apart from some angle grinder signs... , the clutch wasn't new and it wasn't a double mass. Which would normally make me happy, since I got a single mass flywheel, BUT it's basically trash. And I wondered why it felt a bit odd and a bit shakey...
I forgot to take a picture of the clutch disc, but it's a non-sprung one. Well, that explains some unwanted noises... and while it shaked when pulling out of first gear. And I tried to blame the driveshaft.. into the trash it goes. New clutch and flywheel are waiting for me anyway!
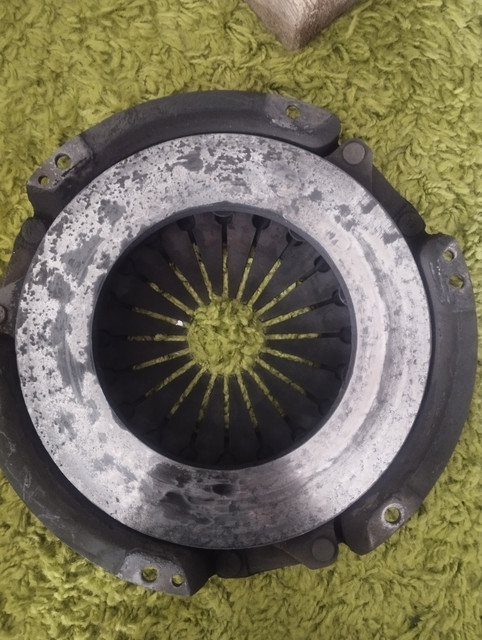
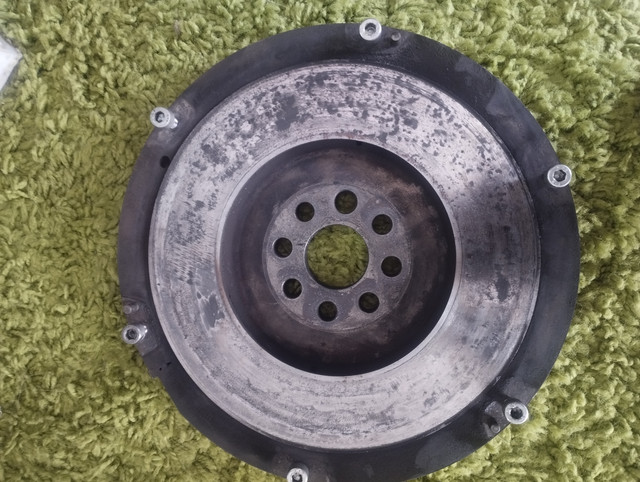
3. bad news: cylinder #4 had a conrod bearing failure. Yet again, I forgot to take a picture, which I will make up for later. But it's worn down to the copper/bronze base, and when fitted without the crankshaft, I can visually see that it's oval and bent. AND YET, the crankshaft is in perfect shape.
Maybe the head gasket issue wasn't that bad after all, or else, I wouldn't have pulled the engine. I really don't know how I did not notice this, I had oil pressure, and there was no knocking sound at all.
Anyway, I'll measure and polish the crankshaft and get new bearings.
I'll disassamble the cylinder head when I have some time - and when I feel better, then the head and the block are off to the machine shop! Both will be skimmed for higher compression ratio, and the block will recieve a clean-up honing.
4. This is just interesting: I yet again got SUPER LUCKY! Do you see anything missing here? No? Yes? Welp, I've lost the king nut while driving. Luckily, nothing was sent to the sky... this could've ended badly!
I'll NEVER install anything again without checking every single bolt and myself.
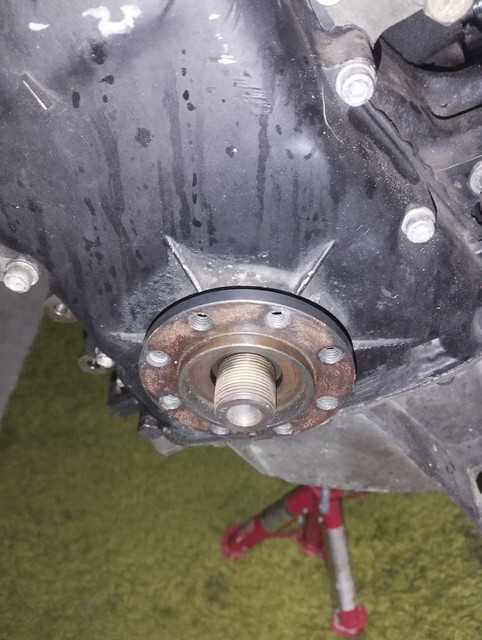
Until next time!
So my friend came over on Saturday, and "helped me" (read: did everything while I observed.) Here are some updated.
1. Good news: All the pistons, and rings came out undamaged. So my fear of having broken rings or damanged pistons is gone. There's some wear, and minor scrape on all pistons. I will measure the cylinders and pistons next week and see how bad the wear is, and continue after I've got the data.
I'm also considering coating them with Cerakote C110 and C186. I don't think it would gain much, I'm mostly just interested in the technology, + the skirt coating could help with the minor wear and scrathes. We'll see!
2. news: we removed the clutch and flywheel and had quite a surprise. When I bought this powertrain - engine to transmission - I was told "resurfaced, double mass flywheel, with a new sachs clutch".
Well, the flywheel wasn't resurfaced, apart from some angle grinder signs...
I forgot to take a picture of the clutch disc, but it's a non-sprung one. Well, that explains some unwanted noises... and while it shaked when pulling out of first gear. And I tried to blame the driveshaft..


3. bad news: cylinder #4 had a conrod bearing failure. Yet again, I forgot to take a picture, which I will make up for later. But it's worn down to the copper/bronze base, and when fitted without the crankshaft, I can visually see that it's oval and bent. AND YET, the crankshaft is in perfect shape.
Maybe the head gasket issue wasn't that bad after all, or else, I wouldn't have pulled the engine. I really don't know how I did not notice this, I had oil pressure, and there was no knocking sound at all.
Anyway, I'll measure and polish the crankshaft and get new bearings.
I'll disassamble the cylinder head when I have some time - and when I feel better, then the head and the block are off to the machine shop! Both will be skimmed for higher compression ratio, and the block will recieve a clean-up honing.
4. This is just interesting: I yet again got SUPER LUCKY! Do you see anything missing here? No? Yes? Welp, I've lost the king nut while driving. Luckily, nothing was sent to the sky... this could've ended badly!
I'll NEVER install anything again without checking every single bolt and myself.

Until next time!

Re: szacsi72's E28 535i build thread - "The Reddie"
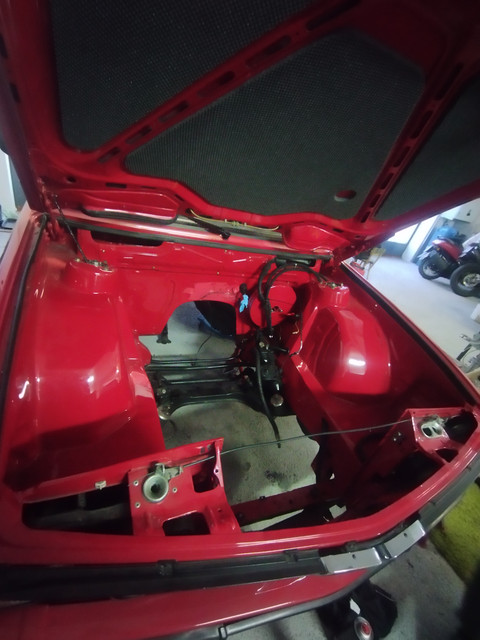
That's a VERY clean engine bay!
Love the way it looks.
Love the way it looks.
Re: szacsi72's E28 535i build thread - "The Reddie"
Thanks, I'm about to destroy it.

Re: szacsi72's E28 535i build thread - "The Reddie"
While the components I need to continue with the engine build are on their way, I've decided on the interior.
Black headliner ✓
Red seatbelts ✓
Red stitching ✓
Red gauges/needles ✓
Black plastics ✓
E34 sport seats ✓
And the last piece of the puzzle:
M-Rain cloth fabric for the seats with black sides and middle for the rear seats; and also M-rain for the door cards.
I think it will match nicely.
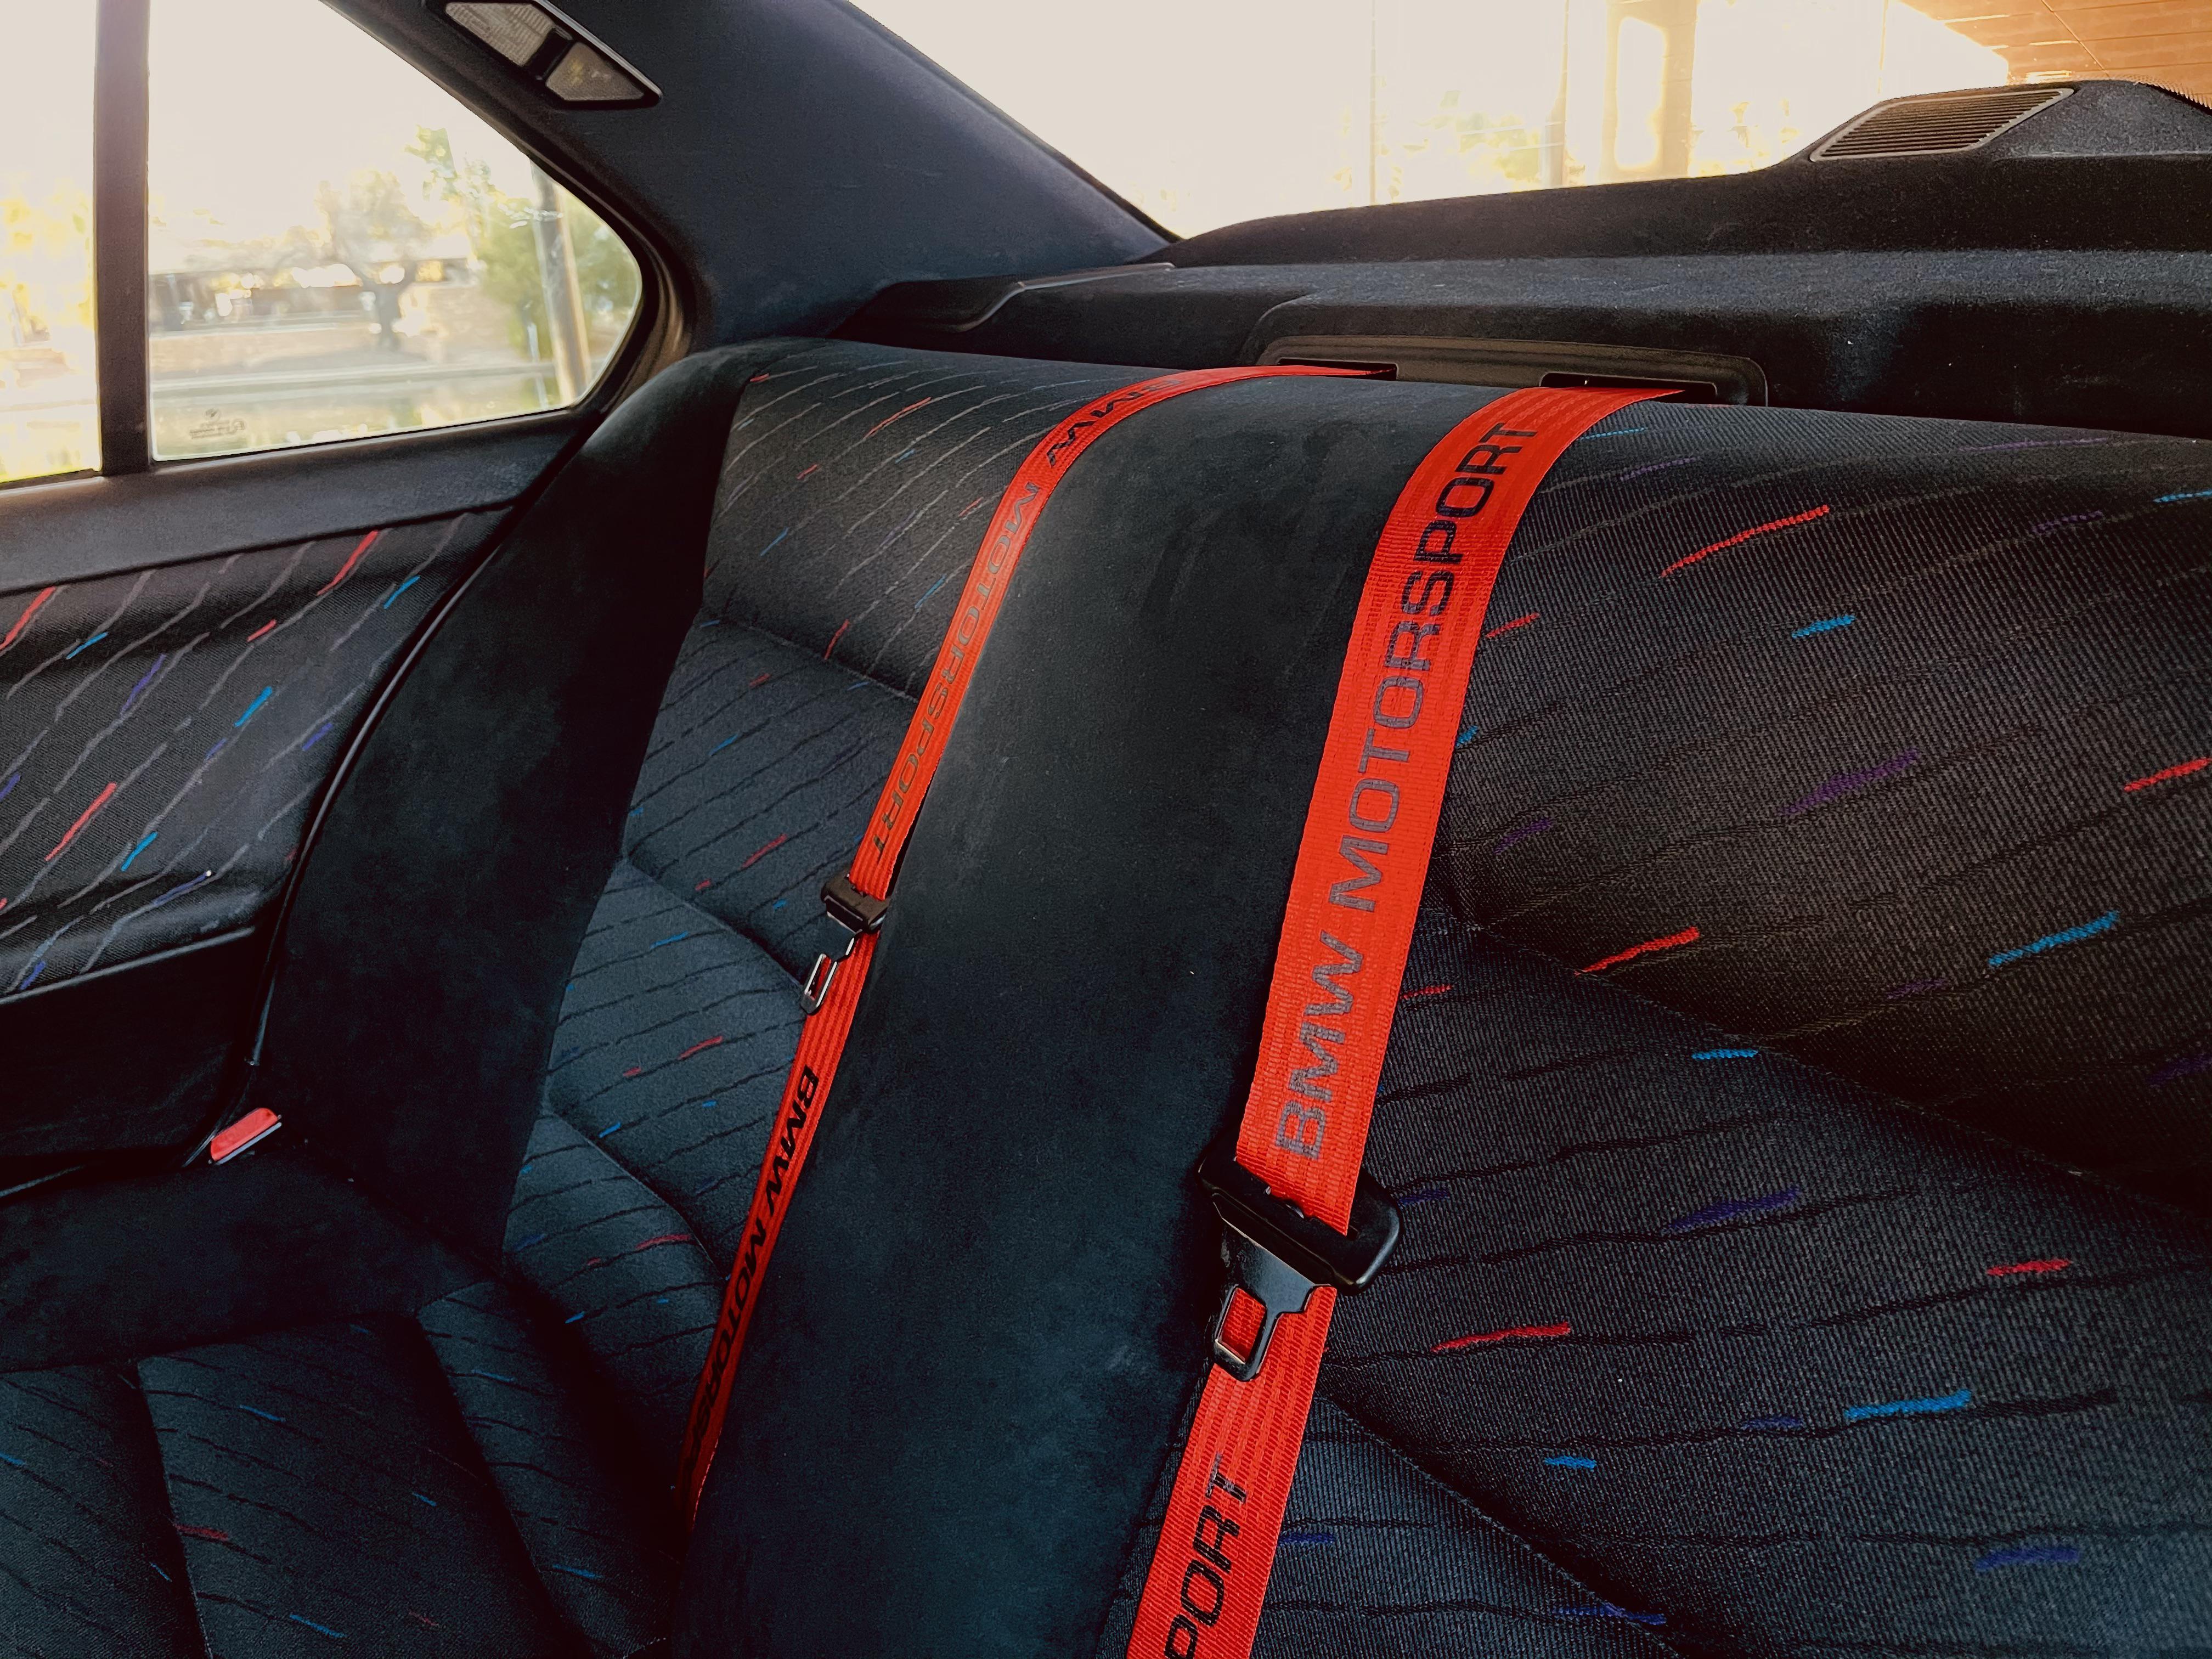
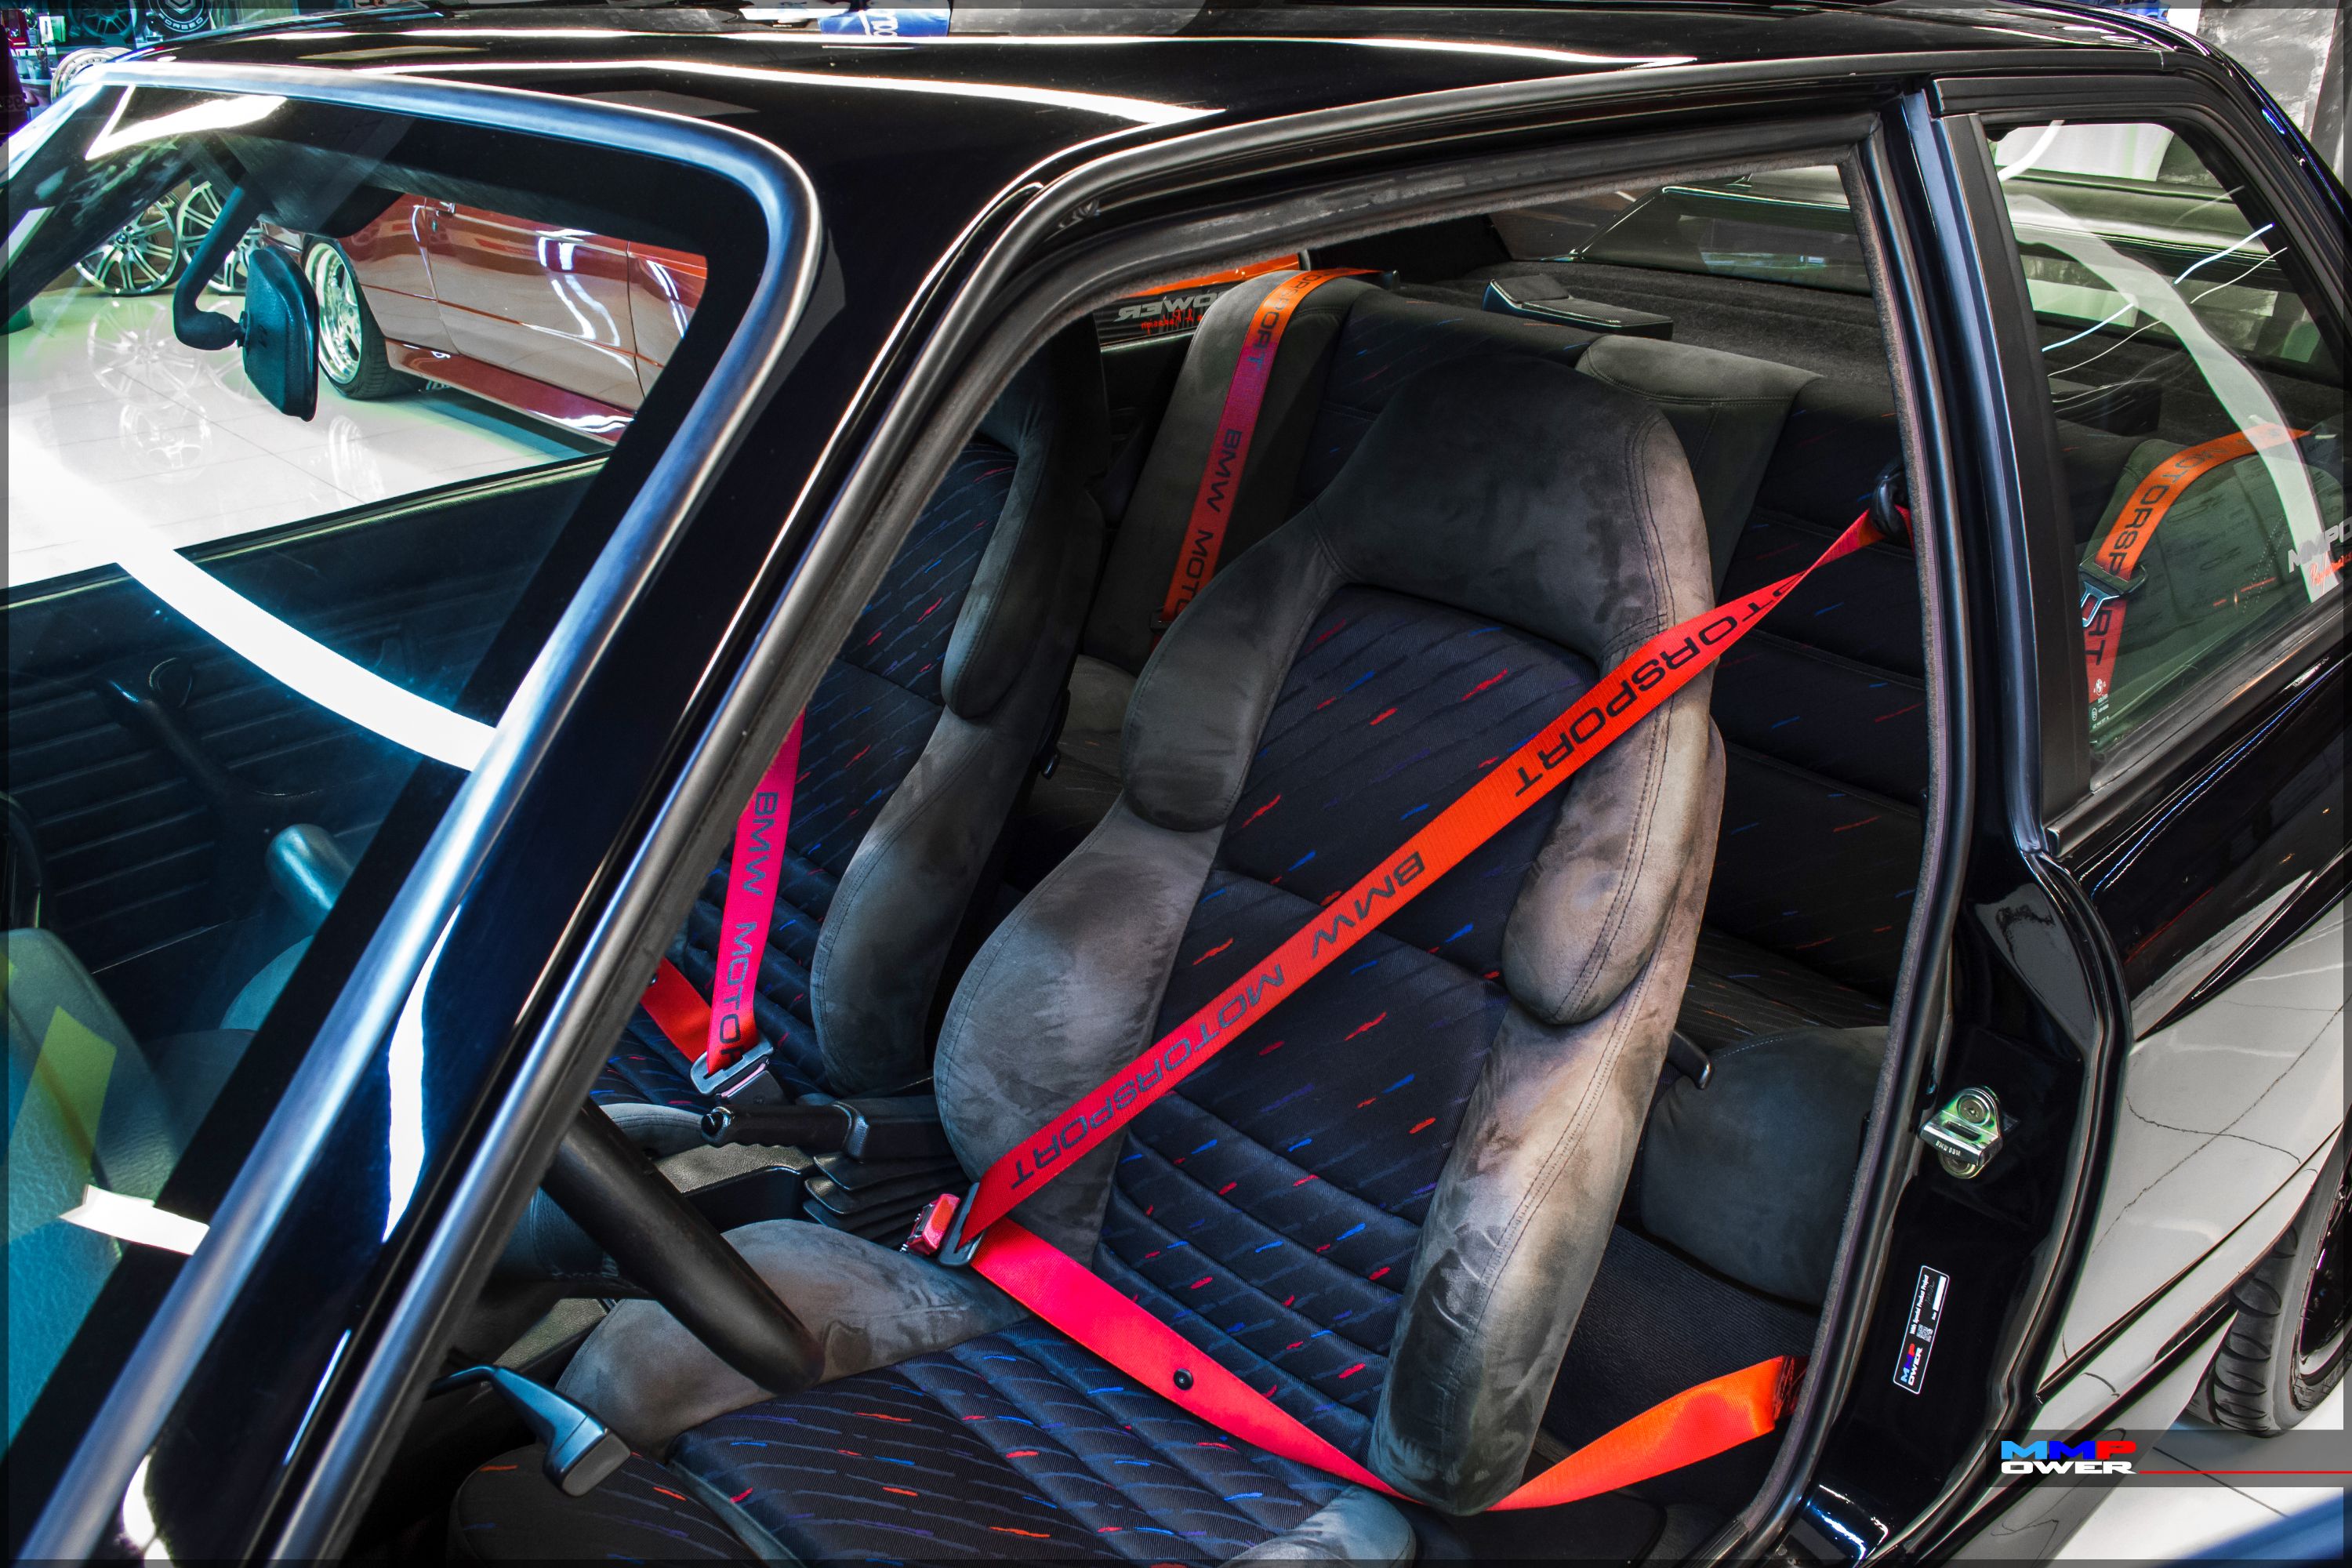
Black headliner ✓
Red seatbelts ✓
Red stitching ✓
Red gauges/needles ✓
Black plastics ✓
E34 sport seats ✓
And the last piece of the puzzle:
M-Rain cloth fabric for the seats with black sides and middle for the rear seats; and also M-rain for the door cards.
I think it will match nicely.


Re: szacsi72's E28 535i build thread - "The Reddie"
I'm feeling better and better, so todays program was measurements.
I removed most components from the cylinder head to prepare it for the machine shop, and measured the piston and cylinder wear to see if I can reuse them.
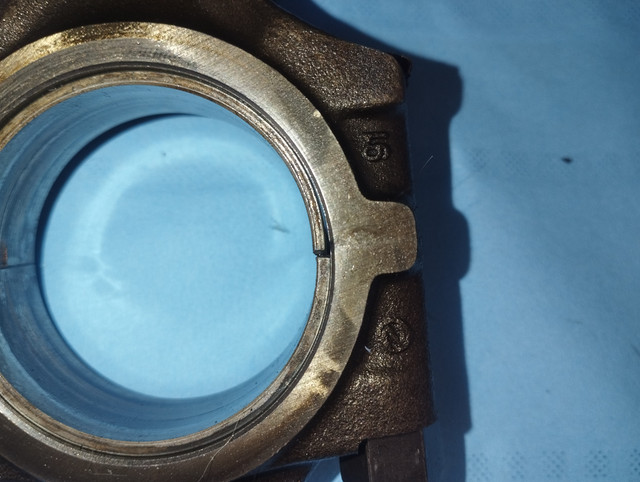
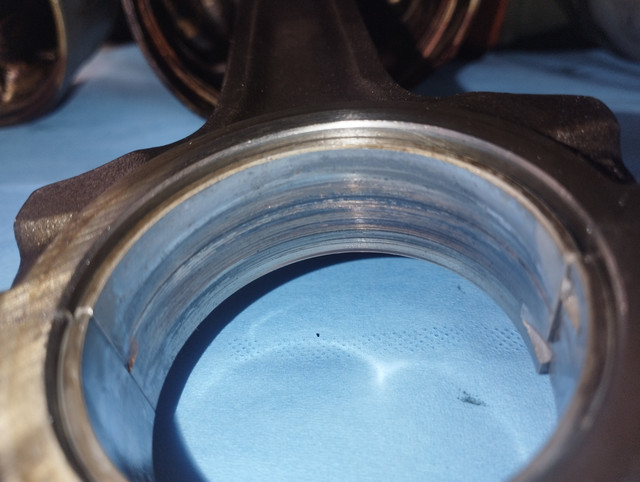
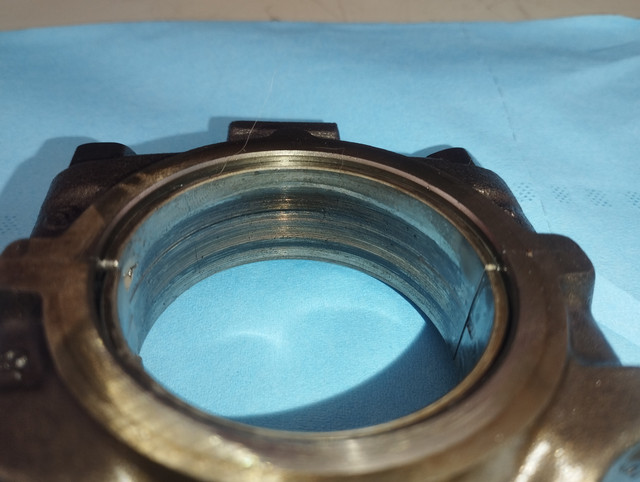
Before I get going with that, here are the pictures of the rod bearing on cyl4. As you can see it's really worn, and even deformed. I'm not sure how, and why only cyl4 is like this, probably lack of oil from a blocked oil path? Possibly. I will never know, but this engine did NOT live an easy life, that's for sure, and you'll see soon as you scroll....
Surprise #1:
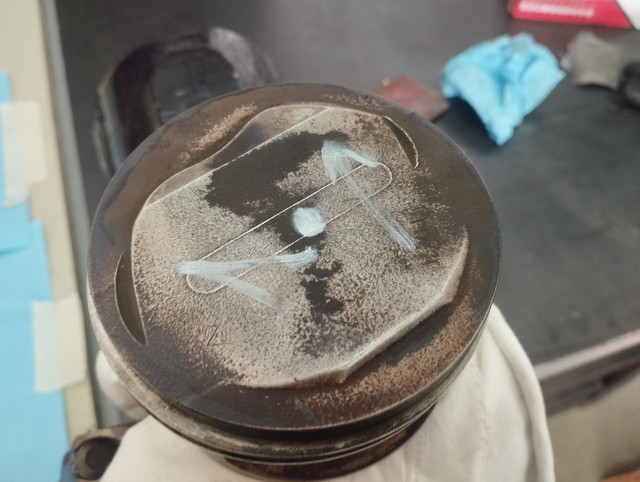
I was looking at this piston and something was odd. I looked at the other pistons and noticed that only this one had a relief cut for the exhaust... wait! That's not a relief cut! Someone lost a valve before me... must have been a different head, the valve looks intact.
Surprise #2:
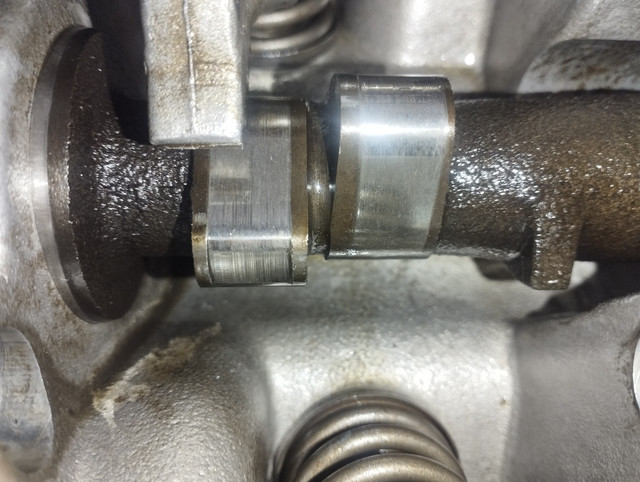
As I was disassemblying the head, I finally had a good look at the camshaft. I knew that there was quite some wear on cyl1, (the rest are barely worn - maybe it had a banjo fail somewhen..), but I didn't expect it to be this bad. The wear on cyl1 exhaust lobe measured exactly 0.6mm, which means roughly 0.8mm in lift. No wonder it idled like it had a hotcam..
Surprise #3:
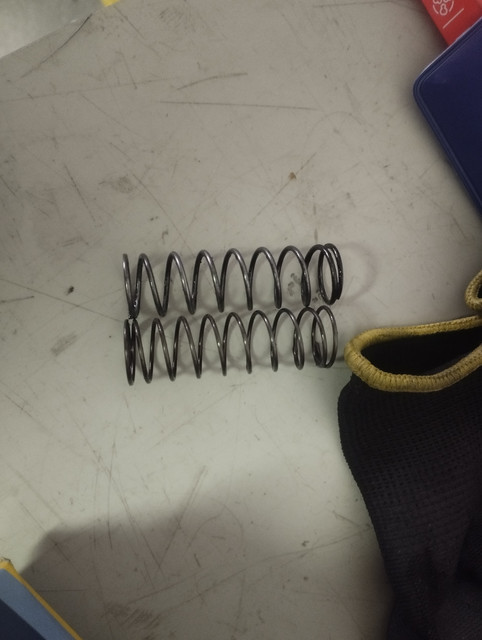
There was one spring that was different to the others. It was much stiffer. I don't think it would have caused any issues, but I'm glad I caught it. Probably doesn't help with wear!
Surprise #4:
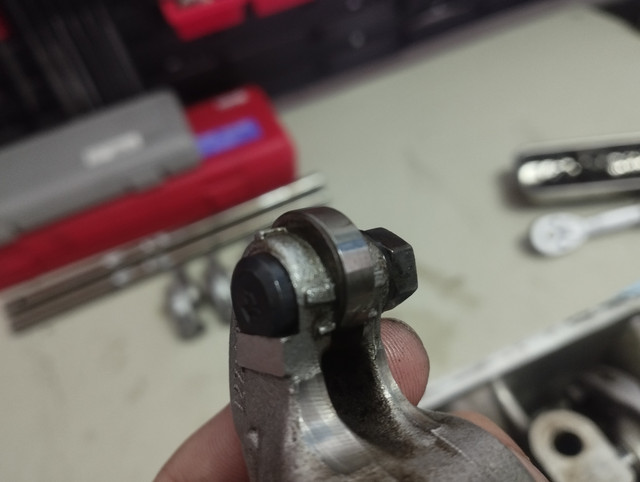
I've never seen an original BMW rocker this worn. This one is cyl1 exhaust, the one that had the wear on the camshaft, so it's understandable..:
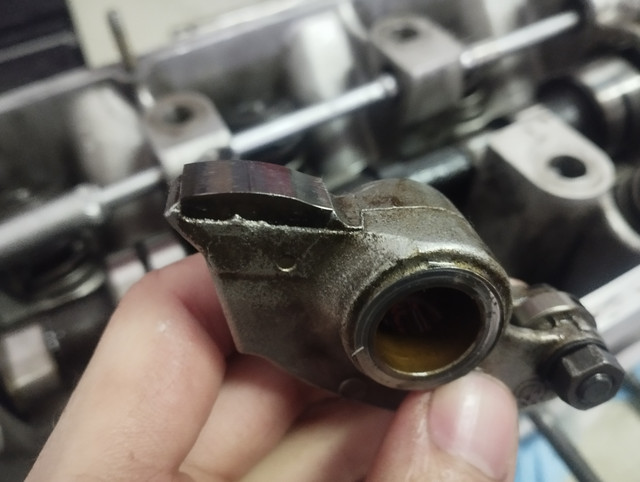
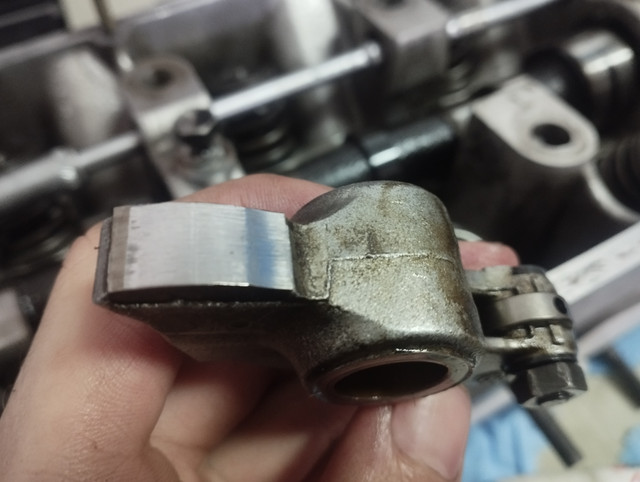
But this one is even worse, this is cyl5 intake. The camshaft is barely worn, or damaged! No idea how this happened but I think probably this head (and the whole engine basically) was just thrown together from random components they had laying around... I guess it shows. It lived 5000kms-ish.
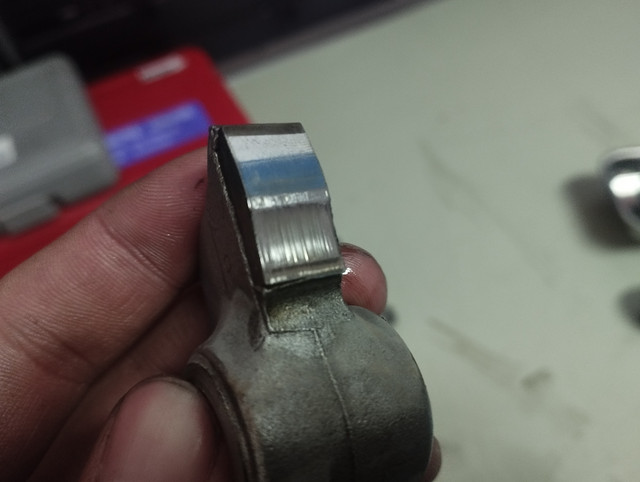
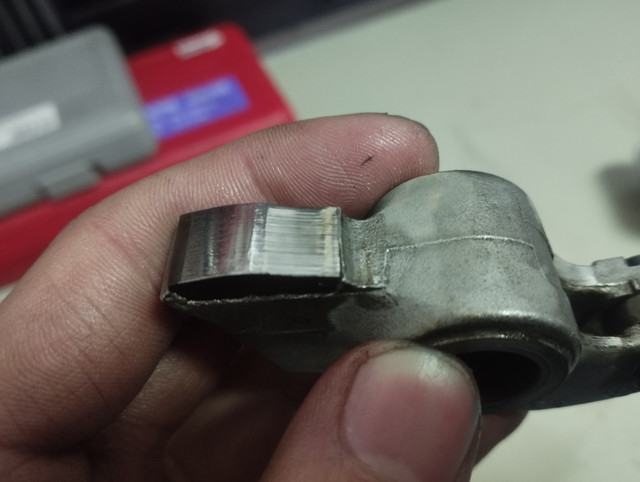
Wear on the eccentrics was quite normal:
That's all for the head now. Needed to see what I'm dealing with - time to measure!
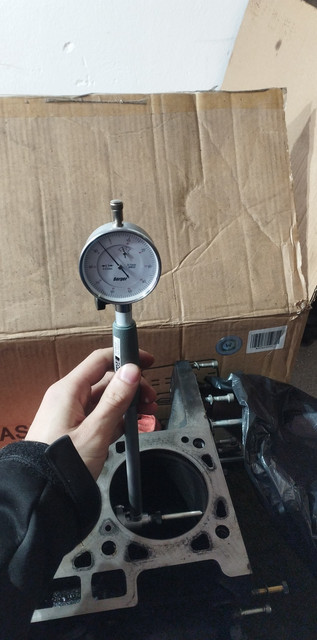
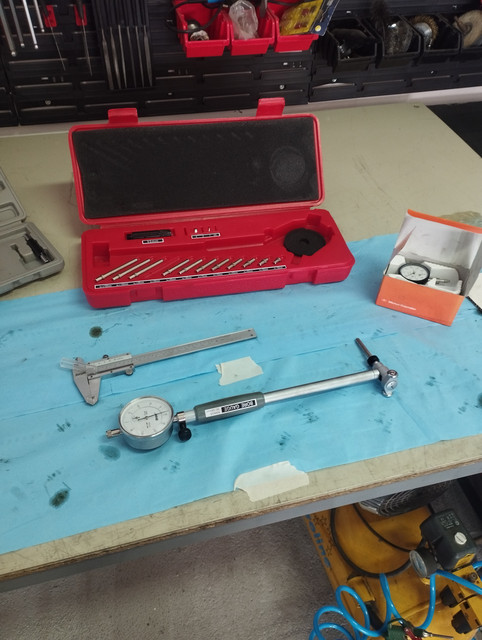
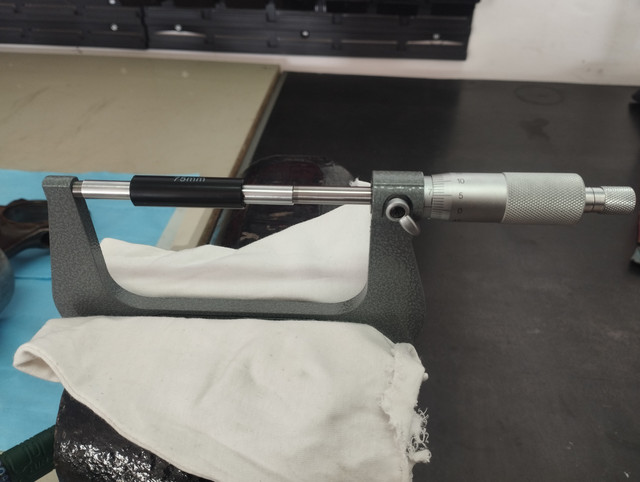
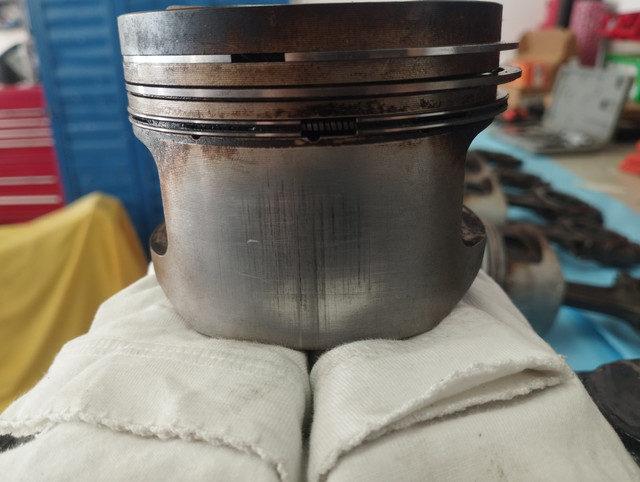
There was some scoring (scuffing?) on all 6 pistons, but neither of them looked too bad and they aren't too deep. Almost all older M30 pistons look like this, so I'm not too worried (but let me know if you think otherwise!), probably a lot of cold starts.
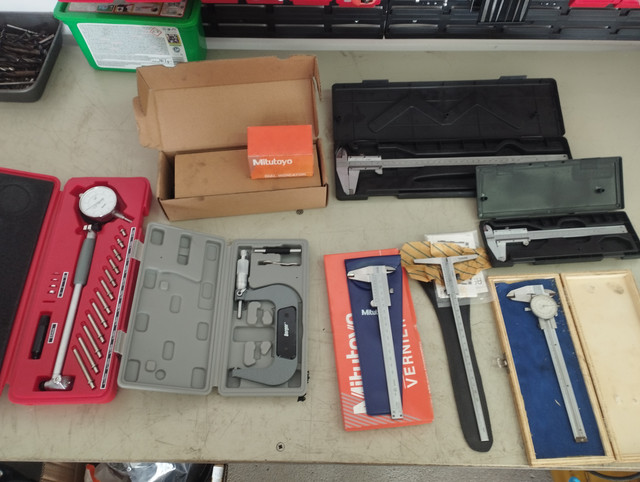
I won't bore you with the process, here are the numbers:
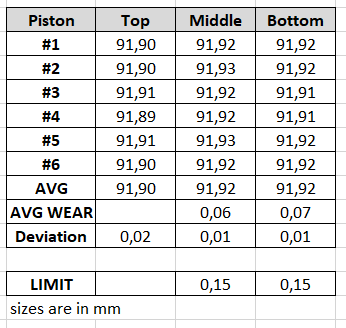
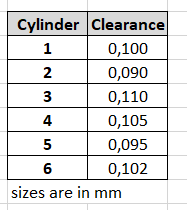
Regarding the pistons, I'm quite satisfied. On average, I'm at 40% of their life based on the 0.15 "wear limit". Good for another... who even knows how many kilometers... a lot of.
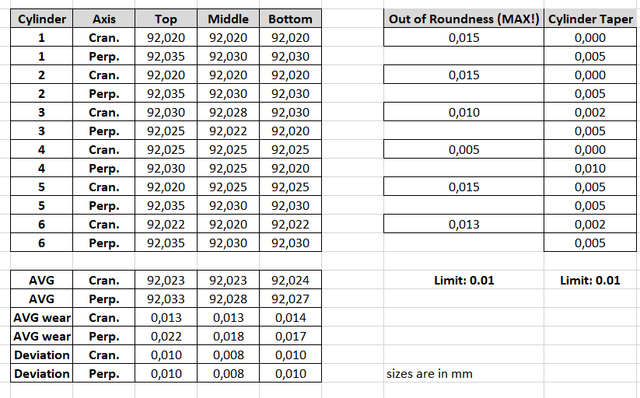
The cylinder wear isn't too bad either, but the sides appear polished and I can't see the honing marks, so it's far from new. Unfortunately, I'm just over the limit... BMW states that out of roundness should be 0.01mm max, and multiple cylinders measured in at 0.015mm.
Cylinder taper is good, not out of the limit anywhere.
Based on these values, I'm considering asking my machinist to hone my cylinders to 92.04mm.
I would still be within reasonable clearances (0.15mm service limit for the piston, remember), but it would remove the leftover taper and out of roundness. Plus, it needs a cleanup and re-hone anyway...
Guys with M30 experience... Let me know what you think!
I'll talk about compression ratio and how much I want to deck the parts in the next post...
I removed most components from the cylinder head to prepare it for the machine shop, and measured the piston and cylinder wear to see if I can reuse them.
Before I get going with that, here are the pictures of the rod bearing on cyl4. As you can see it's really worn, and even deformed. I'm not sure how, and why only cyl4 is like this, probably lack of oil from a blocked oil path? Possibly. I will never know, but this engine did NOT live an easy life, that's for sure, and you'll see soon as you scroll....


Surprise #1:
I was looking at this piston and something was odd. I looked at the other pistons and noticed that only this one had a relief cut for the exhaust... wait! That's not a relief cut! Someone lost a valve before me...

Surprise #2:
As I was disassemblying the head, I finally had a good look at the camshaft. I knew that there was quite some wear on cyl1, (the rest are barely worn - maybe it had a banjo fail somewhen..), but I didn't expect it to be this bad. The wear on cyl1 exhaust lobe measured exactly 0.6mm, which means roughly 0.8mm in lift. No wonder it idled like it had a hotcam..

Surprise #3:
There was one spring that was different to the others. It was much stiffer. I don't think it would have caused any issues, but I'm glad I caught it. Probably doesn't help with wear!

Surprise #4:
I've never seen an original BMW rocker this worn. This one is cyl1 exhaust, the one that had the wear on the camshaft, so it's understandable..:


But this one is even worse, this is cyl5 intake. The camshaft is barely worn, or damaged! No idea how this happened but I think probably this head (and the whole engine basically) was just thrown together from random components they had laying around... I guess it shows. It lived 5000kms-ish.


Wear on the eccentrics was quite normal:

That's all for the head now. Needed to see what I'm dealing with - time to measure!


There was some scoring (scuffing?) on all 6 pistons, but neither of them looked too bad and they aren't too deep. Almost all older M30 pistons look like this, so I'm not too worried (but let me know if you think otherwise!), probably a lot of cold starts.

I won't bore you with the process, here are the numbers:


Regarding the pistons, I'm quite satisfied. On average, I'm at 40% of their life based on the 0.15 "wear limit". Good for another... who even knows how many kilometers... a lot of.
The cylinder wear isn't too bad either, but the sides appear polished and I can't see the honing marks, so it's far from new. Unfortunately, I'm just over the limit... BMW states that out of roundness should be 0.01mm max, and multiple cylinders measured in at 0.015mm.
Cylinder taper is good, not out of the limit anywhere.
Based on these values, I'm considering asking my machinist to hone my cylinders to 92.04mm.
I would still be within reasonable clearances (0.15mm service limit for the piston, remember), but it would remove the leftover taper and out of roundness. Plus, it needs a cleanup and re-hone anyway...
Guys with M30 experience... Let me know what you think!

I'll talk about compression ratio and how much I want to deck the parts in the next post...
Re: szacsi72's E28 535i build thread - "The Reddie"
So, regarding the compression ratios.
My plan is to basically up the compression, as I will be running a medium-hot cam, to have a higher than original dynamic compression ratio. I don't want the engine to react sluggish at low RPM - which is something that I've seen happen with the combination of a hot cam and low compression.
I also measured out the B35 Alkan pistons to have a dome volume of 6.6cc.
Interestingly enough (I still can't get over this) the values I get are higher than the stated BMW values. Either the head CC is wrong, or BMW lied.
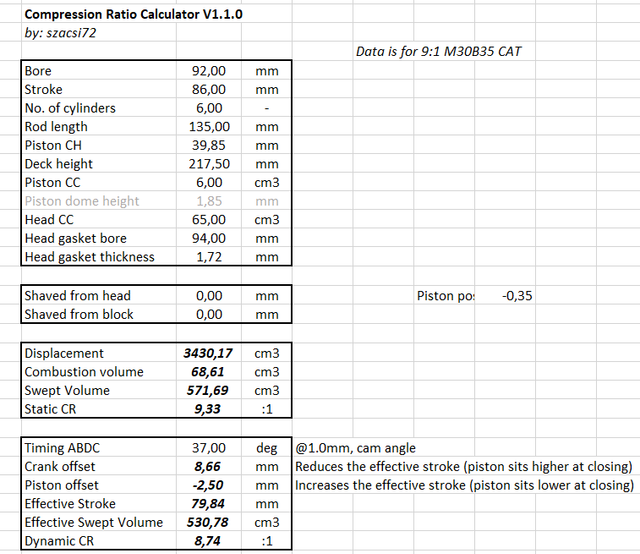
Anyway, I measured my cylinder head to be 128.8mm and the block to be 217.4mm.
My plan is to shave off 0.3mm from the head (to be at -0.5mm from the original of 129.0mm), and the block 0.2mm (to be at -0.3mm of the original of 217.5mm).
This should give me a dynamics compression ratio of 9.03, while the original is 8.74.
I will probably need to mill the pistons for the valves...
My plan is to basically up the compression, as I will be running a medium-hot cam, to have a higher than original dynamic compression ratio. I don't want the engine to react sluggish at low RPM - which is something that I've seen happen with the combination of a hot cam and low compression.
I also measured out the B35 Alkan pistons to have a dome volume of 6.6cc.
Interestingly enough (I still can't get over this) the values I get are higher than the stated BMW values. Either the head CC is wrong, or BMW lied.

Anyway, I measured my cylinder head to be 128.8mm and the block to be 217.4mm.
My plan is to shave off 0.3mm from the head (to be at -0.5mm from the original of 129.0mm), and the block 0.2mm (to be at -0.3mm of the original of 217.5mm).
This should give me a dynamics compression ratio of 9.03, while the original is 8.74.
I will probably need to mill the pistons for the valves...
Re: szacsi72's E28 535i build thread - "The Reddie"
Very interesting.
What are the cam specs and what's the new CR?
What are the cam specs and what's the new CR?
Re: szacsi72's E28 535i build thread - "The Reddie"
Cam specs are:
KMCams Steg 2
290°/290°, 10.2mm/10.2mm, 110°/110°
https://kmcams.com/products/bmw-735-528 ... m30-steg-2
The new static compression ratio is just a hair under 10.0:1.
Re: szacsi72's E28 535i build thread - "The Reddie"
Cheers. Looking forward to future updates.
Re: szacsi72's E28 535i build thread - "The Reddie"
It will hopefully come soon!
Re: szacsi72's E28 535i build thread - "The Reddie"
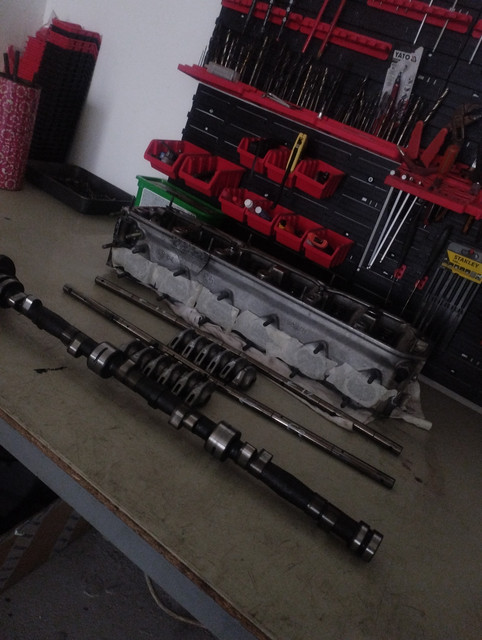
Had some time to completely disassemble the head.
The goal is to do all the modifications now, so once it's back from the machine shop, I can clean it and install it, without worrying of particles and/or damaging the surface.
I re-tapped every thread to clean them up, and sanded all the mating surfaces with 400grit. Prior to that, I soda blasted the whole head to make my job easier.
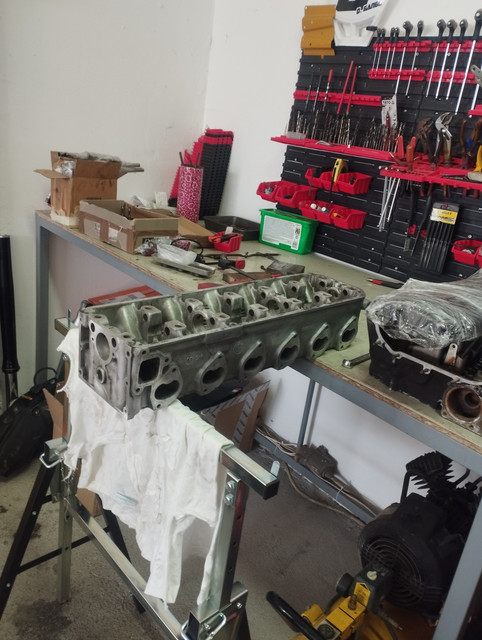
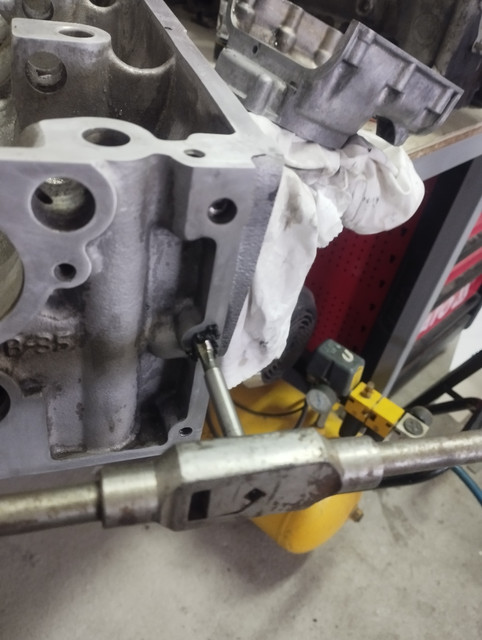
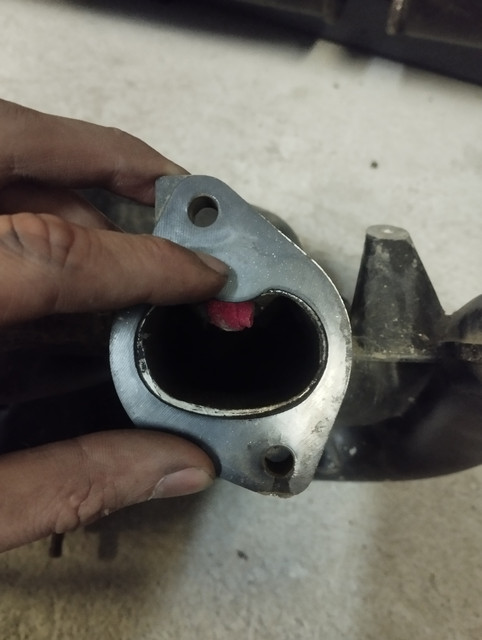
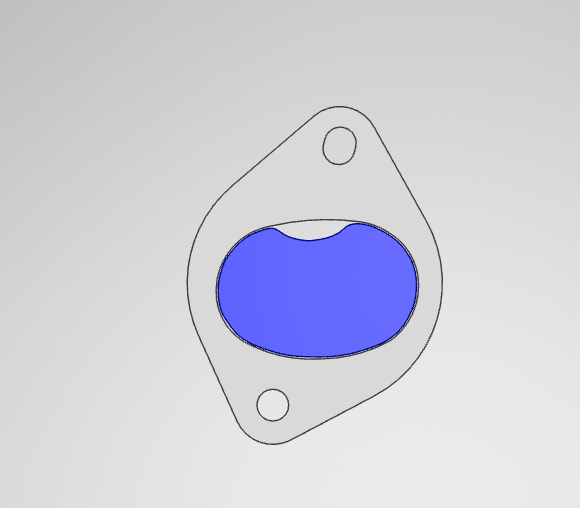
Now that it's empty, I can prepare for the head porting. I'm not doing anything crazy - no need to reinvent the wheel. The most important thing is port matching the intake manifold. The gasket is 95% accurate compared to the actual head port, so you can see that there's quite some material that needs to be removed. In some areas, the lip is as big as 2mm... To help with the porting, I scanned the gasket, and drew the new port shape I'm looking to create.
upload pic
Apart from that, I'll just smoothen out the ports with 120 grit on both sides, and blend in the guide a bit more.
However I don't know what to do on the exhaust site. The headers I bought have a larger than stock port, which means that if I want to take advantage of that - and match the cylinder head port to it - I'll need custom, bigger port gaskets. That's not a problem, but then I'd loose the heat shield. So I guess I'll need to make a custom heat shield too, that I'll mount OVER the manifold - not under, like the stock one.
It's not the end of the worlds, just a bit more work that I don't want to do, this build it taking forever already Anyway.
As I could not start with the porting but still had some time, I took a closer look at the KMcams rockers. They are gas nitrided, which leaves the surface finish a bit dull. KMcams states that it's fine, and I can see why. This is after roughly 30 seconds of polishing with a car paint polishing compound. It's nice underneath, and the coating will probably come off in the first 15 seconds when the engine is finally started...
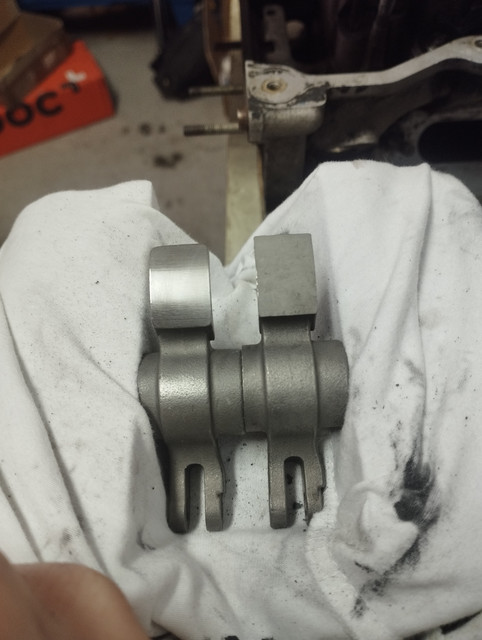
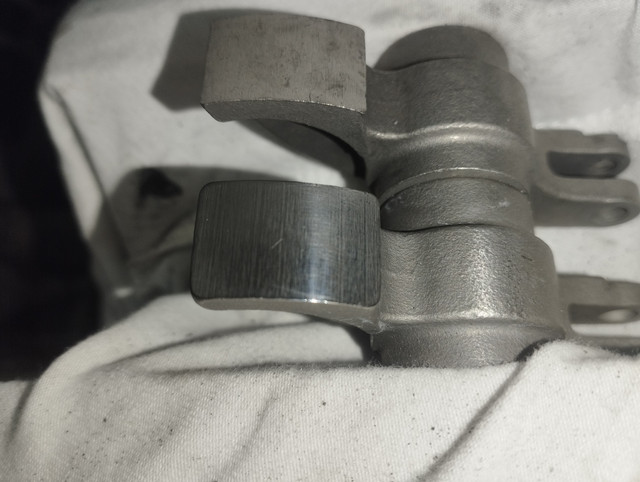
Of course that doesn't stop me from pre-polishing them. I'll get some 2000, 4000 sanding blocks and hit every single one of them, then some polishing compound. I'm doing this because in my head, I have this idea that this will help with the break in - I hope for a smoother initial finish on the cam - the materials from the dull finish will go somewhere! Either into my oil, or onto my camshaft. Don't want neither!
Second, I hope this will help minimize the valve gap enlarging, so the valve train won't get too loud too quickly, before I do my 1000km valve adjustment.
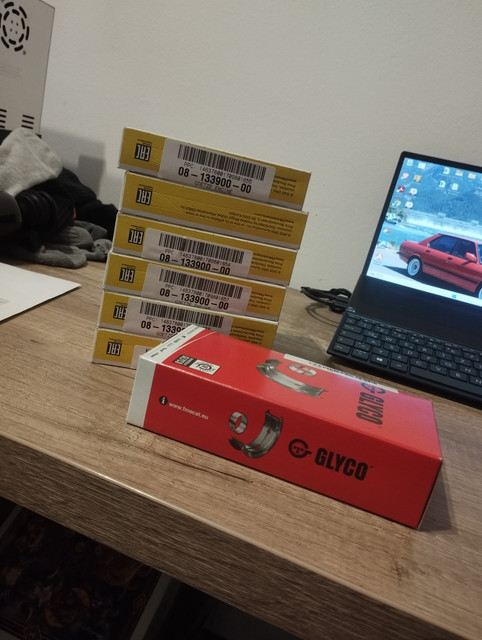
And of course, parts are slowly but surely being collected... I want every single piece laying on my desk before I start the assembly.
The goal is to do all the modifications now, so once it's back from the machine shop, I can clean it and install it, without worrying of particles and/or damaging the surface.
I re-tapped every thread to clean them up, and sanded all the mating surfaces with 400grit. Prior to that, I soda blasted the whole head to make my job easier.


Now that it's empty, I can prepare for the head porting. I'm not doing anything crazy - no need to reinvent the wheel. The most important thing is port matching the intake manifold. The gasket is 95% accurate compared to the actual head port, so you can see that there's quite some material that needs to be removed. In some areas, the lip is as big as 2mm... To help with the porting, I scanned the gasket, and drew the new port shape I'm looking to create.


upload pic
Apart from that, I'll just smoothen out the ports with 120 grit on both sides, and blend in the guide a bit more.
However I don't know what to do on the exhaust site. The headers I bought have a larger than stock port, which means that if I want to take advantage of that - and match the cylinder head port to it - I'll need custom, bigger port gaskets. That's not a problem, but then I'd loose the heat shield. So I guess I'll need to make a custom heat shield too, that I'll mount OVER the manifold - not under, like the stock one.
It's not the end of the worlds, just a bit more work that I don't want to do, this build it taking forever already Anyway.
As I could not start with the porting but still had some time, I took a closer look at the KMcams rockers. They are gas nitrided, which leaves the surface finish a bit dull. KMcams states that it's fine, and I can see why. This is after roughly 30 seconds of polishing with a car paint polishing compound. It's nice underneath, and the coating will probably come off in the first 15 seconds when the engine is finally started...


Of course that doesn't stop me from pre-polishing them. I'll get some 2000, 4000 sanding blocks and hit every single one of them, then some polishing compound. I'm doing this because in my head, I have this idea that this will help with the break in - I hope for a smoother initial finish on the cam - the materials from the dull finish will go somewhere! Either into my oil, or onto my camshaft. Don't want neither!
Second, I hope this will help minimize the valve gap enlarging, so the valve train won't get too loud too quickly, before I do my 1000km valve adjustment.
And of course, parts are slowly but surely being collected... I want every single piece laying on my desk before I start the assembly.

Re: szacsi72's E28 535i build thread - "The Reddie"
I love reading about your engine build. And super sorry to hear about your health setback.
Wishing you the best recovery, and the best with the motor and car.
It’s always a moment of truth when you start a motor you’ve rebuilt, wondering if every bolt was torqued, did I forget anything etc.
Wishing you the best recovery, and the best with the motor and car.
It’s always a moment of truth when you start a motor you’ve rebuilt, wondering if every bolt was torqued, did I forget anything etc.
Re: szacsi72's E28 535i build thread - "The Reddie"
Thank you. It took a good turn, I'm recovering very well. Physically, I'm pretty much recovered, apart from wound on my head, that I need to watch out for; and of course, I've lost a lot of body weight, so I'm very weak. But it's getting better.gwb72tii wrote: Mar 19, 2024 7:51 AM I love reading about your engine build. And super sorry to hear about your health setback.
Wishing you the best recovery, and the best with the motor and car.
It’s always a moment of truth when you start a motor you’ve rebuilt, wondering if every bolt was torqued, did I forget anything etc.
Mentally I'm fine, just constantly tired. I forget too many things, make mistakes and I'm slow. So therefore, I'm also not back to work yet. It would not be fair to ask for my wage and only do 50%.
Re: szacsi72's E28 535i build thread - "The Reddie"
Good news, glad to hear it.szacsi72 wrote: Mar 19, 2024 8:49 AM
Thank you. It took a good turn, I'm recovering very well. Physically, I'm pretty much recovered, apart from wound on my head, that I need to watch out for; and of course, I've lost a lot of body weight, so I'm very weak. But it's getting better.
Mentally I'm fine, just constantly tired...
I can empathize having recently gone thru a major event.
My bitch about the whole thing is we don't heal as quickly the older we get and typically don't get back to pre-event strength and stamina points.
Lovin' the fact that the build continues.
Re: szacsi72's E28 535i build thread - "The Reddie"
I'm still young so I'm recovering OK, but it feels like if I had suddenly become 10 years older. My luck is that I started to hit the gym last year, so I had a couple extra kgs to spare. Came in handy when I could only eat pudding for 3 weeks!1st 5er wrote: Mar 19, 2024 9:22 AM
Good news, glad to hear it.szacsi72 wrote: Mar 19, 2024 8:49 AM
Thank you. It took a good turn, I'm recovering very well. Physically, I'm pretty much recovered, apart from wound on my head, that I need to watch out for; and of course, I've lost a lot of body weight, so I'm very weak. But it's getting better.
Mentally I'm fine, just constantly tired...
I can empathize having recently gone thru a major event.
My bitch about the whole thing is we don't heal as quickly the older we get and typically don't get back to pre-event strength and stamina points.
Lovin' the fact that the build continues.
Glad to hear you're OK as well!
Re: szacsi72's E28 535i build thread - "The Reddie"
I’d like to see some pics of your exhaust system once it’s in place.
Re: szacsi72's E28 535i build thread - "The Reddie"
Sure! Will post!gwb72tii wrote: Mar 20, 2024 11:09 PM I’d like to see some pics of your exhaust system once it’s in place.
I'm planning on running the following:
Schmiedmann headers (42mm OD) into 2x50mm, x-pipe, two small flex pipes, a long middle resonator and a reasonably big rear muffler. It will be similar to a supersprint; but since I have the tools (and skills?) to make it myself, I'll happily save a good 1500Euros on a set of pipes
Re: szacsi72's E28 535i build thread - "The Reddie"
Cool, thanks.I have a full Supersprint to install and I am somewhat anxious about the mounting pieces that will need to be fabricated and welded, but it should be similar to yours.
I was looking at the same header as yours too so I'm curious to what it all looks like when installed. Good looking header.
I was looking at the same header as yours too so I'm curious to what it all looks like when installed. Good looking header.
Re: szacsi72's E28 535i build thread - "The Reddie"
I have a LOT of questions. A LOT.
I normally post them in the Tech Talk section, however, I don't want to spam the whole board...
So I collected them, and I'm posting them here, hoping that you guys actually read my build thread
1. Can I use regular DIN931 bolts in the engine?
I think I've heard someone do this in an S38 for main bolts. Is 10.9 just 10.9? Or do you think that there would be a quality difference between OEM bolts and cheap regular 10.9s from the local hardware store?
For head bolts, I suspect this is a no-go, they are too long and they are thinner in the middle.
2. Would it make sense to get my flywheel and clutch combination balanced?
The flywheel is brand new, made from billet steel and has been balanced at the factory. The clutch is a new Sachs S38B36 clutch. Are these both balanced enough not to cause any trouble when combined? Or should I get them balanced together? Would it make a difference (smoother running?)
3. What do you guys think of running a smaller water pump pulley?
My current one (OEM on the B35) is 130mm, it's the smaller of the two M30 pulleys. But the S38 had 112 and 102mm versions. The water pump impeller is the same on the M30 and S38 water pumps, so I figured this could be a good upgrade for people who mostly use their cars on the street (for track users, the higher rpm would just create more drag and won't flow more after a point).
4. When it comes to a V-belt, which diameter counts when calculating the ratio?
Outer diameter? "Inner diameter" (OD - 2x belt depth)? Middle (OD - Belt depth (2x 0.5))?
5. Would I cook my R8 coils without a heat shield?
I can't use the stock exhaust gaskets and the new gaskets don't have the shield part. (I discussed this a bit more in a previous post)
6. Should I open up my exhaust ports?
The headers I bought are larger than the original ports on my M30. They are 41.5mm OD tubing that are 1.5mm thick, so 38.5mm ID.
The B35 ports have an area of 1081mm2, so its equivalent diameter is 37.099 ~37mm. I would need to open up the exhaust ports "roughly" 0.75mm all around. This sounds OK to me, I don't think the port velocities will get too low especially since I plan to push a lot more air trough. And even if it was a touch too big, I guess it's still better than having a lip? Let me know!
7. Is there a way to fix the oil filter housing's drain valve if it's bad (lets oil flow down?)
So far on most forums they just state that you should replace it (but another used unit can also malfunction..)
8. Can you recommend me a MATERIAL for heat shielding my underbody tunnel?
Not an exact product - I will probably have problem finding it in my country. I'm just looking for materials that adhere well enough and are heat resistant enough to be used on the outside... Transmission tunnel's right side, where the exhaust is.
9. Which clutch cylinder should I use?
My transmission came from an E34 and I've reused the cylinder on it, but I just realised it is 22.2mm instead of the E28's 20.64mm. It did not cause any troubles, but I guess I should swap to one from an E28? That would result in the engagement point being higher, and the clutch pedal being heavier? The clutch master is 19.05mm on both the E28 and the E34...
10. Stainless or regular studs?
Since my headers are made from 304, I figured that using A2 grade exhaust studs instead of 8.8 could be a good idea, because I really don't want to end up with a rusting stainless part! Of course A2 and aluminium like to galvanically corrode, but I think it should be fine with Loctite 8150 anti seize?
Thank you for your answers!
I'm finally feeling better, and now that the build is rolling lot's of thing are popping around in my head...
Re: szacsi72's E28 535i build thread - "The Reddie"
1: I think 10.9 is 10.9. Head bolts are specifically TTY so they aren't going to be the same as the hardware store ones (if you can even find them in the right length)
2: I threw a new billet flywheel and clutch at two cars without balancing them together and didn't have any noticeable problems
3: overheating is bad, water flow is good
9: I'd match the master and slave sizes, I think I mismatched mine and the engagement is really high (but I also have the 323i tall throwout bearing). E34 master cylinders are too long for the E28 pedal box, at least the 525i one I used
Re: szacsi72's E28 535i build thread - "The Reddie"
6. From what I've read, port matching should be used on intake side only on a street engine. Don't open up your exhaust ports.6. Should I open up my exhaust ports?
8. Can you recommend me a MATERIAL for heat shielding my underbody tunnel?
Not an exact product - I will probably have problem finding it in my country. I'm just looking for materials that adhere well enough and are heat resistant enough to be used on the outside... Transmission tunnel's right side, where the exhaust is.
You actually do want a "step" between port and runner, something to do with exhaust scavenging and reflection IIRC.
Do some reading on this and decide for yourself.
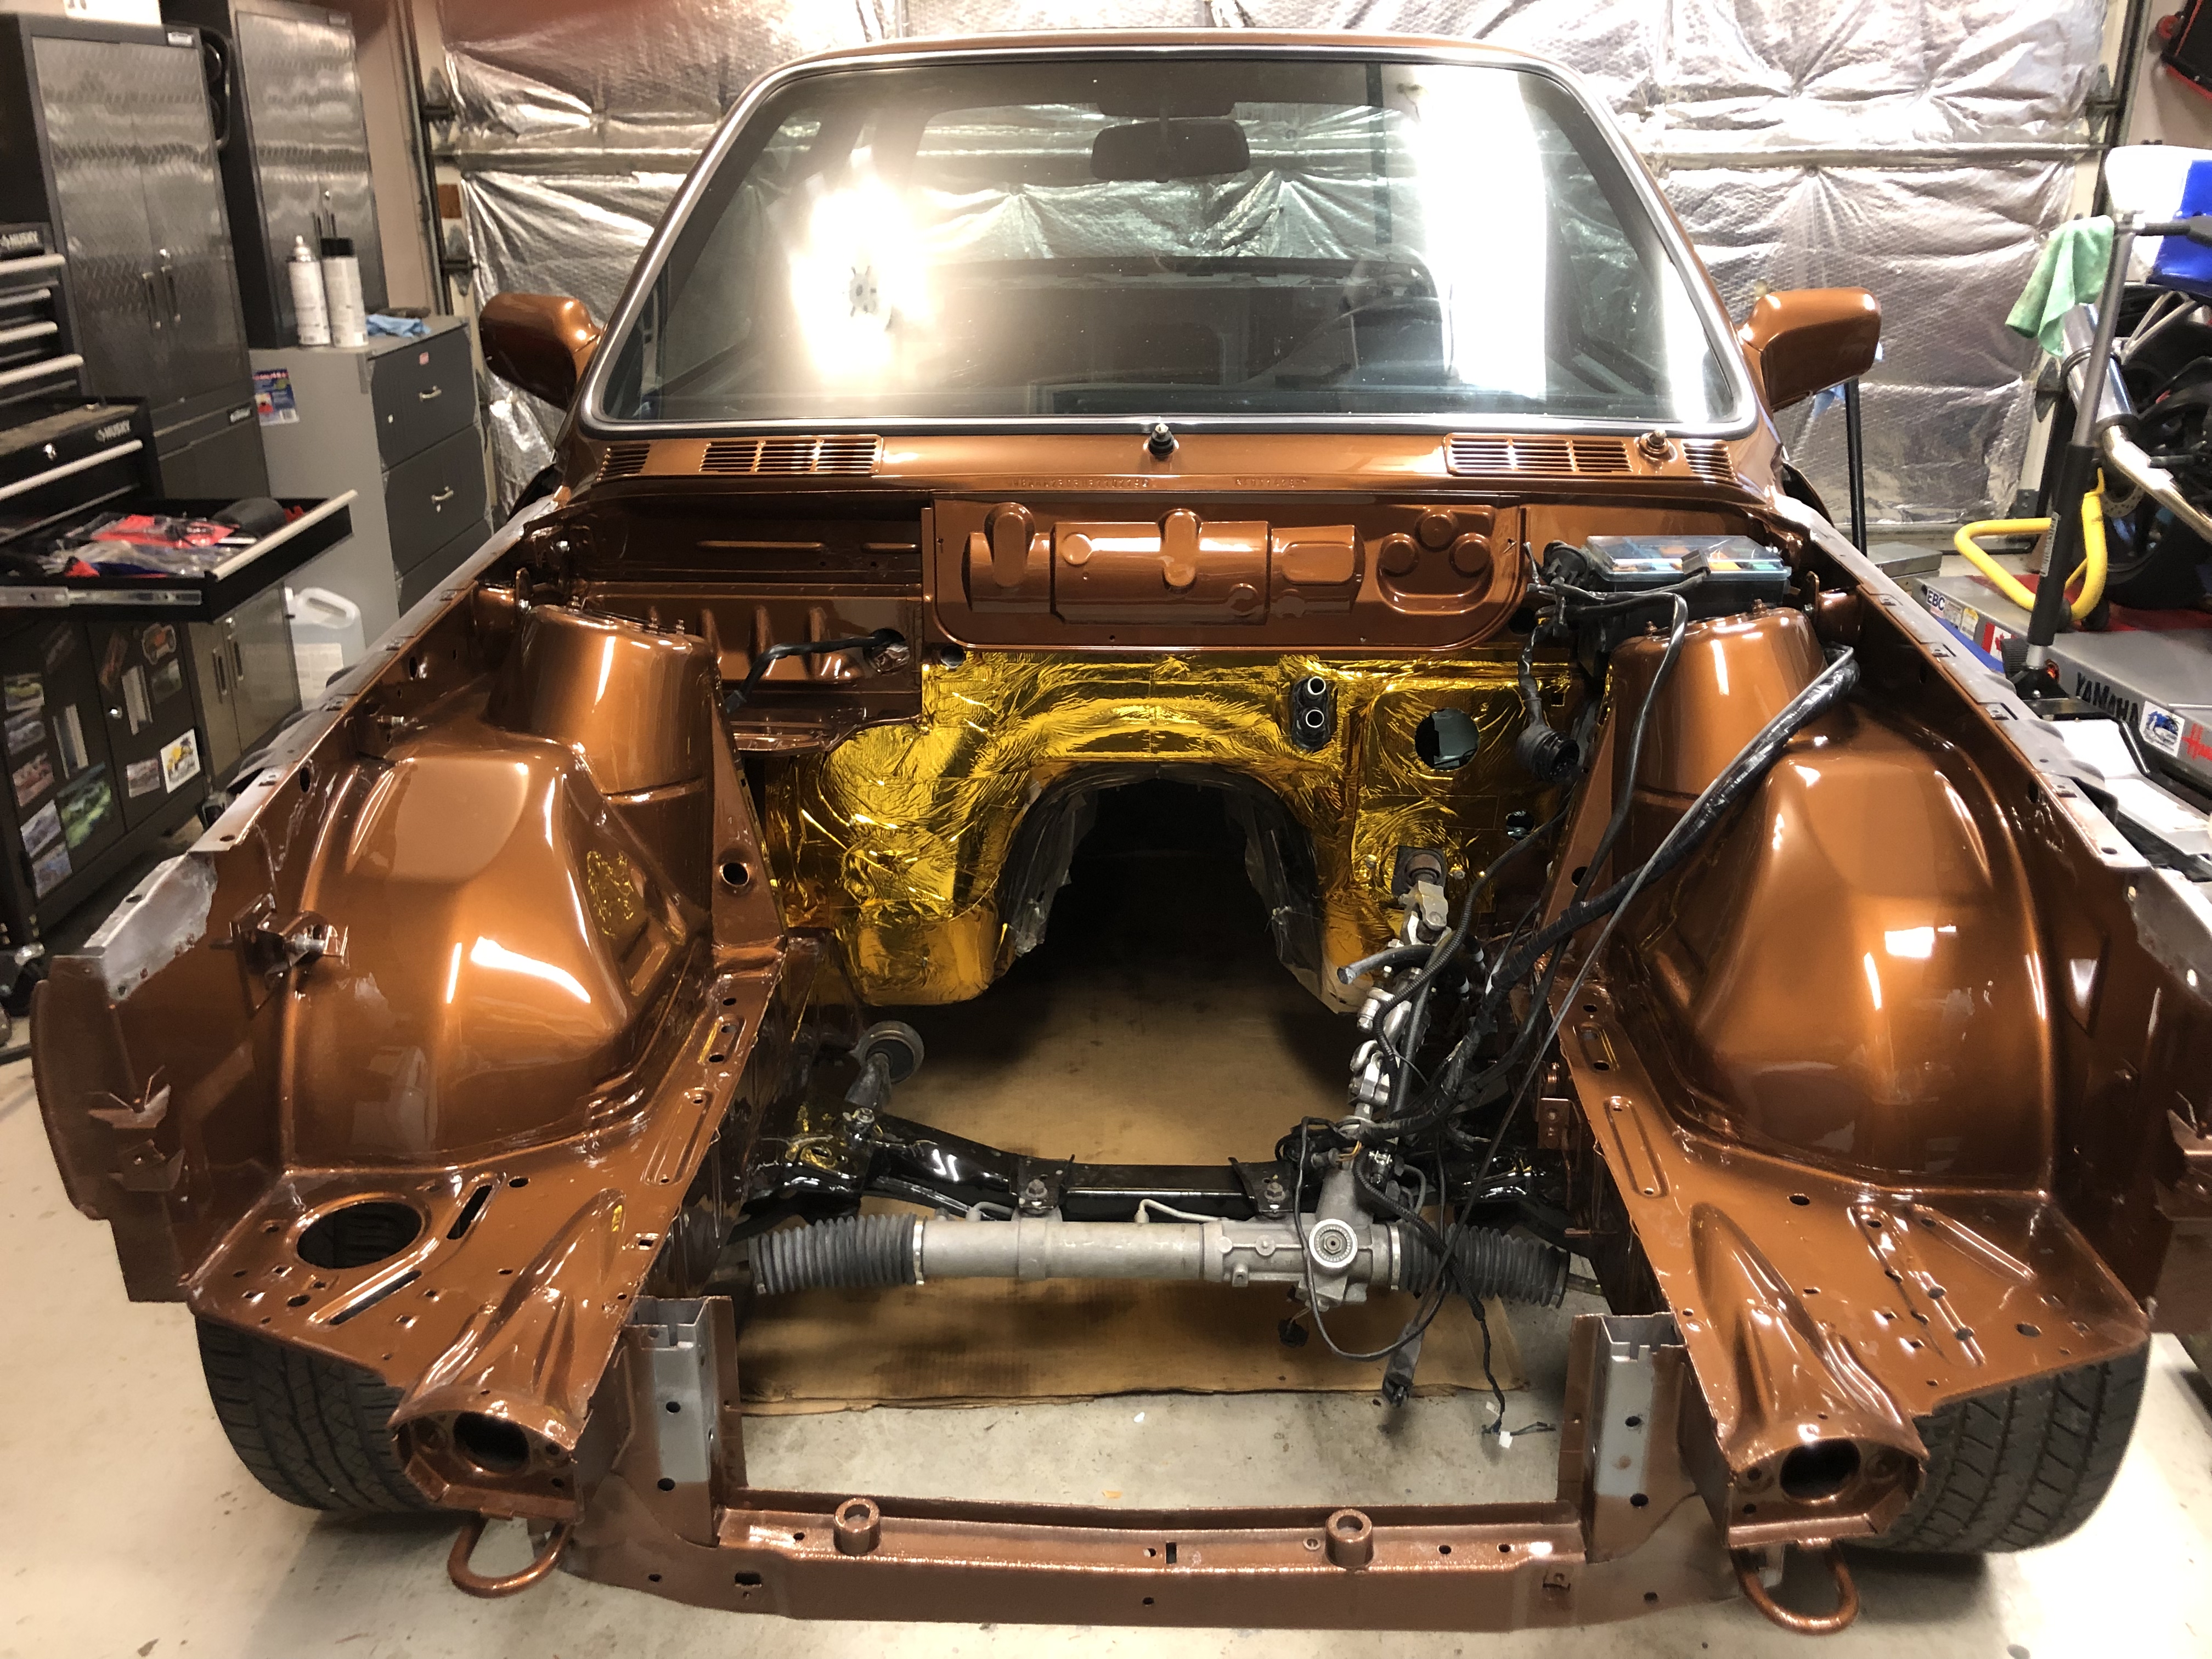
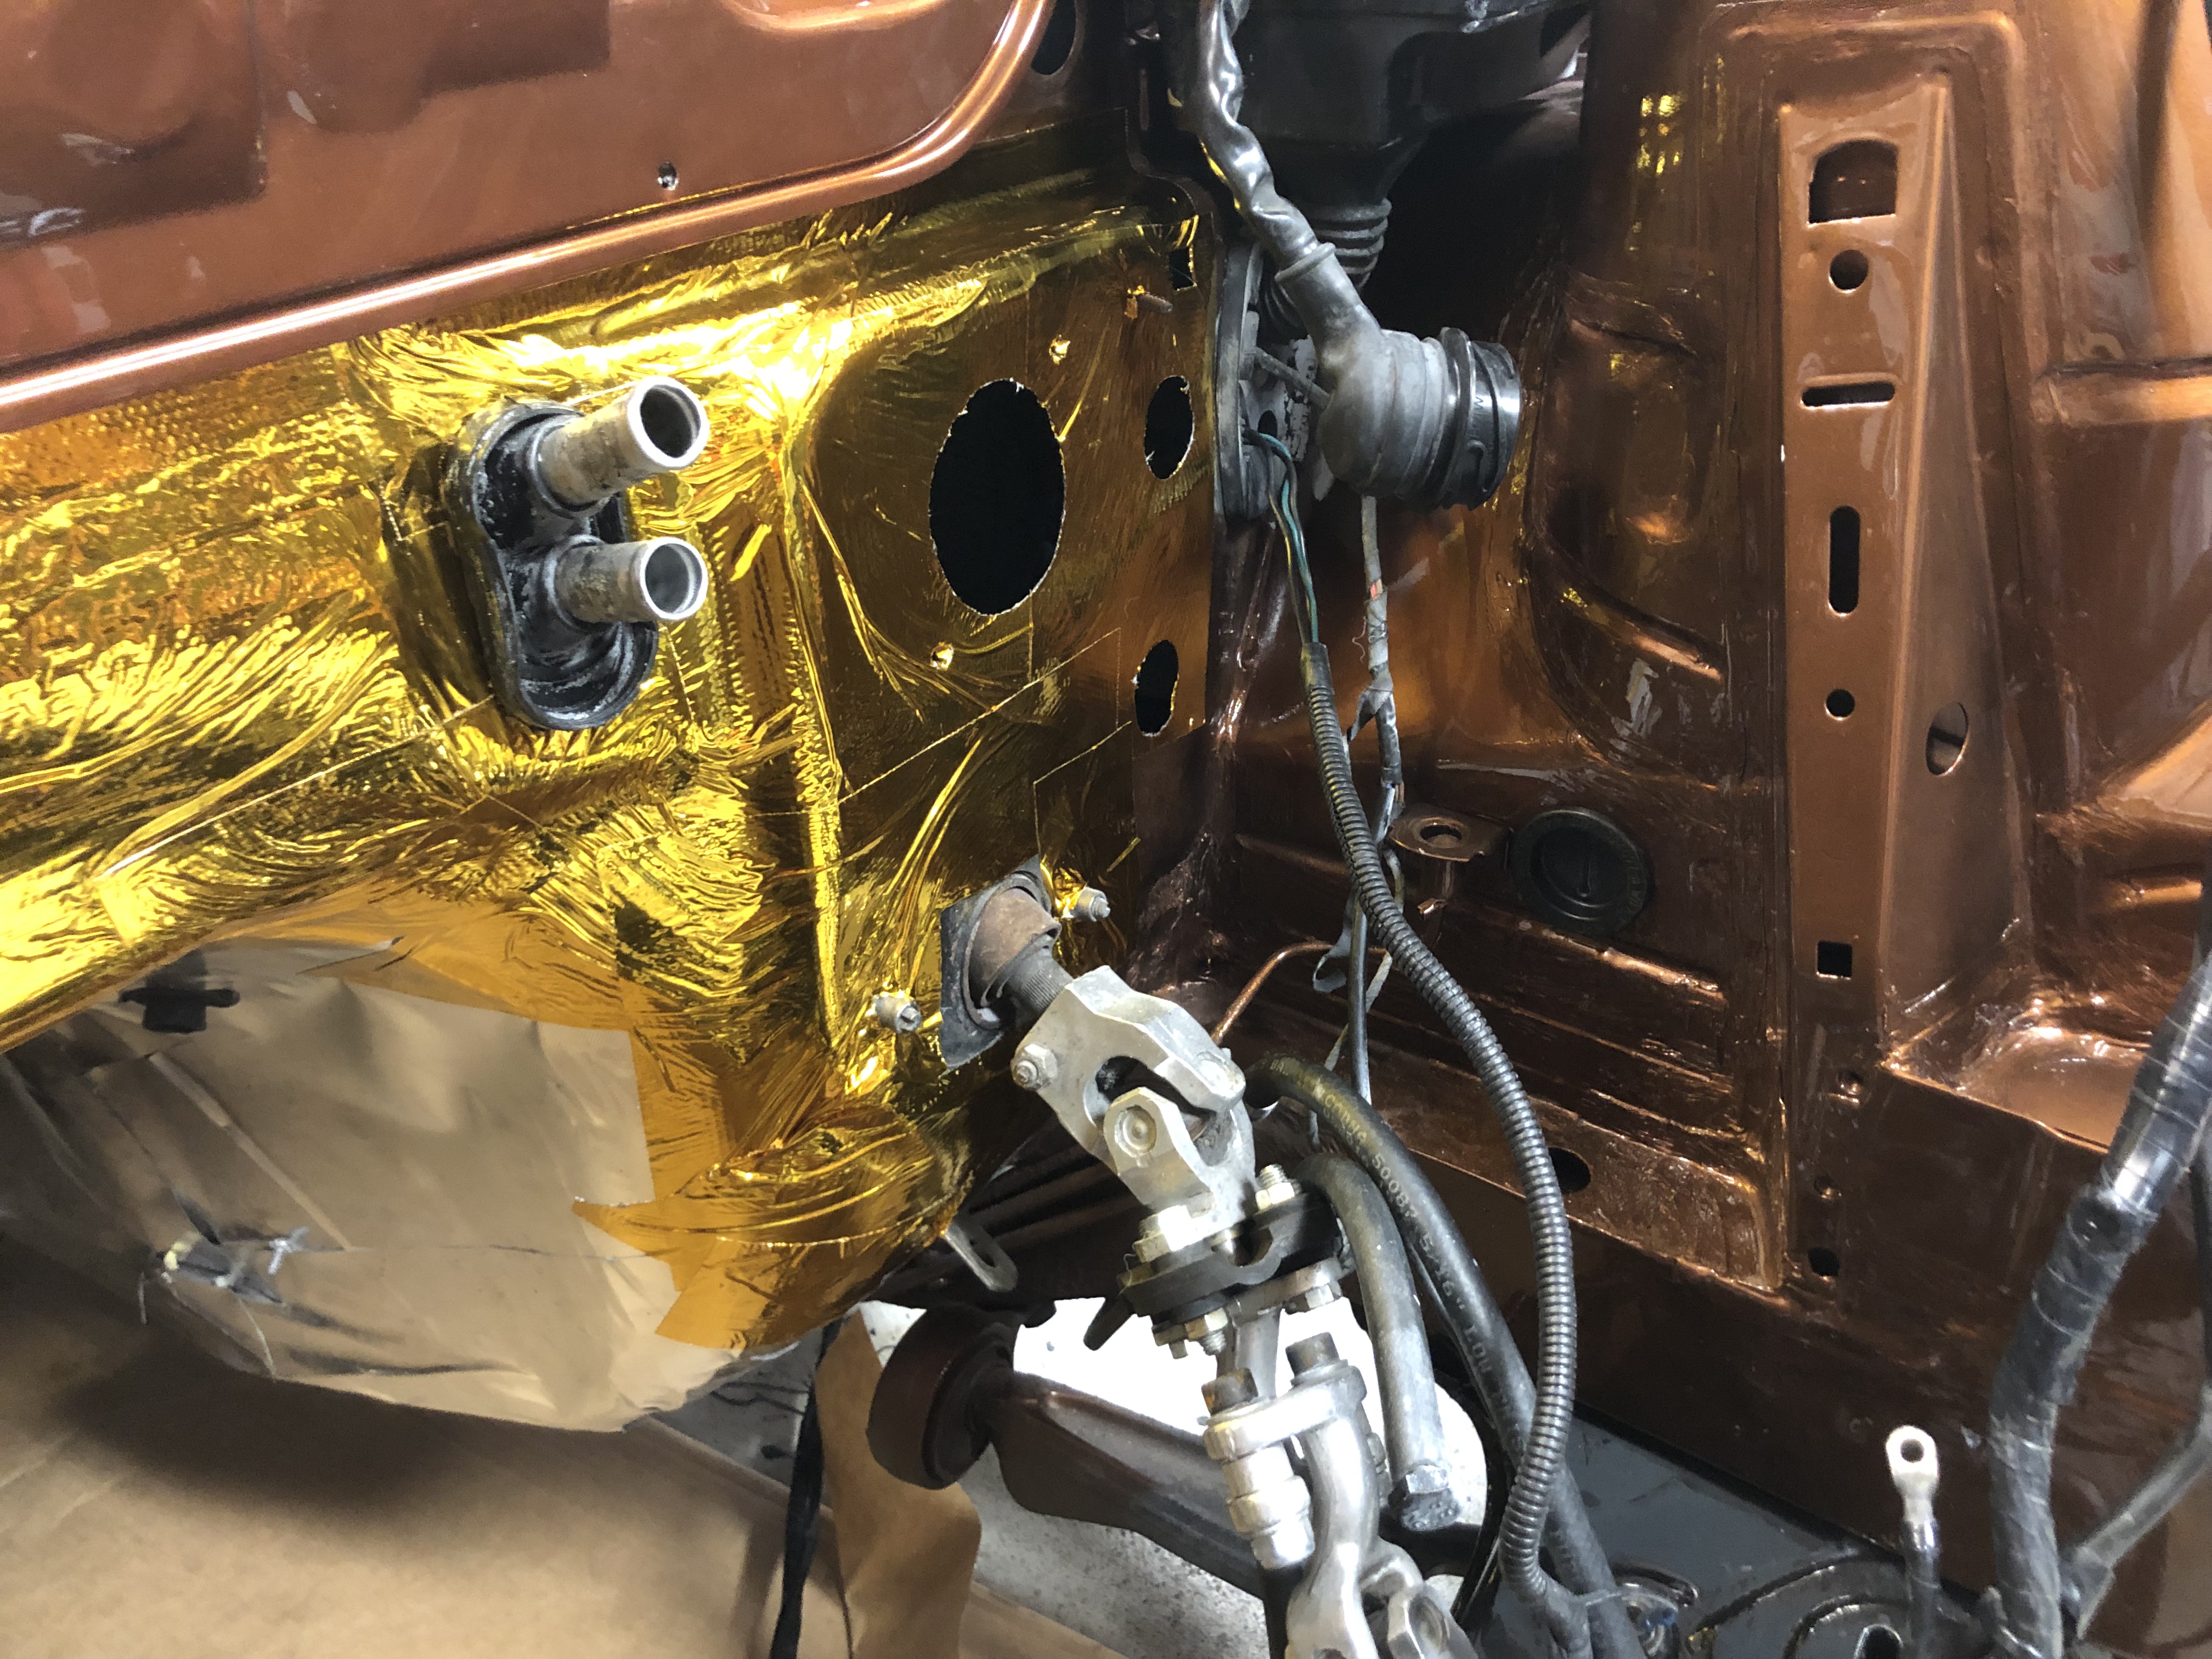
8. You want a "metal" reflective product, rather then an asphalt or butyl-based product used for interior sound/heat.
Something like DEI Reflect-A-Cool or DEI Reflect-A-Gold does the trick.
Here is my E30's engine bay using both of those products. Then I have Hushmat for sound & heat rejection inside the car.
Re: szacsi72's E28 535i build thread - "The Reddie"
The master is actually the same diameter of 19.05mm for the E28 and E34 both, only the slave is larger for the E34. However, I am not sure if their lengths are different... They mount up to the same transmission, so I suspect they are the same. In that case I guess I can choose between lower engagement and softer pedal vs higher engagement and stiffer pedal. I wonder if anyone has tried both?Galahad wrote: Mar 27, 2024 12:37 AM 9: I'd match the master and slave sizes, I think I mismatched mine and the engagement is really high (but I also have the 323i tall throwout bearing). E34 master cylinders are too long for the E28 pedal box, at least the 525i one I used
I tried to find some information but no data on their lengths. Visually judging, they are the same, at least they are not marginally different. The only difference seems to be their diameter.
I've seen a lip used on the bottom/floor side on earlier race cars for anti reversal, but they were using race cams and carbs; but never on the roofing. I'll try to read into it a bit more.Panici wrote: Mar 27, 2024 6:57 AM 6. From what I've read, port matching should be used on intake side only on a street engine. Don't open up your exhaust ports.
You actually do want a "step" between port and runner, something to do with exhaust scavenging and reflection IIRC.
Do some reading on this and decide for yourself.
There's a company who sells reflect-a-cool and others, but it's pretty expensive. 30x30cm goes for roughly 20 bucks. Instead I've found this product, it's also made by DEI:Panici wrote: Mar 27, 2024 6:57 AM 8. You want a "metal" reflective product, rather then an asphalt or butyl-based product used for interior sound/heat.
Something like DEI Reflect-A-Cool or DEI Reflect-A-Gold does the trick.
Here is my E30's engine bay using both of those products. Then I have Hushmat for sound & heat rejection inside the car.
https://race-shop.hu/ontapado-hoszigete ... x60cm.html
Looks like it's a cheaper, lower quality product. I think this would be fine, it's not a turbo car, I just want to add some isulation because the tunnel does get really hot in the summer.
Does this product stick OK to underbody coatings? Or do I need to adhere it to paint?
I will also add sound and heat insulation and deadening from the inside too.
Re: szacsi72's 1984 Zinnoberrot 535i Build
To my 10th question:
I just remember that I need to heli coil basically ALL exhaust mount threads, as someone before me used bolts instead of studs and managed to rip out the first 5-6mm in EVERY hole. Since helicoils are stainless anways...
I just remember that I need to heli coil basically ALL exhaust mount threads, as someone before me used bolts instead of studs and managed to rip out the first 5-6mm in EVERY hole. Since helicoils are stainless anways...
Re: szacsi72's 1984 Zinnoberrot 535i Build
On 8: I've used aluminum HVAC tape for reflecting exhaust heat, it sticks quite well to the underbody coating on my 528e. Similar to Panici's gold tape
10: I'd be worried about corrosion, that's messed things up for me (not on a car) in the past. May be fine if you make sure water can't get in
10: I'd be worried about corrosion, that's messed things up for me (not on a car) in the past. May be fine if you make sure water can't get in
Re: szacsi72's 1984 Zinnoberrot 535i Build
I will share my opinion, but it is just that.
Don't try to get fancy with hardware like main or head bolts for a street engine,
what BMW used works without fail as long as you clean and lightly oil threads. Clean headbolt holes with a tap, then verify that bolt threads with ease!!
Stainless hardware is a bit tricky. It has no hardness value (like 8.8/10.9/12.9) stainless has its place but be careful. Don't use it in a Helicoil.
Stock black exhaust studs with copper lock nuts are very effective.
Time sert makes a good thread repair that in my opinion might work for all 12 exhaust holes, lock better, install easier to get 12 quality results.
M88/S38 waterpumps are different, A correct M pump has fewer fingers on the impeller. It is a very different system actually from the radiator to the cylinder head and water passages. I would, and do, use quality correct cooling system parts on my High Performance BMW engines and if I were to find an issue, (very hot climate or only track use high RPM) then would look at speeding up or slowing down the coolant possibly.
There you have it, My opinion ...
Jeff
Re: szacsi72's 1984 Zinnoberrot 535i Build
11: How shitty are 260/6-s to shift?
I have a really poor quality, overly short shifter in my car. When I shift, it takes time before the shifter pops into gear - I need to wait for the RPM to drop. I started to wonder, is this normal with a short shifter, or maybe that larger E34 master cylinder is causing my clutch to not fully disengage?
No grinding or anything, goes into first OK at a stop.. Just takes time to shift.
My 260/5 I had before was similar, the difference being, that that one would grind when cold.
Thanks
Last edited by szacsi72 on Apr 05, 2024 4:24 PM, edited 1 time in total.
Re: szacsi72's 1984 Zinnoberrot 535i Build
Just to highlight: I swapped a 260/6 from an E34 into my E28. I'm not sure if the clutch slave is transmission specific, or chassis specific..szacsi72 wrote: Apr 03, 2024 7:54 AM How shitty are 260/6-s to shift?
I have a really poor quality, overly short shifter in my car. When I shift, it takes time before the shifter pops into gear - I need to wait for the RPM to drop. I started to wonder, is this normal with a short shifter, or maybe that larger E34 master cylinder is causing my clutch to not fully disengage?
No grinding or anything, goes into first OK at a stop.. Just takes time to shift.
My 260/5 I had before was similar, the difference being, that that one would grind when cold.
Thanks
Thanks
Re: szacsi72's E28 535i build thread - "The Reddie"
It will matter just how close to OEM you want to get. Panici's gold reflective material may be extremely effective but isn't really spec. For mine I wanted/needed to match the original as much as possible and chose to install the reflective material in the original configuration (mostly on the passenger side) but I did take some liberties for performance reasons.szacsi72 wrote: Mar 27, 2024 8:03 AMThere's a company who sells reflect-a-cool and others, but it's pretty expensive. 30x30cm goes for roughly 20 bucks. Instead I've found this product, it's also made by DEI:Panici wrote: Mar 27, 2024 6:57 AM 8. You want a "metal" reflective product, rather then an asphalt or butyl-based product used for interior sound/heat.
Something like DEI Reflect-A-Cool or DEI Reflect-A-Gold does the trick.
Here is my E30's engine bay using both of those products. Then I have Hushmat for sound & heat rejection inside the car.
https://race-shop.hu/ontapado-hoszigete ... x60cm.html
Looks like it's a cheaper, lower quality product. I think this would be fine, it's not a turbo car, I just want to add some isulation because the tunnel does get really hot in the summer.
Does this product stick OK to underbody coatings? Or do I need to adhere it to paint?
I will also add sound and heat insulation and deadening from the inside too.
I chose a similar material that the Reflect-A-Cool (Cool-It Thermo Tec); it was self-adhering but I added some aggressive high-temp spray adhesive to ensure long-term adhesion.
You can read my write-up here on page 2 of my build thread: https://www.mye28.com/viewtopic.php?f=7 ... 5&start=25
I applied layers of other thermal and acoustic layers to the interior when I did the interior remodel later in that build thread. It all makes a difference; how much? It's hard to tell.
